 | ||
|
Prievous:
| ||
|
Next:
| ||
|
Beginning:
End:
| ||
|
Out-Come:
| ||
|
Place's:
| ||
|
Major Battle's / Campaign's:
| ||
| ||
|
World War II, or the Second World War (often abbreviated as WWII or WW2), was a global Military conflict lasting from 1939 to 1945, which involved most of the world's nations, including all of the great powers: eventually forming two opposing military alliances, the Allies and the Axis. It was the most widespread war in history, with more than 100 million military personnel mobilised. In a state of "total war," the major participants placed their entire economic, industrial, and scientific capabilities at the service of the war effort, erasing the distinction between civilian and military resources. Marked by significant events involving the mass death of civilians, including the Holocaust and the only use of nuclear weapoms in warfare, it was the deadliest conflict in human history, resulting in 50 million to over 70 million fatalities.
The war is generally accepted to have begun on 1 September 1939, with the invasion of Poland by Germany and Slovakia, and subsequent declaration of war on Germany by France and most of the countries of the British Empire and Commonwealth. Germany set out to establish a large empire in Europe. From late 1939 to early 1941, in a series of campaigns and treaties, Germany conquered or subdued much of continental Europe; amid Nazi-Soviet agreements, the nominally neutral Soviet Union fully or partially occupied and annexed territories of its six European neighbours. Britain and the Commonwealth remained the only major force continuing the fight against the Axis in North Africa and in extensive naval warfare. In June 1941, the European Axis launched an invasion of the Soviet Union, giving a start to the largest land theatre of war history, which, from this moment on, was tying down the major part of the Axis military power. In December 1941, Japan, which had been at war with China since 1937, and aimed to dominate Asia, attacked the United States and European possessions in the Pacific Ocean, quickly conquering much of the region.
The Axis advance was stopped in 1942 after the defeat of Japan in a series of naval battles and after defeats of European Axis troops in North Africa and, decisively, at Stalingrad. In 1943, with a series of German Defeats in Eastern Europe, the Allied Invasion of Facist Italy, and American victories in the Pacific, the Axis lost the initiative and undertook strategic retreat on all fronts. In 1944, the Western Allies invaded France, while the Soviet Union regained all territorial losses and invaded Germany and its allies.
The war in Europe ended with the capture of Berlin by Soviet and Polish troops and the subsequent German unconditional surrender on 8 May 1945. The Japanese Navy was defeated by the United States, and invasion of the Japanese Archipelago ("Home Islands") became imminent. The war in Asia ended on 15 August 1945 with the surrender of Japan.
The war ended with the total victory of the Allies over Germany and Japan in 1945. World War II altered the political alignment and social structure of the world. The United Nations (UN) was established to foster international cooperation and prevent future conflicts. The Soviet Union and the United States emerged as rival superpowers, setting the stage for the Cold War, which would last for the next 46 years. Meanwhile, the influence of European great powers started to decline, while the decolonisation of Asia and Africa began. Most countries whose industries had been damaged moved towards economic recovery. Political integration, especially in Europe emerged as an effort to stabilise postwar relations.
Invasion of Poland[]
The Invasion of Poland, also known as the September Campaign or 1939 Defensive War (Polish: Kampania wrześniowa or Wojna obronna 1939 roku) in Poland and the Poland Campaign (German: Polenfeldzug) in Germany, was an invasion of Poland by Germany, theSoviet Union, and a small Slovak contingent that marked the start of World War II in Europe. The invasion began on 1 September 1939, one week after the signing of the Molotov–Ribbentrop Pact, and ended on 6 October 1939 with Germany and the Soviet Union dividing and annexing the whole of Poland.
The morning after the Gleiwitz incident, German forces invaded Poland from the north, south, and west. As the Germans advanced, Polish forces withdrew from their forward bases of operation close to the Polish-German border to more established lines of defence to the east. After the mid-September Polish defeat in the Battle of the Bzura, the Germans gained an undisputed advantage. Polish forces then withdrew to the southeast where they prepared for a long defence of the Romanian Bridgehead and awaited expected support and relief from France and theUnited Kingdom. The two countries had pacts with Poland and had declared war on Germany on 3 September, though in the end their aid to Poland in the September campaign was very limited.
The Soviet Red Army's invasion of Eastern Poland on 17 September, in accordance with a secret protocol of the Molotov–Ribbentrop Pact, rendered the Polish plan of defence obsolete. Facing a second front, the Polish government concluded the defence of the Romanian Bridgehead was no longer feasible and ordered an emergency evacuation of all troops to neutral Romania. On 6 October, following the Polish defeat at the Battle of Kock, German and Soviet forces gained full control over Poland. The success of the invasion marked the end of the Second Polish Republic, though Poland never formally surrendered.
On 8 October, after an initial period of military administration, Germany directly annexed western Poland and the former Free City of Danzigand placed the remaining block of territory under the administration of the newly established General Government. The Soviet Unionincorporated its newly acquired areas into its constituent Belarusian and Ukrainian republics, and immediately started a campaign ofsovietization. This included staged elections, the results of which were used to legitimize the Soviet Union's annexation of eastern Poland. In the aftermath of the invasion, a collective of underground resistance organizations formed the Polish Underground State within the territory of the former Polish state. Many of the military exiles that managed to escape Poland subsequently joined the Polish Armed Forces in the West, an armed force loyal to the Polish government in exile.
Prelude to the Campaign
In 1933, the National-Socialist German Workers' Party—under its leader Adolf Hitler—came to power in Germany. Germany sought to gainhegemony in Europe, and to take over territory from the Soviet Union, acquiring "Living Space" (Lebensraum) and expanding "Greater Germany" (Großdeutschland), to be eventually surrounded by a ring of allied states, satellite or puppet states. As part of this long term policy, at first, Hitler pursued a policy of rapprochement with Poland, trying to improve German–Polish relations, culminating in the German–Polish Non-Aggression Pact of 1934. Earlier, Hitler's foreign policy worked to weaken the ties between Poland and France, and to manoeuvre Poland into the Anti-Comintern Pact, forming a cooperative front against the Soviet Union. Poland would be granted territory of its own, to its northeast, but the concessions the Poles were expected to make meant that their homeland would become largely dependent on Germany, functioning as little more than a client state. The Poles feared that their independence would eventually be threatened altogether.
In addition to Soviet territory, the National-Socialists were also interested in establishing a new border with Poland because the Germanexclave of East Prussia was separated from the rest of the Reich by the "Polish Corridor". The Corridor constituted land long disputed by Poland and Germany, and inhabited by both groups. The Corridor became a part of Poland after the Treaty of Versailles. Many Germans also wanted the city of Danzig and its environs (together the Free City of Danzig) to be reincorporated into Germany. Danzig was an

Vyacheslav Molotov signs the Molotov-Ribbentrop Pact, a German–Soviet non-aggression pact.
important port city with 95% of the population German speakers. It had been separated from Germany after Versailles and made into a nominally independent Free City of Danzig. Hitler sought to reverse these territorial losses, and on many occasions made an appeal to Germannationalism, promising to "liberate" the German minority still in the Corridor, as well as Danzig.
Poland participated in the partition of Czechoslovakia that followed the Munich Agreement, although they were not part of the agreement. It coerced Czechoslovakia to surrender the region of Český Těšín by issuing an ultimatum to that effect on 30 September 1938, which was accepted by Czechoslovakia on 1 October.
By 1937, Germany began to increase its demands for Danzig, while proposing that a roadway be built in order to connect East Prussia with Germany proper, running through the Polish Corridor. Poland rejected this proposal, fearing that after accepting these demands, it would become increasingly subject to the will of Germany and eventually lose its independence as the Czechs had. Polish leaders also distrusted Hitler. Furthermore, Germany's collaboration with anti-Polish Ukrainian nationalists from the Organization of Ukrainian Nationalists, which was seen as an effort to isolate and weaken Poland, weakened Hitler's credibility from the Polish point of view. The British were also aware of the situation between Germany and Poland. On 31 March, Poland was backed by a guarantee from Britain and France which stated that Polish territorial integrity would be defended with their support. On the other hand, British Prime Minister Neville Chamberlain and his Foreign Secretary, Lord Halifax, still hoped to strike a deal with Hitler regarding Danzig (and possibly the Polish Corridor), and Hitler hoped for the same. Chamberlain and his supporters believed war could be avoided and hoped Germany would agree to leave the rest of Poland alone. German hegemony over Central Europe was also at stake.
With tensions mounting, Germany turned to aggressive diplomacy as well. On 28 April 1939, it unilaterally

Planned and actual divisions of Poland, according to the Molotov-Ribbentrop Pact, with later adjustments
withdrew from both the German-Polish Non-Aggression Pact of 1934 and the London Naval Agreement of 1935. Nevertheless, talks over Danzig and the Corridor broke down and months passed without diplomatic interaction between Germany and Poland. During this interim, the Germans learned that France and Britain had failed to secure an alliance with the Soviet Union against Germany and the Soviet Union was interested in an alliance with Germany against Poland. Hitler had already issued orders to prepare for a possible "solution of the Polish problem by military means"—a Case Whitescenario.
However, with the surprise signing of the Molotov-Ribbentrop Pact on 23 August, the denouement of secret Nazi-Soviet talks held in Moscow, Germany neutralized the possibility of Soviet opposition to a campaign against Poland and war became imminent. In fact, the Soviets agreed to aid Germany in the event of France or the UK going to war with Germany over Poland and, in a secret protocol of the pact, the Germans and the Soviets agreed to divide Eastern Europe, including Poland, into two spheres of influence; the western ⅓ of the country was to go to Germany and the eastern ⅔ to the Soviet Union.
The German assault was originally scheduled to begin at 04:00 on 26 August. However, on 25 August, the Polish-British Common Defence Pact was signed as an annex to the Franco-Polish Military Alliance. In this accord, Britain committed itself to the defence of Poland, guaranteeing to preserve Polish independence. At the same time, the British and the Poles were hinting to Berlin that they were willing to resume discussions—not at all how Hitler hoped to frame the conflict. Thus, he wavered and postponed his attack until 1 September, managing to in effect halt the entire invasion "in mid-leap".
However, there was one exception: in the night of 25–6 August, a German sabotage group which had not heard anything about a delay of the invasion made an attack on the Jablunkov Pass and Mosty railway station in Silesia. On the morning of 26 August, this group was repelled by Polish troops. The German side described all this as an incident "caused by an insane individual" (see Jabłonków Incident).
On 26 August, Hitler tried to dissuade the British and the French from interfering in the upcoming conflict, even pledging that the Wehrmacht forces would be made available to Britain's empire in the future. The negotiations convinced Hitler that there was little chance the Western Allies would declare war on Germany, and even if they did, because of the lack of "territorial guarantees" to Poland, they would be willing to negotiate a compromise favourable to Germany after its conquest of Poland. Meanwhile, the number of increased overflights by high-altitude reconnaissance aircraft and cross border troop movements signalled that war was imminent.
On 29 August, prompted by the British, Germany issued one last diplomatic offer, with Fall Weiss "Case White" yet to be rescheduled. That evening, the German government responded in a communication that it aimed not only for the restoration of Danzig but also the Polish Corridor (which had not previously been part of Hitler’s demands) in addition to the safeguarding of the German minority in Poland. It said that they were willing to commence negotiations, but indicated that a Polish representative with the power to sign an agreement had to arrive in Berlin the next day while in the meantime it would draw up a set of proposals. The British Cabinet was pleased that negotiations had been agreed to but, mindful of howEmil Hacha had been forced to sign his country away under similar circumstances just months earlier, regarded the requirement for an immediate arrival of a Polish representative with full signing powers as an unacceptable ultimatum. On the night of 30/31 August, German Foreign Minister Joachim von Ribbentrop read a 16-point German proposal to the British ambassador. When the ambassador requested a copy of the proposals for transmission to the Polish government Ribbentrop refused on the grounds that the requested Polish representative had failed to arrive by midnight. When Polish Ambassador Lipski went to see Ribbentrop later on 31 August to indicate that Poland was favorably disposed to negotiations, he announced that he did not have the full power to sign, and Ribbentrop dismissed him. It was then broadcast that Poland had rejected Germany's offer, and negotiations with Poland came to an end. Hitler issued orders for the invasion to commence soon afterwards.
On 29 August, German saboteurs planted a bomb at the railway station in Tarnów and killed 21 passengers, leaving 35 wounded.
On 30 August, the Polish Navy sent its destroyer flotilla to Britain, executing Operation Peking. On the same day, Marshal of Poland Edward Rydz-Śmigły announced the mobilization of Polish troops. However, he was pressured into revoking the order by the French, who apparently still hoped for a diplomatic settlement, failing to realize that the Germans were fully mobilized and concentrated at the Polish border. During the night of 31 August, the Gleiwitz incident, a false flag attack on the radio station, was staged near the border city of Gleiwitz by German units posing as Polish troops, inUpper Silesia as part of the wider Operation Himmler. On 31 August 1939, Hitler ordered hostilities against Poland to start at 4:45 the next morning. Because of the prior stoppage, Poland managed to mobilize only 70% of its planned forces, and many units were still forming or moving to their designated frontline positions.
Opposing forces
Germany[]
Germany had a substantial numerical advantage over Poland and had developed a significant military prior to the conflict. The Heer (army) had some 2,400 tanks organized into six panzer divisions, utilizing a new operational doctrine. It held that these divisions should act in coordination with other elements of the military, punching holes in the enemy line and isolating selected units, which would be encircled and destroyed. This would be followed up by less-mobile mechanized infantry and foot soldiers. The Luftwaffe (air force) provided both tactical and strategic air power, particularly dive bombers that disrupted lines of supply and communications. Together, the so-called "new" methods, were nicknamed "Blitzkrieg" (lightning war). Historian Basil Liddell Hart claimed "Poland was a full demonstration of the Blitzkrieg theory." Some other historians, however, disagree.
Aircraft played a major role in the campaign. Bombers also attacked cities, causing huge losses amongst the civilian population through terror bombing. The Luftwaffe forces consisted of 1,180 fighters, 290 Ju 87 Stuka dive bombers, 1,100 conventional bombers (mainly Heinkel He 111s and Dornier Do 17s), and an assortment of 550 transport and 350 reconnaissance aircraft. In total, Germany had close to 4,000 aircraft, most of them modern. A force of 2,315 aircraft was assigned to Weiss. Due to its prior participation in the Spanish Civil War, the Luftwaffe was probably the most experienced, best trained and best equipped air force in the world in 1939.
Poland
Between 1936 and 1939, Poland invested heavily in the Central Industrial Region. Preparations for a defensive war with Germany were ongoing for many years, but most plans assumed fighting would not begin before 1942. To raise funds for industrial development, Poland sold much of the modern equipment it produced. In 1936, a


Polish Infantry
National Defence Fund was set up to collect funds necessary for strengthening the Polish Armed forces. The Polish Army had approximately a million soldiers, but less than ½ of them were mobilized by 1 September. Latecomers sustained significant casualties when public transport became targets of the Luftwaffe. The Polish military had fewer armored forces than the Germans, and these units, dispersed within the infantry, were unable to effectively engage the enemy.
Experiences in the Polish-Soviet War shaped Polish Army organizational and operational doctrine. Unlike the trench warfare of World War I, the Polish-Soviet War was a conflict in which the cavalry's mobility played a decisive role. Poland acknowledged the benefits of mobility but was unable to invest heavily in many of the expensive, unproven inventions since then. In spite of this, Polish cavalry brigades were used as a mobile mounted infantry and had some successes against both German infantry and cavalry.


Polish PZL.37 Łoś medium bomber
The Polish Air Force (Lotnictwo Wojskowe) was at a severe disadvantage against the German Luftwaffe, although it was not destroyed on the ground early on, as is commonly believed. The Polish Air Force lacked modern fighters, but its pilots were among the world's best trained, as proven a year later in the Battle of Britain, in which the Poles played a major part.
Overall, the Germans enjoyed numerical and qualitative aircraft superiority. Poland had only about 600 aircraft, of which only 37 P-37 Łoś bombers were modern and comparable to its German counterparts. The Polish Air Force had roughly 185 PZL P.11 and some 95 PZL P.7 fighters, 175 PZL.23 Karaś Bs, 35 Karaś As, and by September, over 100 PZL.37s were produced. However, for the September Campaign, only some 70% of those aircraft were mobilized. Only 36 PZL.37s were deployed. All those aircraft were of indigenous Polish design, with the bombers being more modern than fighters, according to the Ludomił Rayski air force expansion plan, which relied on a strong bomber force. The Polish fighters were a generation older than their German counterparts; the PZL P.11 fighter—produced in the early 1930s—had a top speed of only 365 km/h (227 mph), far less than German bombers. To compensate, the pilots relied on its maneuverability and high diving speed.


Polish 7TP light tank
The tank force consisted of two armored brigades, four independent tank battalions and some 30 companies of TKS tankettes attached to infantry divisions and cavalry brigades. A standard tank of the Polish Army during the Polish Defensive War of 1939 was the 7TP light tank. It was the first tank in the world to be equipped with a diesel engine and 360° Gundlach periscope. The 7TP was significantly better armed than its most common opponents, the GermanPanzer I and II, but only 140 tanks were produced between 1935 and the outbreak of the war. Poland had also a few relatively modern imported designs, such as 50 Renault R35 tanks and 38 Vickers E tanks.
The Polish Navy was a small fleet of destroyers, submarines and smaller support vessels. Most Polish surface units followed Operation Peking, leaving Polish ports on 20 August and escaping by way of the North Sea to join with the British Royal Navy. Submarine forces participated in Operation Worek, with the goal of engaging and damaging German shipping in the Baltic Sea, but they had much less success. In addition, many merchant marine ships joined the British merchant fleet and took part in wartime convoys.
Phoney War / Battle from September 1939-May 1940
The Phoney War was a phase early in World War II—in the months following Britain and France's declaration of war on Germany (shortly after the German invasion of Poland) in September 1939 and preceding the Battle of France in May 1940—that was marked by a lack of major military operations in Continental Europe. The various European powers had declared war on one another but neither side had committed to launching a significant land offensive, notwithstanding the terms of the Anglo-Polish military alliance and the Franco-Polish military alliance, which obliged the United Kingdom and France to assist Poland.
The period was also called at the time, the Twilight War by Winston Churchill, der Sitzkrieg in German ("the sitting war": a play on the wordBlitzkrieg), the Bore War (a play on the Boer War), the Polish dziwna wojna ("strange war"), and the French drôle de guerre("strange/funny war"). The American news magazine TIME called the period the Lullablitz.
The term Phoney War was possibly coined by U.S. Senator William Borah who stated in September 1939, "There is something phoney about this war."
Inactivity
While most of the German army was engaged in Poland, a much smaller German force manned the Siegfried Line, their fortified defensive line along the French border. At the Maginot Line on the other side of the border, British and French troops stood facing them, but there were only some local, minor skirmishes. The Royal Air Force dropped propaganda leaflets on Germany and the first Canadian troops stepped ashore in Britain, while


People of Warsaw under British Embassy in Warsaw with banner "Long live England!" just after British declaration of state of war with Nazi Germany
western Europe was in a strange calm for seven months. Meanwhile, the opposing nations clashed in the Norwegian Campaign. In their hurry to re-arm, Britain and France had both begun buying large amounts of weapons from manufacturers in the U.S. at the outbreak of hostilities, supplementing their own productions. The non-belligerent U.S. contributed to the Western Allies by discounted sales, and, later, lend-lease of military equipment and supplies.
Despite the relative calm on land, on the high seas the war was very real indeed. Within a few hours of the declaration of war, the British liner Athenia was torpedoed off the Hebrides with the loss of 112 lives in what was to be the beginning of the long running Battle of the Atlantic. On 4 September, the Allies announced a blockade of Germany to prevent her importing food and raw materials to sustain her war effort, and the Germans immediately declared a counter-blockade.
At the Nuremberg Trials, Alfred Jodl said that "if we did not collapse already in the year 1939 that was due only to the fact that during the Polish campaign, the approximately 110 French and British divisions in the West were held completely inactive against the 23 German divisions."
Saar Offensive
The Saar Offensive was a French operation into Saarland on the German 1st Army defence sector in the early stages of World War II. The purpose of the attack was to assist Poland, which was then under attack. However, the assault was stopped and the French forces withdrew.
According to the Franco-Polish military convention, the French Army was to start preparations for the major offensive three days after mobilisation started. The French forces were to effectively gain control over the area between the French border and the German lines and were to probe the German defenses. On the 15th day of the mobilization (that is on 16 September), the French Army was to start a full-scale assault on Germany. The preemptive mobilization was started in France on August 26 and on September 1 full mobilization was declared.
French mobilization suffered from an inherently out of date system. The French military′s ordnance lacked the tanks and planes of the mechanized German military which greatly affected their ability to swiftly deploy their forces on the field, French command still believed in tactics of the previous war which relied heavily on stationary artillery which took time to transport and deploy (many pieces also had to be retrieved from storage before any advance could be made).
A French offensive in the Rhine valley began on 7 September, four days after France declared war on Germany. Then, the Wehrmacht was occupied in the attack on Poland, and the French soldiers enjoyed a decisive numerical advantage along the border with Germany. However, the French did not take any action that was able to assist the Poles. Eleven French divisions advanced along a 32 km (20 mi) line near Saarbrückenagainst weak German opposition. The French army had advanced to a depth of 8 km (5.0 mi) and captured about 20 villages evacuated by the German army, without any resistance. However, the half-hearted offensive was halted after France seized the Warndt Forest, 3 sq mi (7.8 km2) of heavily-mined German territory.
The attack did not result in any diversion of German troops. The all-out assault was to be carried out by roughly 40 divisions, including one armored division, three mechanized divisions, 78 artillery regiments and 40 tank battalions. On 12 September, the Anglo French Supreme War Council gathered for the first time at Abbeville in France. It was decided that all offensive actions were to be halted immediately. General Maurice Gamelinordered his troops to stop "not closer than 1 kilometre" from the German positions along the Siegfried Line. Poland was not notified of this decision. Instead, Gamelin informed Marshal Edward Rydz-Śmigły that 1/2 of his divisions were in contact with the enemy, and that French advances had forced the Wehrmachtto withdraw at least six divisions from Poland. The following day, the commander of the French Military Mission to Poland—General Louis Faury—informed the Polish chief of staff—General Wacław Stachiewicz—that the planned major offensive on the western front had to be postponed from 17 September to 20 September. At the same time, French divisions were ordered to retreat to their barracks along the Maginot Line. The Phoney War had begun.
Winter War
The Winter War (Finnish: Talvisota, Swedish: Vinterkriget, Russian: Зимняя война (trans. Zimnyaya voyna) was a military conflict between the Soviet Union and Finland. It began with a Soviet offensive on 30 November 1939 – three months after the start of World War II and the Soviet invasion of Poland – and ended on 13 March 1940 with the Moscow Peace Treaty. The League of Nations deemed the attack illegal and expelled the Soviet


A Finnish machine gun crew during the Winter War
Union from the League on 14 December 1939.
The Soviet forces had three times as many soldiers as the Finns, 30 times as many aircraft, and a hundred times as many tanks. The Red Army, however, had been crippled by Soviet leader Joseph Stalin's Great Purge of 1937, reducing the army's morale and efficiency shortly before the outbreak of the fighting. With more than 30,000 of its army officers executed or imprisoned, including most of those of the highest ranks, the Red Army in 1939 had many inexperienced senior officers. Because of these factors, and high commitment and morale in the Finnish forces, Finland was able to resist the Soviet invasion for far longer than the Soviets expected.
Hostilities ceased in March 1940 with the signing of the Moscow Peace Treaty. Finland ceded 11% of its pre-war territory and 30% of its economic assets to the Soviet Union. Soviet losses on the front were heavy, and the country's international reputation suffered. The Soviet forces did not accomplish their objective of the total conquest of Finland, but did gain sufficient territory along Lake Ladoga to provide a buffer for Leningrad. The Finns, however, retained their sovereignty and enhanced their international reputation.
The peace treaty thwarted the Franco-British plan to send troops to Finland through northern Scandinavia. One of the Allied operation's major goals had been to take control of northern Sweden's iron ore and cut its deliveries to Germany.
Battle of Tolvajärvi
Prelude: After the Winter War broke out on November 30, the Finnish troops north of Lake Ladoga began a pre-planned retreat before the overwhelming opposition. It was not thought possible for the Soviets to deploy large number of troops in this rugged and almost roadless area, but the Soviets deployed an entire division which advanced along the road between Suojärvi and Tolvajärvi (now Tolvayarvi, Russia). The Soviet advance was a serious threat to the Finnish IV Corps' lines of communication. To counter this threat the Finnish high command assembled "Group Talvela" commanded by Colonel Paavo Talvela.
Battle: The northern group consisting of two battalions soon met Soviet resistance. In fact, they met the Soviet 718th regiment which was preparing to make its own attack on the Finnish flank. By noon, the Finnish troops withdrew to their own lines. Although this attack was a failure, it prevented the 718th from attacking the Finnish flank, and also from sending reinforcements to the south.
While the second battalion of the Finnish 16th infantry regiment (II/JR 16) was preparing to attack along the road it was interrupted by an attack from the Soviet 609th regiment. The Finns were still able to attack after they got some artillery support. The Finnish attack continued towards a hotel located on a thin isthmus between the two lakes. Pajari decided to commit his reserves in a pincer attack at the Soviet troops around the hotel. In the end the hotel was captured and in it were found a dead Soviet regimental commander and all the regiment's papers.
The Finns withdrew back over the lakes for the night. In the morning Colonel Talvela demanded a new attack and the 139th division was pushed back and later (20–22 December) destroyed aroundÄgläjärvi (now, Yaglyayarvi) (some 20 km from Tolvajärvi). Contact was also made with the 75th Soviet division which was sent as reinforcements.
Battle of Suomussalmi[]
{C}On November 30, 1939, the Soviet 163rd division crossed the border between Finland and the Soviet Union and advanced from the north-east towards the village of Suomussalmi. The Soviet objective was to advance to the city of Oulu, effectively cutting Finland in half. This sector had only one Finnish battalion (Er.P 15), which was placed near Raate, outside Suomussalmi.
Suomussalmi was taken with little resistance on December 7 (only two incomplete companies of covering forces led a holding action between the border and Suomussalmi), but the Finns destroyed the village before this, to deny the Soviets shelter, and withdrew to the opposite shore of lakes Niskanselkä and Haukiperä.
The first extensive fight started on December 8, when Soviet forces began to attack across the frozen lakes to the west. Their attempt failed completely. The second part of Soviet forces led the attack to the northwest on Puolanka, that was defended by the Er.P 16 (lit. 16th detached battalion), that had just arrived. This attempt also failed.
On December 9, the defenders were reinforced with a newly founded regiment (JR 27). Colonel Hjalmar Siilasvuo was given the command of the Finnish forces and he began immediate counter-measures to regain Suomussalmi. The main forces advanced on Suomussalmi, but failed to take the village, suffering serious losses.
On December 24, Soviet units counterattacked, but failed to break through the surrounding Finnish forces.
Reinforced with two new regiments (JR 64 and JR 65), the Finns again attacked on December 27. This time, they took the village, and the Soviets retreated in panic over the surrounding frozen lakes.
During this time, the Soviet 44th Division (mostly composed of Ukrainians) had advanced from the east towards Suomussalmi. It was entrenched on the road between Suomussalmi and Raate and got caught up in the retreat of the other Soviet forces.
Between January 4 and January 8, 1940, the 44th Division was divided into isolated groups and destroyed by the Finnish troops (in a tactic known as motti), leaving much heavy equipment for the Finnish troops.
Battle of Changsha
The Japanese launched the attacks on September 17, when their forces in northern Jiangxi attacked westward toward Hunan. However, the Japanese stretched too far out westward and were counter-attacked by Chinese forces from the south and the north, forcing them to retreat eastward.
On September 19, the Japanese then proceeded to attack the Chinese along the Sinchiang River. Even though the use of poison gas was prohibited by the Geneva Protocol, the Japanese army employed it on Chinese positions. On September 23 the Japanese drove the Chinese out of the Sinchiang river area, and the 6th and 13th Divisions crossed the river under artillery cover and advanced further south along the Miluo River.
Heavy fighting continued after the 23rd and the Chinese retreated southward to attract the Japanese while supporting battalions arrived on the east and the west for encirclement maneuver. On September 29 the Japanese reached the outskirts of Changsha. However, they were unable to conquer the city because their supply lines were cut off by the Chinese. By October 6 the Japanese forces at Changsha were decimated while the remnants retreated northward.
Battle of the River Plate[]
On 13 December, the ships sighted each other and closed. Admiral Graf Spee—despite having correctly identified Exeter—initially suspected that the two light cruisers were smaller destroyers and that the British ships were protecting a merchant convoy, the destruction of which would be a major prize. Since Graf Spee′s reconnaissance aircraft was out of service, Langsdorf relied on lookouts for this information. He decided to engage, despite having received a broadly accurate report from the German naval staff on 4 December outlining British activity in the River Plate area. This report included information that Ajax, Achilles, Exeter and Cumberland were patrolling the South American coast. Langsdorf realised too late that he was facing three cruisers. Calling upon the immediate acceleration of his diesel engines, he closed the enemy squadron at 24 kn (28 mph; 44 km/h) in the hope of engaging the steam-driven British ships before they could work up from cruising speed to full power.This strategy may seem an inexplicable blunder. Langsdorf could perhaps have manoeuvered to keep the British ships at a range where he could destroy them with his 11 in (280 mm) guns while remaining out of the effective range of their smaller 6- and 8-inch guns. On the other hand, he knew the British cruisers had a 4–6 kn (4.6–6.9 mph; 7.4–11 km/h) speed advantage over Graf Spee and could in principle stay out of range should they choose to do so—standard cruiser tactics in the presence of a superior force—while calling on reinforcements.
The British executed their battle plan: Exeter turned north-west, while Ajax and Achilles—operating together—turned north-east to spread Graf Spee′s fire.Graf Spee opened fire on Exeter at 19,000 yd (17,000 m) with her six 11 in (280 mm) guns at 06:18. Exeter opened fire at 06:20, Achilles at 06:21, Exeter′s aft guns at 06:22 and Ajax at 06:23. From her opening salvo, Graf Spee′s gunfire proved fairly accurate, her third salvo straddling Exeter. At 06:23, an 11 in (280 mm) shell burst just short of Exeter, abreast the middle of the ship. Splinters from this shell killed the torpedo tubes' crews, damaged the ship's communications, riddled the ship's funnels and searchlights and wrecked the ship's Walrus aircraft just as it was to be launched for gunnery spotting. Three minutes later, Exeter suffered a direct hit in her "B"-turret, putting it and its two guns out of action.[7] Shrapnel swept the bridge, killing or wounding all bridge personnel except the captain and two others. Captain Bell's communications were wrecked. Communications from the aft conning position were also destroyed, and the ship had to be steered via a chain of messengers for the rest of the battle.
Meanwhile, Ajax and Achilles closed to 13,000 yd (12,000 m) and started making in front of Graf Spee, causing her to split her main armament at 06:30, and otherwise use her 5.9 in (150 mm) guns against them. At 06:32, Exeter fired two torpedoes from her starboard tubes but both missed. At 06:37, Ajaxlaunched her spotter aircraft from its catapult. At 06:38, Exeter turned so that she could fire her port torpedoes, and received two more direct hits from 11 in (280 mm) shells. One hit "A"-turret and put it out of action, the other entered the hull and started fires. At this point Exeter was severely damaged, having only "Y"-turret still in action, a 7°list, was being flooded and being steered with the use of her small boat's compass. In return, one of Exeter′s 8 in (200 mm) shells penetrated two decks, then exploded in Graf Spee′s funnel area — destroying her raw fuel processing system and leaving her with just 16 hours fuel, insufficient to allow her to return home.
Thus, from 06:38, Graf Spee was doomed; she could not make the fuel system repairs (of this complexity) under fire. Two-thirds of her anti-aircraft guns were knocked out as well as one of her secondary turrets. There were no friendly naval bases within reach. She was not seaworthy and could only make the neutral port of Montevideo.
At approximately 06:36, Admiral Graf Spee hauled around from an easterly course, now behind Ajax and Achilles, toward the northwest and laid smoke. This position brought Langsdorf roughly parallel to Exeter. By 06:50, Exeter listed heavily to starboard, taking water forward. Nevertheless, she still steamed at full speed and fired with her one remaining turret. Forty minutes later, water splashed in by an 11 in (280 mm) near-miss short-circuited Exeter′s electrical system for that turret. Captain Bell was forced to break off action. This would have been the opportunity to finish off Exeter. Instead, the combined fire of Ajax and Achilles drew Langsdorf's attention as both ships closed.
At 06:56, Ajax and Achilles turned to starboard to bring all their guns to bear, at 07:10 causing Admiral Graf Spee to turn away and lay a smokescreen. At 07:10, the two light cruisers turned to reduce the range from 8 mi (7.0 nmi; 13 km), even though this meant only their forward guns could fire. At 07:16, Graf Spee turned to port and headed straight for the heavily damaged Exeter, but fire from Ajaxand Achilles forced her at 07:20 to turn and fire her 11 in (280 mm) guns at them, who turned to starboard to bring all their guns to bear. Ajax turned to starboard at 07:24 and fired her torpedoes at a range of 4.5 mi (3.9 nmi; 7.2 km), causing Graf Spee to turn away under a smokescreen. At 07:25, Ajax was hit by an 11 in (280 mm) shell that put "X"-turret out of action and jammed "Y"-turret, causing some casualties. By 07:40, Ajax and Achilles were running low on resources and the British decided to change tactics, moving to the east under a smokescreen. Harwood decided to shadowAdmiral Graf Spee and try to attack at night when he could attack with torpedoes and better utilise his advantage of speed and manoeuvrability while minimising his deficiencies in armour. Ajax was again hit by an 11 in (280 mm) shell that destroyed her mast and caused some casualties. Graf Spee continued on a south-westward course.
The Pursuit[]
The battle now turned into a pursuit. Captain Parry of Achilles wrote afterwards: 'To this day I do not know why the Admiral Graf Spee did not dispose of us in the Ajax and the Achilles as soon as she had finished with the Exeter. The British and New Zealander cruisers split up keeping about 15 mi (13 nmi; 24 km) from Graf Spee. Ajax kept to the German's port and the Achilles to the starboard. At 09:15, Ajax recovered her aircraft. At 09:46, Harwood signalled to the Cumberland for reinforcement, and the Admiralty also ordered ships within 3,000 mi (2,600 nmi; 4,800 km) to proceed to the River Plate. At 10:05, Achilles had overestimated Graf Spee′s speed, and she came into range of the German guns. Graf Spee turned and fired two three-gun salvoes with her foreguns. Achilles turned away under a smokescreen.
According to Pope, at 11:03 a merchant ship was sighted close to Graf Spee. After a few minutes, Graf Spee called Ajax on W/T using both ships' pre-war call-signs, with the signal: "please pick up lifeboats of English steamer". The German call-sign was DTGS, confirming to Harwood that the pocket-battleship he had engaged was indeed Graf Spee. Ajax did not reply but a little later the British flagship closed with SS Shakespeare with its lifeboats still hoisted and men still on board. Graf Spee had fired a gun and ordered them to stop, but when they did not obey orders to leave the ship Langsdorff decided to continue on his way, and Shakespeare had a lucky escape. The shadowing continued for the rest of the day until 19:15, when Graf Spee turned and opened fire on Ajax, which turned away under a smokescreen.
It was now clear that Graf Spee was entering the River Plate Estuary. Since the estuary had sandbanks, Harwood ordered the Achilles to shadow the Graf Spee while Ajax would cover any attempt to double back through a different channel. The sun set at 20:48, with Graf Spee silhouetted against the sun. Achilles had again closed the range and Graf Spee opened fire, forcing Achilles to turn away. During the battle, a total of 108 men had been killed on both sides, including 36 on Graf Spee.
Graf Spee entered Montevideo in neutral Uruguay, dropping anchor at about 00:10 on 14 December. This was a political error, since Uruguay, while neutral, had benefited from significant British influence during its development, and it favoured the Allies. The British Hospital, for example (where the wounded from the battle were taken) was the leading hospital in the city. The port of Mar del Plata on the Argentine coast and 200 mi (170 nmi; 320 km) south of Montevideo would have been a better choice for Graf Spee.
Also, had Graf Spee left port at this time, the damaged Ajax and Achilles would have been the only British warships that it would have encountered in the area.
Trap of Montevideo[]
In Montevideo, the 13th Hague Convention came into play. Under Article 12, "...belligerent war-ships are not permitted to remain in the ports, roadsteads, or territorial waters of the said Power for more than twenty-four hours...", modified by Article 14 "A belligerent war-ship may not prolong its stay in a neutral port beyond the permissible time except on account of damage..." British diplomats duly pressed for the speedy departure of the Graf Spee. Also relevant was Article 16, of which part reads, "A belligerent war-ship may not leave a neutral port or roadstead until twenty-four hours after the departure of a merchant ship flying the flag of its adversary."
The Germans released 61 captive British merchant seamen who had been on board in accordance with their obligations. Langsdorff then asked the Uruguayan government for two weeks to make repairs. Initially, the British diplomats in Uruguay—principally Eugen Millington-Drake—tried to have Admiral Graf Speeforced to leave port immediately. After consultation with London, which was aware that there were no significant British naval forces in the area, Millington-Drake continued to openly demand that Graf Spee leave. At the same time, the British secretly arranged for British and French merchant ships to steam from Montevideo at intervals of 24 hours, whether they had originally intended to do so or not, thus invoking Article 16. This kept Graf Spee in port and allowed more time for British forces to reach the area.
At the same time, efforts were made by the British to feed false intelligence to the Germans that an overwhelming British force was being assembled, including Force H (the aircraft carrier HMS Ark Royal and the battlecruiser HMS Renown), when in fact only the heavy cruiser HMS Cumberland was nearby. Cumberland—one of the earlier County class cruisers—was only a little more powerful thanExeter, with two more 8 in (200 mm) guns. She was no match alone for Admiral Graf Spee, whose guns had much longer range and fired much heavier shells. Cumberland arrived at 22:00 on 14 December, after steaming at full speed for 36 hours from the Falkland Islands. Overwhelming British forces (HMS Renown, Ark Royal, Shropshire, Dorsetshire, and Neptune) were en route, but would not assemble until 19 December. For the time being, the total force comprised the undamaged Cumberland, and the damaged Ajax and Achilles. To reinforce the propaganda effect, these ships—which were waiting just outside the 3 mi (2.6 nmi; 4.8 km) limit—were ordered to make smoke, which could be clearly seen from the Montevideo waterfront.
The Germans, however, were entirely deceived, and expected to face a far-superior force on leaving the River Plate. Graf Spee had also used two-thirds of her 11 in (280 mm) ammunition and only had enough left for approximately a further 20 minutes of firing, which was hardly enough to fight her way out of Montevideo, let alone get back to Germany.
While the ship was prevented from leaving the harbour, Captain Langsdorff consulted with his command in Germany. He received orders that permitted some options, but not internment in Uruguay. The Germans feared that Uruguay could be persuaded to join the Allied cause. Ultimately, he chose to scuttle his ship in the River Plate estuary on 17 December, to avoid unnecessary loss of life for no particular military advantage, a decision that is said to have infuriated Adolf Hitler. The crew of Admiral Graf Spee was taken to Buenos Aires, Argentina, where Captain Langsdorff committed suicide on 19 December. He was buried there with full military honours, and several British officers who were present attended. Many of the crew members were reported to have moved to Montevideo with the help of local people of German origin. The German dead were buried in the "Cementerio del Norte" in Montevideo.
Battle of the Atlantic (Skimishes in 1939)[]
In 1939, the Kriegsmarine lacked the strength to challenge the combined British Royal Navy and French Navy (Marine Nationale) for command of the sea. Instead, German naval strategy relied oncommerce raiding using capital ships, armed merchant cruisers, submarines and aircraft. Many German warships were already at sea when war was declared, including most of the available U-boats and the "pocket battleships" (Panzerschiffen) Deutschland and Admiral Graf Spee which had sortied into the Atlantic in August. These ships immediately attacked British and French shipping. U-30sank the liner SS Athenia within hours of the declaration of war—in breach of her orders not to sink passenger ships. The U-boat fleet, which was to dominate so much of the Battle of the Atlantic, was small at the beginning of the war; many of the 57 available U-boats were the small and short-range Type IIs, useful primarily for minelaying and operations in British coastal waters. Much of the early German anti-shipping activity involved minelaying by destroyers, aircraft and U-boats off British ports.
With the outbreak of war, the British and French immediately began a blockade of Germany, although this had little immediate effect on German industry. The Royal Navy quickly introduced a convoy system for the protection of trade that gradually extended out from the British Isles, eventually reaching as far as Panama, Bombay and Singapore. Convoys allowed the Royal Navy to concentrate its escorts near the one place the U-boats were guaranteed to be found — the convoys. Each convoy consisted of between 30 and 70 mostly unarmed merchant ships.
Some British naval officials, particularly the First Lord of the Admiralty, Winston Churchill, sought a more 'offensive' strategy. The Royal Navy formed anti-submarine hunting groups based on aircraft carriers to patrol the shipping lanes in the Western Approaches and hunt for German U-boats. This strategy was deeply flawed because a U-boat, with its tiny silhouette, was always likely to spot the surface warships and submerge long before it was sighted. The carrier aircraft were little help. Although they could spot submarines on the surface, at this stage of the war they had no adequate weapons to attack them. Any submarine found by an aircraft was long gone by the time surface warships arrived. The hunting group strategy proved a disaster within days. On September 14 1939, Britain's most modern carrier, HMS Ark Royal, narrowly avoided being sunk when three torpedoes from U-39 exploded prematurely. U-39 was promptly forced to surface and scuttle by the escorting destroyers, becoming the first U-boat loss of the war. The British failed to learn the lesson: another carrier, HMS Courageous, was sunk three days later by U-29.
Escort destroyers hunting for U-boats continued to be a prominent, but misguided, feature of British anti-submarine strategy for the first year of the war. U-boats nearly always proved elusive, and the convoys, denuded of cover, were put at even greater risk.
German success in sinking Courageous was surpassed a month later when Günther Prien in U-47 penetrated the British base at Scapa Flow and sank the old battleship HMS Royal Oak at anchor. Prien immediately became a hero in Germany.
In the South Atlantic, British forces were stretched by the cruise of Admiral Graf Spee, which sank nine merchant ships of 50,000 tons in the South Atlantic and Indian Oceans during the first three months of war. The British and French formed a series of hunting groups including three battlecruisers, three aircraft carriers, and 15 cruisers to seek the raider and her sister Deutschland, which was operating in the North Atlantic. These hunting groups had no success until Graf Spee was caught off the mouth of the River Plate by an inferior British force. After suffering damage in the subsequent action, she took shelter in neutral Montevideo harbour and was scuttled on 17 December 1939.
War from 1940 (May)-1941 (January)[]
Battle of Atlantic (Skimishes in 1940)[]
After this initial burst of activity, the Atlantic campaign quieted down. Admiral Karl Dönitz, commander of the U-boat fleet, had planned a maximum submarine effort for the first month of the war, with almost all the available U-boats out on patrol in September. That level of deployment could not be sustained; the boats needed to return to harbour to refuel, re-arm, re-stock supplies, and refit. The harsh winter of 1939–40, which froze over many of the Baltic ports, seriously hampered the German offensive by trapping several new U-boats in the ice. Hitler's plans to invade Norway and Denmark in the spring of 1940 led to the withdrawal of the fleet's surface warships and most of the ocean-going U-boats for fleet operations in Operation Weserübung.
The resulting Norwegian campaign revealed serious flaws in the magnetic influence pistol (firing mechanism) of the U-boats' principal weapon, the torpedo. Although the narrow fjords gave U-boats little room for manoeuver, the concentration of British warships, troopships and supply ships provided countless opportunities for the U-boats to attack. Time and again, U-boat captains tracked British targets and fired, only to watch the ships sail on unharmed as the torpedoes exploded prematurely (due to the influence pistol), or hit and failed to explode (because of a faulty contact pistol), or ran beneath the target without exploding (due to the influence feature or depth control not working correctly). Not a single British warship was sunk by a U-boat in more than 20 attacks. As the news spread through the U-boat fleet, it began to undermine morale. The director in charge of torpedo development continued to claim it was the crews' fault. In early 1942, the problems were determined to be due to differences in magnetic fields at high latitudes[16][page needed] and a slow leakage of high-pressure air from the submarine into the torpedo's depth regulation gear. Eventually those problems were solved by about March 1941, allowing the torpedos to become a formidable weapon.
Winter War (1940)[]
Battle Kollaa[]
The Battle of Kollaa was fought from December 7, 1939 - March 13, 1940 in the Ladoga's Karelia, Finland as a part of the Winter War.
Despite having far fewer troops than the Soviets, the Finnish forces (12th division) repelled the Red Army because the Soviets were only prepared to proceed along roads. The Kollaa area had very few roads, all of them guarded by Finnish troops, and the Soviets were not able to proceed cross-country without skis.
Kollaa is often considered to have been one of the most difficult places to defend during the Winter War. It has been estimated that the Red Army fired almost 40,000 artillery rounds at the defence line during a single day, whereas the Finnish Artillery could fire only 1,000 rounds per day at the very best.
Although they stopped the Red Army, the 12th Division suffered heavy losses, with the Battle of Kollaa continuing until the end of the Winter War. The Red Army managed to penetrate the Finnish defence line in Kollaa several times, thus pushing the Finns out of their positions but the Finns systematically counter-attacked to restore the integrity of their defence line. The Finnish defence came close to a collapse at the very end of the war - in fact, the Soviets managed to form a 0,5 - 1,5 kilometers deep fracture point into the Finnish defense line on March 12. As a result, the commander of the 12th division of the Finnish Army considered abandoning the main defence line at Kollaa, but as the news from the sector were that the situation was "not yet that alarming", the commander ordered a counter-attack and the defence line to be retaken the following day. However, as the information of the concluded peace treaty reached the front, those orders were cancelled and the men were told to hold their current positions until the end of hostilities.
A memorable quote from the Battle of Kollaa is Major General Hägglund's question, "Will Kollaa hold? (Kestääkö Kollaa)", to which Lieutenant Aarne Juutilainen replied, "Kollaa will hold (Kollaa kestää), unless the orders are to run."
The legendary sniper Simo Häyhä served in the Kollaa front.
Battle of Honkaniemi[]
On the nights of February 25 and 26, members of the Jaeger Battalion 3 were carried by trucks to Heponotko, which was about 3 km away from a depot in Honkaniemi (now Lebedevka) then they skied to the starting point at 4:00 am. The tank company arrived around 30 minutes later from a 50 km march. That march, however, cost them more than they would have liked. Since the conditions of the weather and road were extremely bad, the tank company lost 5 of their 13Vickers 6-Ton tanks mostly due to engine failures.
Seeing this as a major blow to their offensive capabilities, Captain Kunnas split his remaining tanks between the 2nd and 3rd Jaegers Companies and the 1st Jaegers Company. Six tanks will support the Jaegers while two will help the 1st secure the left flank. It was chosen that the attack would commence at 5:00 am, but the communication with the artillery battalions failed so it was decided that they would try again at 6:15 am.
When communications with the artillery battalions were up and running, the time had come to attack. However another setback had occurred. During the preliminary artillery barrage, some of the shells landed at the starting point, resulting in the 30 Finns being killed or injured. The attack had to be postponed by another hour.
The Beginning[]
After the initial artillery bombardment by the two artillery battalions (the 1st Battalions of the 21st and 5th Artillery Regiments) the attack commenced. However, the Finns had had another set-back, another two tanks had been lost to technical failures thereby reducing the total Finnish Tanks to only six for the entire battle. Even after all those set-backs, there was more to come. The 1st Jaegers Battalion had advanced some 200 meters before having to halt under the tremendous firing powers of the Red Army. The 1st Jaegers Company which was covering the left flank, advanced foreword towards the railroad only to be unable to cross it. The 2nd and 3rd Jaegers Companies, which were the main attack forces, had advanced to 200 meters SW from the rail road, but had to be stopped.
Tank Backup[]
The 4th Armoured Company had one of the worst days ever. One of its Vickers tanks got stuck in a ditch; the turret was damaged in the process and it had to retreat back to the starting point. The remaining five tanks were lost in a more honourable way, "being targeted by T-26s, T-28s and the 45 mm AT guns".
The platoon commander's tank, Lt.V. Mikkola's, advanced the farthest, almost 500 meters, almost into Soviet areas. Only two Finnish tanks were able to destroy other Soviet tanks, the tank of Corporal E. Seppälä, which had kept on fighting after being immobilized, had taken out two Soviet tanks before the crew had to abandon their vehicle. The other tank was commanded by 2nd Lt. J. Virniö, which had destroyed one tank before being damaged.
Finnish Retreat[]
Captain Kunnas received orders at 10:00 pm that he was to abort the attack and retreat. The Finns' first tank battle met with an unsuccessful end. The entire tank battle had been fought with inexperienced crews and almost no radio communication, since the tanks had been bought from the UK without guns, optics and radios, and some even without the driver's seat, in order to save money. Due to the lack of vital equipment, communication between tanks was impossible and the tanks would act upon their own judgement.
Battle of France - May 10-June 25, 1940[]
In the Second World War, the Battle of France was the German invasion of France and the Low Countries, beginning on 10 May 1940, which ended the Phoney War. The battle consisted of two main operations. In the first, Fall Gelb (Case Yellow), German armoured units pushed through the Ardennes, to cut off and surround the Allied units that had advanced into Belgium. During the fighting, the British Expeditionary Force (BEF) and many French soldiers were evacuated from Dunkirk in Operation Dynamo.
In the second operation, Fall Rot (Case Red), executed from 5 June, German forces outflanked the Maginot Line and pushed deep into France.Italy declared war on France on 10 June and soon afterwards the French government fled to Bordeaux. France's capital of Paris was occupied on 14 June. On 17 June, Philippe Pétain publicly announced France would ask for an armistice. On 22 June, an armistice was signed between France and Germany, going into effect on 25 June. For the Axis Powers, the campaign was a spectacular victory.
Following the Battle of Britain, France was divided into a German occupation zone in the north and west, a small Italian occupation zone in the southeast, and an unoccupied zone, the zone libre, in the south. A rump state, Vichy France, administered all three zones according to the terms laid out in the armistice. In November 1942, the Axis forces also occupied the zone libre, and metropolitan France remained under Axis occupation until after the Allied landings in 1944. The Low Countries remained under German occupation until 1944 and 1945.
Northern Front[]
Germany initiated Fall Gelb on the evening prior to and the night of 10 May. During the late evening of 9 May, German forces occupied Luxembourg. Army Group B launched its feint offensive during the night into the Netherlands and Belgium. During the morning of 10 May, Fallschirmjäger (paratroopers) from the 7th Flieger and 22. Luftlande Infanteriedivision under Kurt Student executed surprise landings at The Hague, on the road to Rotterdam and against the Belgian fort at Eben-Emael in order to facilitate Army Group B's advance.
The French command reacted immediately, sending its 1st Army Group north in accordance with Plan D. This move committed their best forces, diminishing their fighting power by the partial disorganisation it caused and their mobility by depleting their fuel stocks. By the time the French 7th Army crossed the Dutch border, they found the Dutch already in full retreat, and withdrew into Belgium to protect Brussels.
The Netherlands[]
The Luftwaffe was guaranteed air superiority over the Netherlands by sheer numerical superiority. They allocated 247 medium bombers, 147 fighter aircraft, 424 Junkers Ju 52 transports, and 12 Heinkel He 59 seaplanes to operations over the Netherlands. The Dutch Air Force, the Militaire Luchtvaartafdeling(ML), had a strength of 144 combat aircraft, half of which were destroyed within the first day of operations. The remainder was dispersed and accounted for only a handful of Luftwaffe aircraft shot down. In total the ML flew a mere 332 sorties, losing 110 of its aircraft.
The German 18. Armee secured all the strategically vital bridges in and toward Rotterdam, which penetrated Fortress Holland and bypassed the New Water Line from the south. However, an operation organised separately by the Luftwaffe to seize the Dutch seat of government, known as the Battle for The Hague, ended in complete failure. The airfields surrounding the city (Ypenburg, Ockenburg, and Valkenburg) were taken with heavy casualties and transport aircraft losses. Some 96 aircraft in all were lost to Dutch shell fire. The Luftwaffe''s Transportgruppen operations had cost it 125 Ju 52s destroyed and 47 damaged, representing 50% of the fleet's strength. Moreover, the airborne operation had cost the German paratroopers 4,000 men, of whom 1,200 wereprisoners of war, out of 8,000. The Dutch evacuated them back to Britain. The total percentage cost of the defeat was 20% of NCOs and men and 42% of German officers were lost.
The French 7th Army failed to block the German armoured reinforcements from the 9. Panzerdivision, which reached Rotterdam on 13 May. That same day in the east, following the Battle of the Grebbeberg in which a Dutch counter-offensive to contain a German breach had failed, the Dutch retreated from the Grebbe line to the New Water Line. The Dutch Army, still largely intact, surrendered in the evening of 14 May after the Bombing of Rotterdam by the Luftwaffe. Heinkel He 111 medium bombers of Kampfgeschwader 54 (Bomber Wing 54) destroyed the centre of the city, an act which has remained controversial. The Dutch Army considered its strategic situation to have become hopeless and feared further destruction of the major Dutch cities. The capitulation document was signed on 15 May. However, Dutch forces continued fighting in Zeeland and the colonies while Queen Wilhelmina established a government in exile in Britain. Dutch casualties amounted to 2,157 army, 75 air force, and 125 Navy personnel. 2,559 civilians were also killed.
Invasion of Belgium
The Germans were able to establish air superiority in Belgium. Having completed thorough photographic reconnaissance missions, they destroyed 83 of the 179 aircraft of the Aeronautique Militaire within the first 24 hours. The Belgians would fly 77 operational missions but would contribute little to the air campaign. The Luftwaffe was assured air superiority over the Low Countries.
Because Army Group B had been so weakened compared to the earlier plans, the feint offensive by the German 6. Armee was in danger of stalling immediately, since the Belgian defences on the Albert Canal position were very strong. The main approach route was blocked by Fort Eben-Emael, a large fortress then generally considered the most modern in Europe, controlling the junction of the Meuse and the Albert Canal. Any delay might endanger the outcome of the entire campaign, because it was essential that the main body of Allied troops was engaged before Army Group A established bridgeheads. To overcome this difficulty, the Germans resorted to unconventional means in the assault on the fort. In the early hours of 10 May, DFS 230gliders landed near the fort and unloaded assault teams that disabled the main gun cupolas with hollow charges. The bridges over the canal were seized by German paratroopers. The Belgians launched considerable counter attacks which were broken up by the Luftwaffe. Shocked by a breach in its defences just where they had seemed the strongest, the Belgian Supreme Command withdrew its divisions to the KW-line five days earlier than planned. Similar operations against the bridges in the Netherlands, at Maastricht, failed. All were blown up by the Dutch and only one railway bridge was taken. This stalled the German armour on Dutch territory for a time.
The BEF and the French First Army were not yet entrenched, and the news of the defeat on the Belgian border was unwelcome. The Allies had been convinced Belgian reistance would have given them several weeks to prepare a defensive line at the Gembloux Gap. When General Erich Hoepner's XVI Panzerkorps, consisting of 3rd and 4th Panzer Divisions, was launched over the newly-captured bridges in the direction of the Gembloux Gap, this seemed to confirm the expectations of the French Supreme Command that the German Schwerpunkt would be at that point. Gembloux was located between Wavre and Namur, on flat, ideal tank terrain. It was also an unfortified part of the Allied line. In order to gain time to dig in there, René Prioux, commanding the Cavalry Corps of the French 1st Army, sent two French Light Mechanised divisions, the 2nd DLM and 3rd DLM, forward to meet the German armour at Hannut, east of Gembloux. They would provide an advanced guarding screen which would stall the Germans and allow sufficient time for the French 1st Army to dig into formidable positions.
Battle of Hannut and Gembloux
The resulting Battle of Hannut, which took place on 12-13 May, was the largest tank battle until that date, with about 1,500 armoured fighting vehicles participating. The French disabled about 160 German tanks for the loss of 91 Hotchkiss H35 and 30 Somua S35 tanks destroyed or captured. The Germans controlled the battlefield after a voluntary French withdrawal. They recovered and eventually repaired or rebuilt many of their knocked-out tanks so German irreparable losses amounted to just 49 tanks (20, 3rd Panzer and 29, 4th Panzer). Prioux had achieved his mission in stalling the Panzers and allowing the French 1st Army to settle, so it was a tactical victory for the French. By contrast, although Hoepner had succeeded in diverting the French First Army from Sedan, which was his most important mission, he failed to destroy or forestall it. The French would escape the encirclement and still render invaluable support to the British Army in Dunkirk just two weeks later.
On 14 May, having been tactically defeated at Hannut, Hoepner tried to break the French line again, against orders, leading to The Battle of the Gembloux Gap. This was the only time in the campaign when German armour frontally attacked a strongly held fortified position. The attempt was repelled by the 1st Moroccan Infantry Division, costing 4. Panzerdivision another 42 tanks, 26 of which were irreparable. This French defensive success was made irrelevant by events further south. Following the battle with the French 1st Army on 15 May, the war diary of the 4. Panzerdivisionnoted irreparable losses that day of nine Panzer Is, nine Panzer IIs, six Panzer IIIs, eight Panzer IVs, and two command tanks; of an original total of 314. 137 machines, of which 20 were mk IIIs and four were mk IVs, remained combat-ready.
Central Front[]
Belgian and French Ardennes[]
In the centre, the progress of German Army Group A was to be delayed by Belgian motorised infantry and French mechanised cavalry divisions (Divisions Légères de Cavalerie) advancing into the Ardennes. The main resistance came from the Belgian 1st Chasseurs Ardennais along with the 5th French Light Cavalry Division (DLC). These forces had insufficient anti-tank capacity to block the surprisingly large number of German tanks they encountered and quickly gave way, withdrawing behind the Meuse. The German advance was greatly hampered by the sheer number of troops trying to force their way along the poor road network. Kleist′s Panzergruppe had more than 41,000 vehicles. This huge armada had been allocated only four march routes through the Ardennes. The time-tables proved to be wildly optimistic and there was soon heavy congestion, beginning well over the Rhine to the east, which would last for almost two weeks. This made Army Group A very vulnerable to French air attacks, but these did not materialise. Although Gamelin was well aware of the situation, the French bomber force was far too weak to challenge German air superiority so close to the German border. The French had tried in vain to stem the flow of the German armour during the Battle of Maastricht, and failed with heavy losses. In two days, the bomber force had been reduced to 72 out of 135.
On 11 May, Gamelin had ordered reserve divisions to begin reinforcing the Meuse sector. Because of the danger the Luftwaffe posed, movement over the rail network was limited to night-time, slowing the reinforcement, but the French felt no sense of urgency as they believed the build-up of German divisions would be correspondingly slow. The French Army did not conduct river crossings unless assured of heavy artillery support. While they were aware that the German tank and infantry formations were strong, they were confident in their strong fortifications and artillery superiority. However, the quality of the fighting men was dubious. The German advance forces reached the Meuse line late in the afternoon of 12 May. To allow each of the three armies of Army Group A to cross, three major bridgeheads were to be established at: Sedan in the south, Monthermé to the northwest and Dinant further to the north. The first German units to arrive hardly had local numerical superiority; their already insufficient artillery support was further limited by an average supply of just 12 rounds per gun. Fortunately for the German divisions, the French artillery was also limited to a daily combat supply rate of 30 rounds per "tube" (gun).
Battle of Sedan
At Sedan, the Meuse Line consisted of a strong defensive belt 6 km (3.7 mi) deep, laid out according to the modern principles of zone defence on slopes overlooking the Meuse valley and strengthened by 103 pillboxes, manned by the 147th Fortress Infantry Regiment. The deeper positions were held by the 55th Infantry Division. This was only a grade "B" reserve division. On the morning of 13 May, the 71st Infantry Divisionwas inserted to the east of Sedan, allowing 55th Infantry to narrow its front by one-third and deepen its position to over 10 km (6.2 mi). Furthermore, it had a superiority in artillery to the German units present.
On 13 May, the German XIX Korps forced three crossings near Sedan, executed by the 1., 2. and 10. Panzerdivisions, reinforced by the eliteGroßdeutschland infantry regiment. Instead of slowly massing artillery as the French expected, the Germans concentrated most of their air power (as they lacked strong artillery forces) to smash a hole in a narrow sector of the French lines by carpet bombing and by dive bombing.Hermann Göring had promised Guderian that there would be extraordinarily heavy air support during a continual eight hour air attack, from 08:00am until dusk. The Luftwaffe executed the heaviest air bombardment the world had yet witnessed and the most intense by the Germans during the war. The Luftwaffe committed two Sturzkampfgeschwader (Dive Bomber Wings) to the assault, flying 300 sorties against French positions. A total of 3,940 sorties were flown by nine Kampfgeschwader (Bomber Wings).
Some of the forward pillboxes were unaffected, and repulsed the crossing attempts of the 2. and 10. Panzerdivisions. However, it transpired the morale of the deeper units of the 55th Infantry had been broken by the impact of the air attacks. The French supporting artillery batteries had fled. At a cost of a few hundred casualties, the German infantry had penetrated up to 8 km (5.0 mi) into the French defensive zone by midnight. Even by then, most of the infantry had not crossed, much of the success being due to the actions of just six platoons, mainly assault engineers.
The disorder that had begun at Sedan spread down the French lines. At 19:00 on 13 May, the 295th regiment of 55th Infantry Division, holding the last prepared defensive line at the Bulson ridge 10 km (6.2 mi) behind the river, was panicked by the false rumour that German tanks were already behind its positions. It fled, creating a gap in the French defences, before even a single German tank had crossed the river. This "Panic of Bulson" also involved the divisional artillery. The Germans had not attacked their position, and would not do so until 12 hours later, at 07:20 on 14 May. Still, the French had several hours to launch a counter offensive before the Germans consolidated the bridgeheads, but failed to attack soon enough.
Recognising the gravity of the defeat at Sedan, General Gaston-Henri Billotte, commander of the 1st Army Group, whose right flank pivoted on Sedan, urged that the bridges across the Meuse be destroyed by air attack, convinced that "over them will pass either victory or defeat!". That day, every available Allied light bomber was employed in an attempt to destroy the three bridges, but failed to hit them while suffering heavy losses. Some 44% of the Allies' bomber strength was destroyed.
Collapse of the Meuse front
Heinz Guderian, the commander of the German XIX. Armeekorps, had indicated on 12 May that he wanted to enlarge the bridgehead to at least 20 km (12 mi). His superior, Ewald von Kleist, ordered him on behalf of Hitler to limit his moves to a maximum of 8 km (5.0 mi) before consolidation. At 11:45 on 14 May, von Rundstedt confirmed this order, which implied that the tanks should now start to dig in. Guderian was able to get to Ewald von Kleist to agree to "reconnaissance in force", by threatening to resign and behind the scenes interventions. This vague terminology allowed Guderian to move forward, effectively ignoring Ewald von Kleist's order to halt.
In the original von Manstein Plan as Guderian had suggested, secondary attacks would be carried out to the southeast, in the rear of the Maginot Line, to confuse the French command. This element had been removed by Halder but Guderian now sent the 10th Panzerdivision andGroßdeutschland infantry regiment south to execute precisely such a feint attack, using the only available route south over the Stonneplateau. The commander of the French 2nd Army, General Charles Huntziger, intended to carry out a counterattack at the same spot by the armoured 3e Division Cuirassée de Réserve (DCR) to eliminate the bridgehead. This resulted in an armoured collision, both parties trying in vain to gain ground in furious attacks from 15-17 May, the village of Stonne changing hands many times. Huntzinger considered this at least a defensive success and limited his efforts to protecting his flank. Holding Stonne and taking Bulson would have enabled the French to hold onto the high ground overlooking Sedan. They could disrupt the Sedan bridgehead, even if they could not take it. Heavy battles took place and Stonne changed hands 17 times. However, on the evening of 17 May, it fell to the Germans for the last time.
Meanwhile, Guderian had turned his other two armoured divisions, the 1. and 2. Panzerdivisions, sharply to the west on 14 May. They began to advance at speed to the English Channel.
On 15 May, in heavy fighting, Guderian's motorised infantry dispersed the reinforcements of the newly formed French 6th Army in their assembly area west of Sedan, undercutting the southern flank of the French 9th Army. The 9th Army collapsed, and surrendered en masse. The 102nd Fortress Division, its flanks unsupported, was surrounded and destroyed on 15 May at the Monthermébridgehead by the 6. and 8. Panzerdivisions acting without air support. The French 2nd Army had also been seriously mauled and had rendered itself impotent. The 9th Army was giving way because they also did not have time to fortify their lines. Erwin Rommel had breached its defences within 24 hours of its conception. This allowed the impetuous Rommel to break free with his 7.Panzerdivision, refusing to allow his division rest and advancing both by day and night. The Ghost division advanced 30 mi (48 km) in just 24 hours.
Rommel's lines of communication with his superior, General Hermann Hoth, and his headquarters were cut. Disobeying orders and not waiting for the French to establish a new line of defence, he continued to advance north-west to Avesnes-sur-Helpe, just ahead of the 1. and 2. Panzerdivisions. Rommel was lucky, because the French 5th Motorised Infantry Division had set up its overnight bivouac in his path, leaving its vehicles neatly lined up along the roadsides. At this stage, Rommel's tanks dashed right through them. The slow speed, overloaded crews and lack of any means of communication in battle undid the French. The 5. Panzerdivision joined in the fight. The French did inflict significant losses on the division, but they could not cope with the speed of the German mobile units, which closed fast and dispatched the French armour at close range. During this battle, the remaining elements of the 1st DCR, resting after losing all but 16 of its tanks in Belgium, were also engaged and defeated. The French unit retreated, with just three remaining tanks. The 1st DCR was effectively destroyed on 17 May. The Germans lost 50 out of 500 tanks in the battle.
By 17 May, Rommel claimed to have taken 10,000 prisoners and suffered only 36 losses. Guderian was delighted with the fast advance, and encouraged his XIX Korps, consisting of the 1., 2. and 10. Panzerdivisions to head for the channel, continuing until fuel was exhausted. However, the success of his commanders on the ground began to have effects on Hitler who worried that the German advance was moving too fast. Halder recorded in his diary on 17 May that "Fuhrer is terribly nervous. Frightened by his own success, he is afraid to take any chance and so would pull the reins on us ... [he] keeps worrying about the south flank. He rages and screams that we are on the way to ruin the whole campaign." Through deception and different interpretations of orders to stop from Hitler and von Kleist, the commanders on the ground were able to ignore Hitler's attempts to stop the northern advance to the sea.
Low French morale[]
The Panzerkorps now slowed their advance considerably and put themselves in a very vulnerable position. They were stretched out, exhausted, low on fuel, and many tanks had broken down. There was now a dangerous gap between them and the infantry. A determined attack by a fresh and large enough mechanised force might have cut the Panzers off and wiped them out.
The French High Command, however, was reeling from the shock of the sudden offensive and was now stung by a sense of defeatism. On the morning of 15 May, French Prime Minister Paul Reynaud telephoned the new Prime Minister of the United Kingdom Winston Churchill and said "We have been defeated. We are beaten; we have lost the battle." Churchill, attempting to offer some comfort to Reynaud, reminded the Prime Minister of all the times the Germans had broken through the Allied lines in World War I only to be stopped. Reynaud was, however, inconsolable.
Churchill flew to Paris on 16 May. He immediately recognised the gravity of the situation when he observed that the French government was already burning its archives and was preparing for an evacuation of the capital. In a sombre meeting with the French commanders, Churchill asked General Gamelin, "Où est la masse de manoeuvre?" ["Where is the strategic reserve?"] that had saved Paris in the First World War. "Aucune" ["There is none"] Gamelin replied. After the war, Gamelin claimed his response was "There is no longer any." Churchill described hearing this later as the single most shocking moment in his life. Churchill asked Gamelin where and when the general proposed to launch a counterattack against the flanks of the German bulge. Gamelin simply replied "inferiority of numbers, inferiority of equipment, inferiority of methods".
Failed Allied Counter-Attacks
Some of the best Allied units in the north had seen little fighting. Had they been kept in reserve they might have been used in a decisive counter-strike. In a twist of irony, pre-war General Staff Studies had asserted the main reserves were to be kept on French soil, to resist an invasion of the Low Countries, deliver a counter attack or "re-establish the integrity of the original front".
Despite having a numerically superior armoured force, the French failed to use it properly, or to deliver an attack on the vulnerable German bulge. The Germans combined their fighting vehicles in major, operational formations and used them at the point of main effort. The bulk of French armour was scattered along the front in tiny formations. Most of the French reserve divisions had by now been committed. The 1st DCR had been wiped out when it had run out of fuel and the 3rd DCR had failed to take its opportunity to destroy the German bridgeheads at Sedan. The only armoured division still in reserve, 2nd DCR, was to attack on 16 May west of Saint-Quentin, Aisne. The division's commander could locate only seven of its 12 companies, which were scattered along a 49 ×37 mi (79 ×60 km) front. The formation was overrun by the 8. Panzerdivision while still forming up and was effectively destroyed as a fighting unit.
Colonel Charles de Gaulle, in command of France's hastily formed 4th DCR, attempted to launch an attack from the south at Montcornet where Guderian had his Korps headquarters and the 1.Panzerdivision had its rear service areas. The Germans hastily improvised a defence while Guderian rushed up the 10. Panzerdivision to threaten De Gaulle's flank. This flank pressure and attacks by the Luftwaffe's VIII Fliegerkorps broke up the attack. French losses on 17 May were 32 tanks and armoured vehicles, but had "inflicted loss on the Germans". On 19 May, after receiving reinforcements, De Gaulle made another effort, and was repulsed with the loss of 80 of 155 vehicles. von Richthofen's Fliegerkorps VIII had done most of the work, by targeting French units moving into position to attack the vulnerable German flanks it was able to stop most counter attacks from starting. The defeat of de Gaulle's unit and the disintegration of the French 9th Army was caused mainly by Richthofen's air units.
Although De Gaulle had achieved a measure of success, his attacks on 17 and 19 May did not significantly alter the overall situation. It was the only French counter-attack on the German forces advancing to the channel.
German spearheads reach the Channel
The Allies did little to either threaten the Panzerkorps or to escape from the danger that they posed. The Panzer troops used 17-18 May to refuel, eat, sleep and return more tanks to working order. On 18 May, Rommel caused the French to give up Cambrai by merely feinting an armoured attack toward the city.
On 19 May, General Edmund Ironside, the British Chief of the Imperial General Staff, conferred with General Lord Gort, commander of the BEF, at his headquarters near Lens. He urged Gort to save the BEF by attacking south-west toward Amiens. Gort replied that seven of his nine divisions were already engaged on the Scheldt River, and he had only two divisions left with which he would be able to mount such an attack. Ironside then asked Gort under whose command he was acting. Gort replied that this was General Billotte, the commander of the French 1st Army Group, but that Billotte had issued no orders for eight days. Ironside confronted Billotte, whose own headquarters was nearby, and found him apparently incapable of taking decisive action. He returned to Britain concerned that the BEF was already doomed, and ordered urgent anti-invasion measures.
The German land forces could not remain inactive any longer since it would allow the Allies to reorganise their defence or escape. On 19 May, Guderian was permitted to start moving again and smashed through the weak British 18th and 23rd Territorial Divisions located on the Somme river. The German units occupied Amiens and secured the westernmost bridge over the river at Abbeville. This move isolated the British, French, Dutch, and Belgian forces in the north. On 20 May, a reconnaissance unit from Rudolf Veiel′s 2. Panzerdivision reached Noyelles-sur-Mer, 100 kilometres (62 mi) to the west of their positions on the 17th. From there, they were able to see the Somme estuary and the English Channel. A huge pocket, containing the Allied 1st Army Group (the Belgian, British, and French 1st, 7th and 9th Armies), was created.
VIII. Fliegerkorps, under the command of Wolfram von Richthofen, covered the dash to the channel coast. Heralded as the Ju 87s′ (Stuka) "finest hour", these units responded via an extremely efficient communications system to the Panzer Divisions′ every request for support, which effectively blasted a path for the Army. The Ju 87s were particularly effective at breaking up attacks along the flanks of the German forces, breaking fortified positions, and disrupting rear-area supply chains. The Luftwaffe also benefitted from excellent ground-to-air communications throughout the campaign. Radio-equipped forward liaison officers could call upon the Stukas and direct them to attack enemy positions along the axis of advance. In some cases, the Luftwaffe responded to requests in 10–20 minutes. Oberstleutnant Hans Seidemann (Richthofen's Chief of Staff) said that "never again was such a smoothly functioning system for discussing and planning joint operations achieved". Closer examination reveals the army had to wait 45–75 minutes for Ju 87 units, and just 10 minutes for the Henschel Hs 123 units.
Weygand Plan[]
On the morning of 20 May, Maurice Gamelin ordered the armies trapped in Belgium and northern France to fight their way south and link up with French forces that would be pushing northward from the Somme river. However on the evening of 19 May, French Prime Minister Paul Reynaud had dismissed Gamelin for his failure to contain the German offensive, and replaced him with Maxime Weygand. Weygand had little sense of urgency. He claimed his first mission as Commander-in-Chief would be to get a good night's sleep. Weygand was guilty of wasting valuable time, time which was needed to form a quick and powerful counter-attack. He cancelled Gamelin's planned offensive, then wasted several days making courtesy visits to dignitaries in Paris. He then ordered a similar plan to Gamelin, proposing a counter-offensive from the north and south against the German "corridor", which entailed a combined thrust by the encircled armies in the pocket and French forces on the Somme front (the newly-created French 3rd Army Group, under the command of General Antoine-Marie-Benoît Besson). The situation demanded an all-out offensive on the corridor.
On 22 May, Weygand ordered his forces to pinch off the German armoured spearhead by combining attacks from the north and the south. On the map, this seemed like a feasible mission, as the corridor through which von Kleist's two Panzer Corps had moved to the coast was narrow. On paper, Weygand had sufficient forces to execute it: to the north were the three DLM and the BEF; to the south, was de Gaulle's 4th DCR. However, while the German position was far from safe, the opportunity had been lost. The delays had allowed the Germans to push more infantry divisions into the corridor and they had pushed further along the channel coast. Weygand flew into the pocket on 21 May and met General Billotte, commander of the First Army Group, and King Leopold III of Belgium. The Belgian position on any offensive move was made clear by Leopold. As far as he was concerned, the Belgian Army could not conduct offensive operations as it lacked tanks and aircraft; it existed solely for defence. The King also made clear that in the rapidly shrinking area of Belgium still free, there was only enough food for two weeks. Leopold did not expect the BEF to jeopardize its own position in order to keep contact with the Belgian Army, but he warned the British that if it persisted with the southern offensive the Belgians would be overstretched and their army would collapse. King Leopold suggested the best recourse was to establish a beach-head covering Dunkirk and the Belgian channel ports.
Gort doubted the French Army's ability to prevail in the offensive. On 23 May, making matters worse, Billotte was killed in a road traffic accident, leaving the Allied First Army Group in the pocket leaderless for three days. Billotte was the only member of the Allied armies thoroughly informed on the Weygand plan's details. The same day, the British decided to evacuate from the Channel ports. In the event, communications broke down and only two minor offensives, by the British at Arras on 21 May and the French at Cambrai on 22 May, would be acted upon.
Major-General Harold Edward Franklyn, commanding two tank battalions, had moved into the Arras area. Franklyn was not aware of a French push north toward Cambrai, and the French were unaware of a British attack heading south, out of the pocket, toward Arras. Ignorant as to the importance of the operation, Franklyn assumed he was to relieve the Allied garrison at Arras and to sever German communications in the immediate area. He did not therefore want to risk throwing his main units, the 5th and 50th Infantry Divisions into the fight, especially if the objectives were limited. He also had the French 3rd DLM available, from the French 1st Army. It had caused the German armour severe trouble at the Battle of Hannut with its SOMUA S35 heavy tanks. They were given no more than a flank protection role. Only two infantry battalions and two tank battalions were made available for the attack. British armour numbers had dwindled owing to mechanical failures. However they still fielded 74 Matilda tanks and 14 light tanks.
The resulting Battle of Arras achieved surprise and initial success against German forces which were stretched, but it still failed. Radio communication between tanks and infantry was poor and there was little combined arms coordination as practiced by the Germans. In the end, hastily set up German defences (including 88 mm (3.46 in) FlaK guns and 105 mm (4.1 in) field guns) stopped the attack. The French inflicted heavy losses on German armour as they retreated, but the Luftwaffe broke up the counter-attacks. Just 28 of the 88 British tanks survived. The French V Corps' attack at Cambrai also failed. V Corps had been too disorganised after previous fighting in Belgium to launch a serious effort.
Although this attack was not part of any coordinated attempt to destroy the Panzerkorps, the German High Command panicked even more than Rommel. They thought that hundreds of Allied tanks were about to smash into their elite forces. It was unjustified panic. The operational and strategic effects of the British attack was out of proportion to its tactical achievements. On the morning of the 22 May, the German High Command had regained confidence and ordered Guderian′s XIX Panzerkorps to press north and push on to the Channel ports: the 1. Panzerdivision to Calais, the 2.Panzerdivision to Boulogne and the 10. Panzerdivision to Dunkirk.[182] Later, the missions of the 1st and 10. Panzerdivisions were reversed. The 1. Panzer was ordered to Dunkirk while the 10. Panzerwas to take Calais.
BEF and The Channel Ports
- Main articles: Battle of Dunkirk and Dunkirk evacuation
Halt Order[]
On 23 May, Günther von Kluge proposed that the German 4. Armee, which was poised to continue the attack against the Allied forces at Dunkirk, should "halt and close up". Seeing the Allies were trapped in the city, Gerd von Rundstedt agreed with von Kluge. In the 4. Armee diary, it is recorded on 23 May "will, in the main, halt tomorrow [May 24] in accordance with Colonel-General von Rundstedt's order." General Walther von Brauchitsch, commander in chief of the German Army, disagreed with his colleagues and wanted to continue the attack against Dunkirk by putting the 4.Armee under Bock. Bock was busy and Halder agreed with Von Rundstedt and with von Kluge to stop action against Dunkirk. The disagreement went to Hitler, who overruled Brauchitsch and agreed with stopping action against Dunkirk. Hitler's error wasn't in making the command to halt the German army but in allowing the orders already drawn up by the German generals to stand. It appears that Kleist also agreed with the halt order, which Hitler "rubber-stamped". The halt order remains extremely controversial.
At the same time, Army Group B under Bock was stripped of most of its divisions, including its reserves and air support. Its complement shrank to just 21 divisions, while Army Group A swelled to 70 divisions, including all ten Panzer Divisions. Army Group B was to be used as a "hammer" against Army Group A's "anvil". Halder later claimed Hitler's motivation for the transfer was his wish that the decisive battle be fought on French, not Flemish soil.
Hermann Göring convinced Hitler that the Luftwaffe could prevent any evacuation and von Rundstedt warned him that any further effort by the armoured divisions would lead to a much longer refitting period. The delay and failure of the Luftwaffe to stop the evacuation wasted some three days (24-27 May) and allowed the Allies to build a defence to the approaches of Dunkirk, the main evacuation port. It would seem that Hitler, Göring and Rundstedt shared responsibility for the mistake.
Battle of Calais
In the early hours of 23 May, Gort ordered a retreat from Arras. By now, he had no faith in the Weygand plan, nor in Weygand's proposal to at least try to hold a pocket on the Flemish coast, a so-called Réduit de Flandres. Gort knew that the ports needed to supply such a foothold were already being threatened. That same day, the 2. Panzer Division had assaulted Boulogne. The British garrison there surrendered on 25 May, although significant numbers were evacuated by Royal Navy ships. The RAF also provided air superiority over the port, denying the Luftwaffe an opportunity to attack the shipping. Some 4,286 men were evacuated.
The 10. Panzerdivision attacked Calais, beginning on 24 May. British reinforcements (the 3rd Royal Tank Regiment, equipped with cruiser tanks, and the 30th Motor Brigade) had been hastily landed 24 hours before the Germans attacked. The defenders held on to the port as long as possible, aware that an early capitulation would free up German forces to advance on Dunkirk. The British and French held the town despite the best efforts of Ferdinand Schaal's division to break through. Frustrated, Guderian ordered that if Calais had not fallen by 14:00 on 26 May, he would withdraw the 10.Panzer division and ask the Luftwaffe to destroy the town. Eventually, the French and British ran out of ammunition and the Germans were able to break into the fortified city at around 13:30 on 26 May, 30 minutes before Schaal's deadline was up. Despite the French surrender of the main fortifications, the British held the docks until the morning of 27 May. Around 440 men were evacuated. The Siege of Calais lasted for four crucial days. However, the delaying action came at a price. Some 60% of Allied personnel were killed or wounded.
Operation Dynamo[]
The Allies launched Operation Dynamo which evacuated the encircled British, French and Belgian troops from the northern pocket in Belgium and Pas-de-Calais, beginning on 26 May. About 28,000 men were evacuated on the first day. The French 1st Army—the bulk of which remained in Lille—owing to Weygand's failure to pull it back along with other French forces to the coast, mounted a long defence of the city, the 50,000 men finally capitulating on 31 May. While the 1st Army was mounting its sacrificial defence at Lille, it drew German forces away from Dunkirk, allowing 70,000 Allied soldiers to escape.[ Total Allied evacuation rates stood at 165,000 on 31 May. The Allied position was complicated by Belgian King Léopold III's surrender the following day, which was postponed until 28 May. The gap left by the Belgian Army stretched from Ypres to Dixmude. Nevertheless, a collapse was prevented and 139,732 British and 139,097 French soldiers were evacuated. Between 31 May and 4 June, some 20,000 British and 98,000 French had been saved. Still, some 30-40,000 French soldiers of the rearguard remained to be captured. The overall total evacuated was 338,226.
During the Dunkirk battle, the Luftwaffe did its best to prevent the evacuation. It flew 1,882 bombing and 1,997 fighter sorties. British losses totalled 6% of their total losses during the French campaign, including 60 precious fighter pilots. The Luftwaffe failed in its task of preventing the evacuation, but had inflicted serious losses on the Allied forces. A total of 89 merchantmen (of 126,518 grt) were lost; the Royal Navy lost 29 of its 40 destroyers sunk or seriously damaged. The Germans lost around 100 aircraft confirmed destroyed, and the RAF 106 fighters. Other sources put Luftwaffe losses in the Dunkirk area at 240.
Confusion still reigned. After the evacuation at Dunkirk and while Paris was enduring a short-lived siege, part of the 1st Canadian Infantry Division was sent to Brittany but was withdrawn after the French capitulation. The British 1st Armoured Division under General Evans, without its infantry which had earlier been diverted to the defence of Calais, had arrived in France in June 1940. It was joined by the former labour battalion of the 51st (Highland) Division and was forced to fight a rearguard action. At the end of the campaign, Erwin Rommel praised the staunch resistance of British forces, despite being under-equipped and without ammunition for much of the fighting.
On 26 February 1945, Hitler claimed he had let the BEF escape as a "sporting" gesture, in the hope Churchill would come to terms. Few historians accept Hitler's word in light of Directive No. 13, which called for "the annihilation of French, British and Belgian forces in the [Dunkirk] pocket".
Fall Rot
French Problems[]
The best and most modern French armies had been sent north and lost in the resulting encirclement; the French had also lost much of their heavy weaponry and their best armoured formations. Overall, the Allies had lost 61 divisions in Fall Gelb. Weygand was faced with the prospect of defending a long front (stretching from Sedan to the Channel), with a greatly depleted French Army now lacking significant Allied support. Weygand had only 64 French and one remaining British division (the 51st Highland) available.[210] Weygand lacked the reserves to counter a breakthrough or to replace frontline troops, should they become exhausted from a prolonged battle on a front of 96 in (2.4 m)965 kilometres. The Germans had 142 divisions to use.
Adding to this grave situation, on 10 June, Italy declared war on France and Britain. The country was not prepared for war and made little impact during the last twelve days of fighting. Italian dictator Benito Mussolini was aware of this and sought to profit from German successes. Mussolini felt the conflict would soon end. As he said to the Army's Chief-of-Staff, Marshal Badoglio, "I only need a few thousand dead so that I can sit at the peace conference as a man who has fought." However, French General René Olrycommanding the Army of the Alps resisted all Italian attacks, and then repulsed German attacks from the Rhone valley.
Collapse of the Weygand line[]
{C}The Germans renewed their offensive on 5 June on the Somme. During the next three weeks, far from the easy advance the Wehrmacht expected, they encountered strong resistance from a rejuvenated French Army.[213] It had fallen back on its communications, and had closer access to repair shops, supply dumps and stores. Moreover, 112,000 evacuated French soldiers were repatriated via the Normandy and Brittany ports. It was some substitute for the lost divisions in Flanders. The French were also able to make good a significant amount of its armoured losses and raised the 1st and 2nd DCR (heavy armoured divisions). De Gaulle's division—the 4th DCR—also had its losses replaced. Morale rose and was very high by the end of May 1940.
A central explanation for the high morale was threefold; most French soldiers that knew about the defeats, and were now joining the line, only knew of German success by hearsay; surviving French officers had increased tactical experience against German mobile units; increased confidence in their weapons after seeing their artillery, which the Wehrmacht post-battle anaylsis recognised as technically very good, and their tanks perform better in combat than the German armour. The French tanks were now known to have heavier armour and armament.
Between 23 and 28 May, they reconstituted the French 7th and 10th Armies. Weygand decided on hedgehog tactics, which were to implement defence in depth operations, and perform delaying strategies designed to inflict maximum attrition on enemy units. He employed units in towns and small villages, as well as major towns and cities, and fortified them 360° along their perimeter. Behind this, the new infantry, armoured, and half-mechanised divisions formed up, ready to counter attack and relieve the surrounded units, which were ordered to hold out at all costs.
Army Group B attacked either side of Paris. Of its 47 divisions it had the majority of the mobile units. In fact, only 48 hours into the offensive, the Germans had not made any major breakthroughs. The Germans had been "stopped in their tracks". On the Aisne, Erich Hoepner's XVI Panzerkorps employed over 1,000 AFVs, two Panzer Divisions and a motorised division against the French. The assault was crude, and Hoepner soon lost 80 out of 500 AFVs in the first attack. The German 4. Armee succeeded in capturing bridgeheads over the Somme river, but the Germans struggled to get over the Aisne. Weygand had organised a defence in depth and frustrated the crossing. In a series of examples at Amiens, the Germans were repeatedly driven back by powerful French artillery concentrations, and came to recognise improved French tactics. Once again, the German Army relied on the Luftwaffe to help decisively, by silencing French guns and enabling the German infantry to inch forward. German progress was made only late on the third day of operations, finally forcing crossings. The French Air Force attempted to bomb them but failed. German sources acknowledged the battle was, "hard and costly in lives, the enemy putting up severe resistance, particularly in the woods and tree lines continuing the fight when our troops had pushed passed the point of resistance". However, south of Abbeville, the French 10th Army under General Robert Altmayer had its front broken and it was forced to retreat to Rouen and south along the Seine river. The rapid German advances were the sign of a weakening enemy. Rommel and his 7. Panzerdivision headed west over the Seine river through Normandy and capturing the port of Cherbourg on 18 June. On the way to Cherbourg, Rommel forced the surrender of the British 51st (Highland) Division on 12 June. In close-quarter combat, the Luftwaffe was struggling to have an impact. However, in an operational sense, they helped disperse French armour. The German spearheads were overextended and vulnerable to counter strokes, but the concentration of the Luftwaffe denied the French the ability to concentrate, and the fear of air attack negated their mass and mobile use by Weygand.
On 10 June, the French government declared Paris an open city. The German 18. Armee now deployed against Paris. The French resisted the approaches to the capital strongly, but the line was broken in several places. Weygand now asserted it would not take long for the French Army to disintegrate. On 13 June, Churchill attended a Allied Supreme War Council Meeting at Tours. He suggested a union between the two countries. It was rejected. On 14 June, Paris fell. Those Parisians who stayed in the city found that in most cases the Germans were extremely well mannered.
On top of this added danger, the situation in the air had also grown critical. The Luftwaffe established air supremacy (as opposed to air superiority) as the French air arm was on the verge of collapse. The French Air Force (Armée de l'Air) had only just begun to make the majority of bomber sorties; between 5 and 9 June (during Operation Paula), over 1,815 missions, of which 518 were by bombers, were flown. The number of sorties flown declined as losses were now becoming impossible to replace. The RAF attempted to divert the attention of the Luftwaffe with 660 sorties flown against targets over the Dunkirk area but losses were heavy; on 21 June alone, 37 Bristol Blenheims were destroyed. After 9 June, French aerial resistance virtually ceased, some surviving aircraft withdrew to French North Africa. The Luftwaffe now "ran riot". Its attacks were focused on the direct and indirect support of the German Army. The Luftwaffe subjected lines of resistance to ferocious assault, which then quickly collapsed under armoured attack.
Collapse of the Maginot line[]
Meanwhile, to the east, Army Group C was to help Army Group A encircle and capture the French forces on the Maginot line. The goal of the operation was to envelop the Metz region, with its fortifications, in order to prevent a French counter offensive from the Alsace region against the German line on the Somme. Guderian's XIX Korps was to advance to the French border with Switzerland and trap the French forces in the Vosges Mountains while the XVI Korps attacked the Maginot Line from the west, into its vulnerable rear to take the cities of Verdun, Toul and Metz. The French, meanwhile, had moved the French 2nd Army Group from the Alsace and Lorraine to the 'Weygand line' on the Somme, leaving only small forces guarding the Maginot line. After Army Group B had begun its offensive against Paris and into Normandy, Army Groups A began its advance into the rear of the Maginot line. On 15 June, Army Group C launched Operation Tiger, a frontal assault across the Rhine river and into France.
German attempts to break open or into the Maginot line prior to Tiger had failed. One assault lasted for eight hours on the extreme north of the line, costing the Germans 46 dead and 251 wounded, while just two French were killed (one at Ferme-Chappy and one at Fermont fortress). On 15 June, the last well-equipped French forces, including the French 4th Army were preparing to leave as the Germans struck. The French now holding the line were skeletal. The Germans greatly outnumbered the French. They could call upon the I Armeekorps of seven divisions and 1,000 artillery pieces, although most were First World War vintage, and could not penetrate the thick armour of the fortresses. Only 88 mm guns could do the job, and 16 were allocated to the operation. To bolster this, 150 mm and eight railway batteries were also employed. The Luftwaffe deployed the V Fliegerkorps to give air support.
The battle was difficult and slow progress was made against strong French resistance. However, each fortress was overcome one by one. One fortress (Schoenenbourg) fired 15,802 75 mm rounds at attacking German infantry. It was the most heavily shelled of all the French positions. Nevertheless, its armour protected it from fatal damage. The same day Tiger was launched, Operation Kleiner Bär began. Five assault divisions of the VII Armeekorps crossed the Rhine into the Colmar area with a view to advancing to the Vosges Mountains. It had 400 artillery pieces bolstered by heavy artillery and mortars. They drove the French 104th and 105th Divisions back into the Vosges Mountains on 17 June. However, on the same day Guderian's XIX Korps reached the Swiss border and the Maginot defences were cut off from the rest of France. Most units surrendered on 25 June, and the Germans claimed to have taken 500,000 prisoners. Some main fortresses continued the fight, despite appeals for surrender. The last only capitulated on 10 July, after a request from General Alphonse Joseph Georges, and only then under protest. Of the 58 major fortifications on the Maginot Line, just 10 were captured by the Wehrmacht in battle.
The Second BEF evacuation[]
- Further information: Operation Cycle and Operation Ariel
The evacuation of the second BEF took place during Operation Ariel between 15 and 25 June. The Luftwaffe, with complete domination of the French skies, was determined to prevent more Allied evacuations after the Dunkirk debacle. I. Fliegerkorps was assigned to the Normandy and Brittany sectors. On 9 and 10 June, the port of Cherbourg was subject to 15 t (17 short tons) of German bombs, whilst Le Havre received 10 bombing attacks which sank 2,949 long tons (2,996 t) of escaping Allied shipping. On 17 June, Junkers Ju 88s—mainly from Kampfgeschwader 30—sank a "10,000 tonne ship" which was the 16,243 long tons (16,504 t) liner RMS Lancastria off St Nazaire, killing some 5,800 Allied personnel. Nevertheless, the Luftwaffe failed to prevent the mass evacuation of some 190,000–200,000 Allied personnel.
Surrender and armistice[]
- Main article: Armistice with France (Second Compiègne)
Discouraged by his cabinet's hostile reaction to a British proposal to unite France and Britain to avoid surrender, and believing that his ministers no longer supported him, Prime Minister Paul Reynaud resigned on 16 June. He was succeeded by Marshal Philippe Pétain, who delivered a radio address to the French people announcing his intention to ask for an armistice with Germany. When Hitler received word from the French government that they wished to negotiate an armistice, he selected the Compiègne Forest as the site for the negotiations.
Compiègne had been the site of the 1918 Armistice, which had ended the First World War with a humiliating defeat for Germany, Hitler viewed the choice of location as a supreme moment of revenge for Germany over France. The armistice was signed on 22 June 1940 in the very same railway carriage in which the 1918 Armistice was signed (it was removed from a museum building and placed on the precise spot where it was located in 1918), Hitler sat in the same chair in which Marshal Ferdinand Foch had sat when he faced the defeated German representatives. After listening to the reading of the preamble, Hitler, in a calculated gesture of disdain to the French delegates, left the carriage, leaving the negotiations to the Chief of Staff of the OKW, Wilhelm Keitel. The armistice and the cease-fire went into effect at 01:35 on 25 June.
Battle of Britain
The Battle of Britain (German: Luftschlacht um England or Luftschlacht um Großbritannien, literally "Air battle for England" or "Air battle for Great Britain") is the name given to the World War II air campaign waged by the German Air Force (Luftwaffe) against the United Kingdom during the summer and autumn of 1940. The objective of the campaign was to gain air superiority over the Royal Air Force (RAF), especially Fighter Command. The name derives from a famous speech delivered by Prime Minister Winston Churchill in the House of Commons: "...the Battle of France is over. I expect that the Battle of Britain is about to begin."
The Battle of Britain was the first major campaign to be fought entirely by air forces, and was also the largest and most sustained aerial bombing campaign to that date. From July 1940 coastal shipping convoys and shipping centres, such as Portsmouth, were the main targets; one month later the Luftwaffe shifted its attacks to RAF airfields and infrastructure. As the battle progressed the Luftwaffe also targeted aircraft factories and ground infrastructure. Eventually the Luftwaffe resorted to attacking areas of political significance and usingterror bombing tactics.
The failure of Germany to achieve its objectives of destroying Britain's air defences, or forcing Britain to negotiate an armistice or an outright surrender, is considered its first major defeat and one of the crucial turning points in the war. If Germany had gained air superiority over England, Adolf Hitler might have launched Operation Sea Lion, an amphibious and airborne invasion of Britain.
Channel Battle's[]
The Kanalkampf comprised a series of running fights over convoys in the English Channel and occasional attacks on the convoys by Stuka dive bombers. It was launched partly because Kesselring and Sperrle were not sure about what else to do, and partly because it gave German aircrews some training and a chance to probe the British defences. These battles off the coast tended to favour the Germans, whose bomber escorts massively outnumbered the convoy patrols. The need for constant patrols over the convoys put a severe strain on RAF pilots and machines. It cost fuel and engine hours and exhausted pilots. Eventually, ship losses became so great the British Admiralty cancelled all further convoys through the Channel. However, these early combat encounters provided both sides with experience. They also gave the first indications some aircraft, such as the Defiant and Bf 110, were not up to the intense dog-fighting that would characterise the battle.
Main Assault[]
The main attack upon the RAF's defences was code-named Adlerangriff ("Eagle Attack").
Poor weather delayed Adlertag ("Eagle Day") until 13 August 1940. On 12 August, the first attempt was made to blind the Dowding system, when aircraft from the specialist fighter-bomber unitErprobungsgruppe 210 attacked four radar stations. Three were briefly taken off the air but were back working within six hours. The raids appeared to show that British radars were difficult to knock out. The failure to mount follow-up attacks allowed the RAF to get the stations back on the air, and the Luftwaffe neglected strikes on the supporting infrastructure, such as phone lines and power stations, which could have rendered the radars useless, even if the towers themselves (which were very difficult to destroy) remained intact.
Adlertag opened with a series of attacks, led again by Epro 210, on coastal airfields used as forward landing grounds for the RAF fighters, as well as 'satellite airfields' (including Manston andHawkinge). As the week drew on, the airfield attacks moved further inland, and repeated raids were made on the radar chain. 15 August was "The Greatest Day" when the Luftwaffe mounted the largest number of sorties of the campaign. Luftflotte 5 attacked the north of England. Believing Fighter Command strength to be concentrated in the south, raiding forces from Denmark and Norway ran into unexpectedly strong resistance. Inadequately escorted by Bf 110s, bombers were shot down in large numbers. North East England was attacked by 65 Heinkel 111s escorted by 34 Messerschmitt 110s, and RAF Great Driffield was attacked by 50 unescorted Junkers 88s. Out of 115 bombers and 35 fighters sent, 16 bombers and 7 fighters were destroyed. As a result of these casualties,Luftflotte 5 did not appear in strength again in the campaign.
18 August, which had the greatest number of casualties to both sides, has been dubbed "The Hardest Day". Following the grinding battles of 18 August, exhaustion and the weather reduced operations for most of a week, allowing the Luftwaffe to review their performance. "The Hardest Day" had sounded the end for the Ju 87 in the campaign. This veteran of Blitzkrieg was too vulnerable to fighters to operate over Britain, and to preserve the Stuka force, Göring withdrew them from the fighting. This removed the main Luftwaffe precision-bombing weapon and shifted the burden of pinpoint attacks on the already-stretched Erpro 210. The Bf 110 proved too clumsy for dogfighting with single-engined fighters, and its participation was scaled back. It would only be used when range required it or when sufficient single-engined escort could not be provided for the bombers.
Göring made yet another fateful decision: to order more bomber escorts at the expense of free-hunting sweeps. To achieve this, the weight of the attack now fell on Luftflotte 2, and the bulk of the Bf 109s in Luftflotte 3 were transferred to Kesselring's command, reinforcing the fighter bases in the Pas-de-Calais. Stripped of its fighters, Luftflotte 3 would concentrate on the night bombing campaign. Göring, expressing disappointment with the fighter performance thus far in the campaign, also made sweeping changes in the command structure of the fighter units, replacing manyGeschwaderkommodore with younger, more aggressive pilots like Adolf Galland and Werner Mölders.
Finally, Göring stopped the attacks on the radar chain. These were seen as unsuccessful, and neither the Reichsmarschall nor his subordinates realised how vital the Chain Home stations were to the defence. It was known that radar provided some early warning of raids, but the belief among German fighter pilots was that anything bringing up the "Tommies" to fight was to be encouraged.
The Blitz
The Blitz (from German, "lightning") was the sustained strategic bombing of Britain by Nazi Germany between 7 September 1940 and 10 May 1941, during the Second World War. The city of London was bombed by the Luftwaffe for 76 consecutive nights and many towns and cities across the country followed. More than one million London houses were destroyed or damaged, and more than 40,000 civilians were killed, half of them in London.[3]
Other important military and industrial centres such as Glasgow, Belfast, Birmingham, Bristol, Cardiff, Coventry, Liverpool, Manchester,Portsmouth, Plymouth, and Southampton, Swansea, also suffered heavy air attacks and high numbers of casualties. Bootle and Hull were the most badly damaged cities after London, with a significant percentage of their buildings destroyed or made uninhabitable. Birmingham and Coventry were heavily targeted due to the Spitfire and tank factories in Birmingham and the many munitions factories in Coventry. Both cities were badly damaged, and the city centre of Coventry was almost completely destroyed.
The bombing did not achieve its intended goals of demoralising the British into surrender or significantly damaging their war economy. In fact, the eight months of bombing never seriously hampered British production and the war industries continued to operate and expand. The Blitz did not facilitate Operation Sea Lion, the planned German invasion of Britain. By May 1941, the threat of an invasion of Britain had passed, and Hitler's attention was focused on Operation Barbarossa in the East.
Several reasons have been suggested for the failure of the German air offensive. First, the Luftwaffe High Command (Oberkommando der Luftwaffe, or OKL) failed to develop a coherent long-term strategy for destroying Britain's war industries. It frequently switched from bombing one type of industry to another, and no sustained pressure was put on any one of them. Second, the Luftwaffe was not equipped to carry out a long-term strategic air campaign. It was not armed in depth, and its intelligence on British industry and capabilities was poor. All of these shortcomings denied the Luftwaffe the ability to make a strategic difference.
Italian conquest of British Somaliland
The Italian force attacking British Somaliland in August 1940 was commanded by Lieutenant General Guglielmo Nasi, General Officer Commanding Eastern Sector. The force included twenty-three colonial battalions in five brigades, three Blackshirt battalions, and three bands (bande) of native troops. The Italians also had armoured vehicles (a small number of both light and medium tanks), artillery, and, most important, superior air support. The Italians numbered about 24,000.
On Italy's declaration of war in June 1940, the British forces in Somaliland had been placed under the command of Lieutenant-Colonel Arthur Reginald Chater, the commander of the Somaliland Camel Corps. At the start of August, the newly-promoted Brigadier Chater commanded a contingent of about 4,000 soldiers comprising the lightly armed Somaliland Camel Corps, the 2nd (Nyasaland) Battalion King's African Rifles(KAR), the 1st Battalion Northern Rhodesian Regiment (KAR), the 3/15th Punjab Regiment and 1st East African Light Battery (four 3.7 in (94 mm) howitzers). They were joined from Aden on 7 August by the 1/2nd Punjab Regiment and 8 August by 2nd Battalion Black Watch. Chaters' force was not only critically short of artillery but it had no tanks or armoured cars nor did it have any anti-tank weapons to oppose the Italian medium and light tanks.
Invasion of French Indochina[]
{C}{C}{C Within a few hours, columns from the IJA 5th Division under Lieutenant-General Akihito Nakamura moved over the border at three places and closed in on the railhead at Lang Son, near Longzhou. This contravened the new agreement. In the Battle of Lang Son, a brigade of French Indochinese colonial troops and Foreign Legionaires opposed the IJA until 25 September. The Japanese victory opened the way to Hanoi. Still the Vichy French had defenders in the north and south, and fresh battalions in position on the route from Lang Son to Hanoi.
On 23 September, Vichy France protested the breach of the agreements by the IJA to the Japanese government.
On the morning of 24 September, Japanese aircraft from aircraft carriers in the Gulf of Tonkin attacked French positions on the coast. A Vichy envoy came to negotiate; in the meantime, shore defenses remained under orders to open fire on any attempted landing.
On 26 September, Japanese forces came ashore at Dong Tac, south of Haiphong, and moved on the port. A second landing put tanks ashore, and Japanese planes bombed Haiphong, causing some casualties. By early afternoon the Japanese force of some 4,500 troops and a dozen tanks was outside Haiphong.
By the evening of 26 September fighting had died down. Japan took possession of Gia Lam Airbase outside Hanoi, the rail marshalling yard on the Yunnan border at Lao Cai, and Phu Lang Thuong on the railway from Hanoi to Lang Son, and stationed 900 troops in the port of Haiphong and 600 more in Hanoi. Japanese forces remained in Indochina until the end of World War II.
Battle of Dakar[]
On September 23, the Fleet Air Arm dropped propaganda leaflets on the city of Dakar. Then, Free French aircraft flew off Ark Royal and landed at the airport, but their crews were immediately taken prisoner. A boat with representatives of de Gaulle entered the port, but were fired upon. At 10:00, Vichy ships trying to leave the port were given warning shots from Australia. As the ships returned to port the coastal forts opened fire on Australia. This led to an engagement between the British fleet and the forts. In the afternoon Australia intercepted and fired on the Vichy destroyer L'Audacieux, setting it on fire and causing it to be beached.
Also in the afternoon, an attempt was made to set Free French troops ashore on a beach at Rufisque, to the south-east of Dakar. The attack failed due to fog and heavy fire from strongpoints defending the beach. General de Gaulle declared he did not want to "shed the blood of Frenchmen for Frenchmen" and called off the assault.
During the next two days, the Allied fleet continued to attack the coastal defences and the Vichy forces continued to defend them. Richelieu was hit by two 15" shells from Barham. On the first day of action guns 7 and 8 in turret number 2 of Richelieu failed on the first round. For day 2, the crews were switched and main turret number 1 was used. Lower propellant charges were used but these gave a significant reduction in range and caused problems of fire control. Over the two days Richelieu fired a total of 24 rounds. No hits were recorded by Richelieu.
During these engagements, two Vichy submarines (Persée and Ajax) were sunk, and a destroyer damaged.
The Allied fleet also suffered damage: Resolution was torpedoed by the Bévéziers and Barham was hit by two shells from the coastal defence batteries which had been manned by crew from the No 1 main turret of Richelieu. Two cruisers were also damaged.
Overall, the Battle of Dakar did not go well for the Allies. The Vichy forces did not back down. Resolution was so heavily damaged she had to be towed to Cape Town. During most of this conflict, bombers of the Vichy French Air Force (Armée de l'Air de Vichy), based in North Africa, bombed the British base at Gibraltar. On September 24 about 50 aircraft dropped 150 bombs while on September 25 about 100 aircraft dropped 300 bombs on the harbor and dockyards. Most of the bombs missed. Some damage, but few casualties were caused. Only the British armed trawler HMTStella Sirius was sunk by direct hits. Finally, the Allies withdrew, leaving Dakar and French West Africa in Vichy hands.
Greco-Italian War[]
The Greco-Italian War (Greek: Ελληνοϊταλικός Πόλεμος Ellinoitalikós Pólemos or Πόλεμος του Σαράντα Pólemos tou Saránda, "War of '40", Italian: Guerra di Grecia, "War of Greece") was a conflict between Italy and Greece which lasted from 28 October 1940 to 23 April 1941. It marked the beginning of the Balkans Campaign of World War II. From 6 April 1941 intervention of Nazi Germany onwards, the conflict is known as the Battle of Greece.
Battle of Pindus[]
The primary objective of the Julia Division was to advance towards the Pindus mountain range and to capture the strategic pass at the town ofMetsovo. This move would have a crucial effect on the outcome of the battle, since it would break the Greek supply lines and separate the Greek forces in Epirus from those in Macedonia. The Julia Division managed to cover 40 kilometres (25 mi) of mountain terrain in icy rain and captured the village of Vovousa, but couldn't reach Metsovo. On November 2, Colonel Davakis, was gravely wounded during a reconnaissance mission near Fourka, however, it had become clear for the Italians that they lacked the manpower and the supplies to continue in the face of the arriving Greek reserves.
On November 3, the Italian spearhead, after the initial advance, was surrounded from all sides. The commander of the Julia Division requested from the Italian headquarters relief attacks and Italian reserves were thrown into the battle. However, reinforcements from Albania were unable to reach the cut-off Italian forces and the Julia Division sustained heavy losses. In the meantime, Greek reinforcements were arriving in the Pindus sector, while the assistance of the local population, including men, women, and children, was invaluable. The situation became difficult for the Italians and their pocket came under pressure from Greek units that had advanced to the area, while the Julia Division was virtually wiped out. The villages that had been initially captured during the Italian advance, Samarina and Vovousa, were recaptured by the advancing Greek forces on November 3 and 4. Within less than a week, the remaining Italian troops were in roughly the same positions they occupied before the declaration of the war.
By 13 November, the entire frontier area had been cleared of Italian units, thereby ending the Battle of Pindus in a complete Greek victory. Highly significant for the Greek success was the failure of the Italian air force to disrupt the mobilization and the deployment of the Greek forces. Due to this factor, the geographical and technical obstacles faced by the Greeks to transport men and material to the front proved surmountable.
Battle of Gabon[]
On 8 November 1940, the Shoreham class sloop HMS Milford sank the Vichy submarine Poncelet. Koenig's force landed at Pointe La Mondah. His forces included French Legionnaires (including the 13th Foreign Legion Demi-Brigade), Senegalese, and Cameroonian troops.
On 9 November, Lysander aircraft operating out of Douala bombed the Libreville aerodrome. The aerodrome was eventually captured, despite the stiff resistance encountered by Koenig's force during their approach. Free French naval forces, including the colonial sloop Savorgnan de Brazzaattacked and sank the Vichy colonial sloop Bougainville. Bougainville was the sister ship to Savorgnan de Brazza.
On 12 November, the final Vichy forces capitulated at Port Gentil. Governor Masson—despairing of his actions—committed suicide.
Battle of Taranto[]
The first wave of 12 A/C led by Lt.-Cdr. M. W. Williamson, 815 Sqn. left Illustrious just before 21:00, followed by a second wave of nine about 90 minutes later. Of the second wave, one turned back with a problem with its auxiliary fuel tank, and one aircraft launched 20 minutes late, after requiring emergency repairs to damage from a minor taxiing accident.
The first wave, which consisted of a mixture of six armed with aerial torpedoes and six with aerial bombs, was split into two sections when three of the bombers and one torpedo bomber strayed from the main force while flying through thin clouds. The smaller group continued to Taranto independently. The main group approached the harbor at 22:58. A flare was dropped east of the harbor and the flare dropper and another aircraft made a dive bombing attack to set fire to oil tanks. The next three aircraft, led by Lt Cdr K. Williamson RN of 815 Squadron, attacked over San Pietro Island, and struck the battleship Conte di Cavour with a torpedo that blasted a 27 ft (8.2 m) hole in her side below her waterline. Williamson's plane was shot down by the anti-aircraft guns of the Italian battleship. The two remaining aircraft in this sub-flight continued, dodging barrage balloons and receiving heavy anti-aircraft fire, to press home an unsuccessful attack on the battleship Andrea Doria. The next sub-flight of three attacked from a more northerly direction, attacking the battleship Littorio, hitting it with two torpedoes and launching one torpedo at the flagship—the battleship Vittorio Veneto—which failed to hit its target. The bomber force led by Capt O. Patch RN next attacked. They found the targets difficult to identify but attacked two cruisers from 1,500 ft (460 m) followed by another aircraft which straddled four destroyers.
The second wave of 9 A/C led by Lt.-Cdr. J. W. Hale, 819 Sqn.was now approaching, two of the four bombers also carrying flares, the remaining five carrying torpedoes. Flares were dropped shortly before midnight. Two


aircraft aimed their torpedoes at Littorio, one of which hit home. One aircraft, despite having been hit twice by anti-aircraft fire, aimed a torpedo at Vittorio Veneto but that torpedo missed its target. One aircraft hit the battleship Caio Duilio with a torpedo blowing a large hole in her hull and flooding both of her forward magazines. The aircraft flown by Lt G. W. L. A. Bayly RN was shot down by the heavy cruiser Gorizia while following the attack on Littorio, this being the only aircraft lost from the second wave. The final aircraft to arrive on the scene 15 minutes behind the others made a dive bombing attack on an Italian cruiser despite heavy anti-aircraft fire, and then made a safe getaway, returning to Illustrious at 02:39.
Of the two aircraft shot down, the two crew members of the first plane were taken prisoner. The other two fliers died in their plane.
The Italian battleships received very heavy damage:
- Conte di Cavour had a 12 ×8 m (39 ×26 ft) hole in the hull, and in the six hours following the attack all the attempts to save her failed (later, she was raised and partially repaired, but never regained service in the Navy, so she was in effect lost that night);
- Andrea Doria had only a slightly smaller hole (11 ×7 m (36 ×23 ft)) and was saved by running her aground;
- Littorio had considerable flooding caused by three torpedo strikes. Despite the underwater protection (Pugliese system, standard in all the Italian battleships), the damage was extensive. She suffered 32 lives lost and many wounded, and the ship was totally disabled. She was holed in three places, once on the port side (7 ×1.5 m (22 ft 10 in × 4 ft 10 in)), and twice on the starboard side (15 ×10 m (49 ×33 ft) and 12 ×9 m (39 ×30 ft)). She too was saved by running her aground. Despite this, in the morning the ship's bows were totally submerged.
Italian defences fired roughly 13,489 shells from the land batteries, while several thousand were fired from the ships. The anti-aircraft barrage was, at least on paper, extremely powerful, having 101 guns and 193 machine-guns. There were also 87 balloons, but strong wind caused the loss of 60 of these. Additionally, only 4.2 km (2.3 nmi; 2.6 mi) of anti-torpedo nets were actually fielded around the ships, up to 10 m (33 ft) in depth, while the need was for 12.8 km (6.9 nmi; 8.0 mi). Finally, there were also 13 aerophonic stations and 22 searchlights (ships had two searchlights each).
Later, Littorio was repaired with all available resources, while repairs to the older battleships proceeded at a much slower pace (seven months for Doria, never completed for Cavour). In all, the Swordfish attack was made with just 21 aircraft. Two Italian aircraft were destroyed by the bombing, and two unexploded ordnance hit cruiser Trento and destroyer Libeccio. Near misses damaged destroyerPessagno.
In the meanwhile, X-Force cruisers attacked an Italian convoy. This force had three cruisers (HMS Ajax, Orion and HMAS Sydney) and two Tribal-class destroyers (HMS Nubian and Mohawk). Just past midnight, they met and destroyed four Italian merchantmen (Capo Vado, Catalani, Locatelli and Premuda), damaging the torpedo-boat Fabrizi, while the auxiliary cruiser RAMB III fled.
Cunningham and Lyster wanted to strike Taranto again the next night with Swordfish (six torpedo-bombers, seven bombers, and two flare-dispensers), but bad weather prevented the action.
Hundred Regiments Offensive[]
The Japanese North China Area Army estimated the strength of communist regulars to be about 88,000 in December 1939. Two years later, they revised the estimate to 140,000. On the eve of the battle, the Communist forces grew to 400,000 men strong, in 115 regiments. The extraordinary success and expansion of the 8th Route Army against the Japanese had Zhu De and the rest of the military leadership hoping that they could engage the Japanese army and win.


By 1940, growth was so impressive that Zhu De ordered a coordinated offensive by most of the communist regulars (46 regiments from the 115th Division, 47 from the 129th, and 22 from the 120th) against the Japanese-held cities and the railway lines linking them. From 20 August-10 September, communist forces attacked the railway line that separated the communist base areas, chiefly those from Dezhou toShijiazhuang in Hebei, Shijiazhuang to Taiyuan in central Shanxi, and Taiyuan to Datong in northern Shanxi.
They succeeded in blowing up bridges and tunnels and ripping up track, and went on for the rest of September to attack Japanese garrisons frontally. About 600 mi (970 km) of railways were destroyed, and the Chingching coal mine—which was important to the Japanese war industry—was rendered inoperative for six months. It was the greatest victory the CCP fought and won during the war.
However, from October to December, the Japanese responded in force, reasserting control of railway lines and conducting aggressive "mopping up operations" in the rural areas around them.
War from 1941 (January)-1942 (January)[]
Battle of Koh Chang[]
The Battle of Koh Chang took place on 17 January 1941 during the French-Thai War and resulted in a decisive victory by the French over theRoyal Thai Navy. During the battle, a flotilla of French warships attacked a smaller force of Thai vessels, including a coastal battleship.
In the end, Thailand lost two ships sunk and one heavily damaged and grounded. Within a month of the engagement, the Vichy French and the Thais negotiated a peace which ended the war.
Background[]
The Royal Thai Navy had been modernized with the recent acquisition of vessels from Japan and Italy. The major units of the fleet included two Japanese-built armoured coast defence vessels, which displaced 2,500 long tons (2,500 t) and carried 8 in (200 mm) guns, two older British-built armoured gunboats with 6 in (150 mm) guns, 12 torpedo boats and four submarines.
Thai Navy;
In addition, the Royal Thai Air Force had in its inventory over 140 aircraft, including relatively modern Mitsubishi Ki-30 light bombers, which saw extensive service against the French. These aircraft in themselves were quite capable of causing severe damage to any French naval mission which might be mounted. Other less capable aircraft in the Thai inventory included P-36 Hawk fighters , 70 Chance-Vought O2U-2 Corsairbiplanes, six Martin B-10 bombers and several Avro 504 trainers.
French Navy;
Despite the strengths of the Thai forces the French Governor General of Indochina and Commander-in-Chief Naval Forces, Admiral Jean Decoux, decided that the naval mission should go ahead. A small squadron, the Groupe Occasionnel, was formed on 9 December 1940 at Cam Ranh Bay, near Saigon, under the command of Capitaine de Vaisseau Régis Bérenger.
The squadron consisted of the light cruiser Lamotte-Piquet, the avisos Dumont d'Urville PG 77 (2) and Amiral Charner PG 81 (2), and the older avisos Tahure and Marne. There was no air cover to speak of, apart from eight Loire 130 seaplanes based at Ream which provided reconnaissance. Additional scouting was provided by three coastal survey craft, and intelligence gleaned from the local fishermen.
Bérenger's squadron began training manoeuvres in Cam Ranh Bay shortly after coming together. Early in the new year, on 13 January 1941, Admiral Decoux formally requested Bérenger to send the squadron against the Thais to act in support of a land offensive planned for 16 January. This operation was intended to throw back Thai forces which had been advancing along the coast. Because of the disparate speeds of the French ships, Bérenger sent the slower sloops on ahead, while he remained in Saigon to complete the final elements of the plan.
Several options were currently being prepared, the Admiralty in Paris having recently given its formal blessing to the use of naval forces in support of the army. The final planning meeting of the 13th saw an immediate delay in the execution of the operation for 24 hours. With the plans finalised, Bérenger sailed inLamotte-Picquet, the delay in the start of the operation allowing him to refuel at Cap St. Jacques before the rendezvous with the slower ships at 16:00 on the 15th, 20 mi (17 nmi; 32 km) North of Poulo Condore.
The orders from Admiral Decoux were simple: "attack the Siamese coastal cities from Rayong to the Cambodian frontier to force Siamese government to withdraw its forces from the Cambodian frontier". On the evening of the 15th, following a final conference on board the flagship, the squadron weighed anchor at 21:15 and closed the Thai coast at 14 kn (16 mph; 26 km/h), the best speed of the sloops. The French ships remained undetected as they entered the Gulf of Siam, but their quarry was not as fortunate. The Loire 130s from Ream had completed a sweep of the coast from Trat to Sattahib. They had located one coast defence ship and two torpedo boats at Koh Chang, and one gunboat, four torpedo boats and two submarines at Satahib.
Their report was sent to Marine Headquarters in Saigon, who re-transmitted the report to the Lamotte-Picquet. Bérenger considered his options and decided on a dawn attack on the Thai ships at Koh Chang. He ignored Sattahib because the sloops could not reach there until later in the day, by which time the element of surprise would have been lost. Also, the contribution the harbour defences at Satahib could make was unknown. Moreover, the force at Koh Chang was the weaker of the two and offered the best chance of victory.
Bérenger's plan of attack was as follows. The squadron would approach at dawn from the South West. Because the anchorage at Koh Chang was surrounded by islands and islets, many of which were over 200 metres high, the squadron would break up and use the cover of the islands to concentrate fire on portions of the Thai squadron whilst covering all the avenues of escape. The easternmost channel was regarded as the most likely route by which a breakout would be made — this was the most suitable route and was also the area in which the recce report had placed the largest Thai ships. Lamotte-Picquet would head to the eastern side of the anchorage to block this route whilst the colonial sloops blocked the centre and pounded the Thai ships there. The smaller French ships would concentrate to the West.
The Battle[]
The French squadron closed on the anchorage at 05:30 on 17 January. At 05:45, they split into the three groups as planned, Lamotte-Picquet heading for the eastern part of the anchorage, Dumont d'Urville and Amiral Charner continuing to the central position and Tahure and Marne heading for the western side. Conditions were perfect — the weather was fine, the seas calm and almost flat. Sunrise was due at 06:30, and the scene was lit only by the first rays of light on the horizon and by the dim moonlight.


Lamotte-Piquet.
A final aerial reconnaissance of the target area had been arranged using one of the Ream-based Loire 130s. Lamotte-Picquet carried two such aircraft, but these could not be launched due to catapult problems. At 06:05, the Loire 130 overflew the anchorage and reported two torpedo ships. This came as a nasty surprise to the French — previous reports led them to believe that only one of the torpedo boat was present, but during the night, HTMSChonburi had arrived to relieve Chantaburi, which was to return to Satahib later that day for repairing.
Once their presence had been passed to Lamotte-Picquet the aircraft attempted an attack of its own using bombs, but was forced off by a heavy barrage of AA fire. The effect of this mission was double edged — the French were now aware that they faced both the Thai units, but the element of surprise had been wasted and there was still thirty minutes to go until sunrise. Caught napping by the oncoming French the Thais desperately began to raise steam and prepared to slip their anchors, but the torpedo boats were sunk by gunfire from Lamotte-Picquet.
At 06:38, the lookouts in Lamotte-Picquet spotted the coastal defence ship HTMS Thonburi, heading northwest, at a range of 10,000 metres (11,000 yd). A running battle ensued, with the fire of both ships frequently blocked by the towering islets. The fire from the Thai ship was heavy, but inaccurate. By 07:15, fires could be seen on Thonburi, which then found herself engaged not only by the cruiser but also by the sloops. In the beginning of the engagement, a lucky shot from Lamotte-Picquet killed the captain of Thonburi, Commander Luang Phrom Viraphan, and disrupted her operations. Believing they had a better chance of hurting the smaller French ships the Thais shifted their fire onto Admiral Charner, which soon found 8 in (200 mm) salvoes falling around her.
Thonburi shifted fire back to Lamotte-Picquet after a salvo from the French cruiser put her after turret out of action. Soon she reached the safety of shallow water which the French ships could not enter for fear of grounding, but it all came too late for the hapless Thais as Thonburi was burning fiercely and listing heavily to starboard. Her remaining turret was manned and hand and could not fire unless the maneuvers of the ship put it in appropriate position. At 07:50, Lamotte-Picquet fired a final salvo of torpedoes at 15,000 metres (16,000 yd), but lost sight of Thonburi behind an island from which she was not seen to emerge.
For the next hour, the French ships patrolled the area, picking up survivors and ensuring their victory was total. At 08:40, Bérenger ordered the squadron to head for home, but this coincided with the start of the expected Thai air attacks. Thai planes dropped several bombs close to Lamotte-Picquet and scored one hit, although the bomb failed to explode. Lamotte-Picquet's anti-aircraft guns put up a vigorous barrage and further attacks were not pressed home. The final raid departed at 09:40, after which the victorious French squadron returned to Saigon.
Battle of Litani River
The Battle of the Litani River (9 June 1941) was a battle of the Second World War that took place between during the advance on Beirutduring the Syria-Lebanon campaign. The Australian 7th Division, commanded by Major-General John Lavarack, crossed the Litani River and later clashed with Vichy French troops.
During the first hour of 8 June 1941, Australian forces in northern Palestine crossed the border into southern Lebanon. Guides from the Palmachsupported many of the lead units. Initial resistance from Vichy forces south of the Litani River was scattered and generally disorganised.
The 21st Australian Brigade advanced along the coast road heading for Beirut and attempted to cross the Litani River. The crossing was stubbornly contested by the Vichy French. The Australians came under fire from two Vichy French destroyers, the Guépard and the Valmy. Australian artillery had to drive off the warships which had come inshore to shell the advancing troops.
On 9 June, because the bridge over the Litani River was destroyed by Vichy French, two platoons of the Australian 7th Division had to cross the Litani River in canvas boats. They crossed the river successfully and captured several Vichy French positions on the far shore.
The British No. 11 (Scottish) Commando, under the command of Lieutenant Colonel R.L.Pedder (Highland Light Infantry) who was subsequently killed in action during the operation, were transported by the HMS Glengyle landing ship. On 9 June, after a delay caused by rough seas, the commandos landed on the coast near the Litani River and led the crossing.
Battle of Damascus
The plan called for the troops of 5th Indian Brigade to advance northwards from their positions at Aartouz on the Quneitra to Damascus road cross country west of the road towards Mezzeh. Mezzeh was a large village on the junction with the Beirut to Damascus road, some 3 miles west of Damascus. Their supplies, ammunition and anti-tank element would follow closely behind on the road proper. Meanwhile, the Free French forces would advance along the Kissoué - Damascus road to capture Qadim as a preliminary to entering Damascus, some


Sketch map of the area of the Battle of Damascus, June 1941
four miles further north.
At 20.30 on 18 June, the Indian troops set out and skirmished their way north. They reached Mezzeh at 04.15. By 05.30, after an hour of fierce hand to hand fight, Mezzeh was captured. However, there was a major problem: the equipment and anti-tank guns travelling up the main road had earlier got ahead of the infantry and run into a Vichy roadblock where most of the vehicles were knocked out. Furthermore, the planned advance by the Free French to Qadim had been delayed so that the Vichy forces were able to concentrate on the Mezzeh action, applying intense pressure on the Allied position whilst thwarting any attempt to relieve them and bring in vitally needed anti-tank weapons.
On 19 June, Maj.-Gen. John Evetts, commander of British 6th Infantry Division, arrived to relieve Lloyd and take control of the Allied forces east of Merdjayoun. With the depletion suffered by the Indian brigade he requested that British 16th Infantry Brigade be detached from 7th Australian Division and sent to his sector.
By nightfall on 19 June, the Allied position at Mezzeh was desperate. Ammunition was running low, no food had been eaten for 24 hours, casualties were severe, and medical supplies exhausted. During the night (when Vichy attacks were suspended) three men managed to reachGentforce headquarters with the news of the position in Mezzeh. Early on 20 June, Brigadier Lloyd, having handed over to Evetts, resumed command of 5th Indian Brigade and sent a force comprising two companies from the 3/1st Punjab Regiment, two companies of French Marines and a battery of artillery to fight its way through to Mezzeh. But they could not blast a way through and they progressed only slowly against determined opposition from French tanks. A Free French attack on Qadim the previous night had failed expensively so that they were unable to exert pressure on Qadim that morning to draw Vichy forces away from Mezzeh. That night, however, the Free French with support from British anti-tank and anti-aircraft guns and an Australian machine-gun battalion, advanced against light Vichy defences and captured Qadim in the morning of 21 June.
Through the night of 19—20 June, the Indian defenders at Mezzeh had continued to hold out. By 13.30 on 20 June, with ammunition exhausted and having had no rations for 50 hours, they were being shelled at point blank range. A decision was made to ask for a truce to evacuate the wounded, to try to buy time for the relieving column (which could be heard fighting in the distance) to reach them. However, the white flag was mis-read as a signal of surrender by the Vichy forces who rushed the positions of the remaining bayonet-wielding defenders and overpowered them. The relieving column, reinforced by a battalion of Australian infantry, recaptured Mezzeh at 19.00 that evening to find it empty save for the dead.
By noon on 21 June, the Allied forces were in Damascus and the Vichy forces were retreating west along the Beirut road.
Battle of Beirut[]
The Battle of Beirut (12 July 1941) marked the end of hostilities in the Syria-Lebanon campaign of World War II.
On 8 July, even before the fall of Damour, the Vichy French commander—General Henri Dentz—had sought an armistice: the advance on Beiruttogether with the Allied capture of Damascus in late June and the rapid advance of Allied troops into Syria from Iraq in early July to capture Deir ez Zor and then push on towards Aleppo had made the Vichy position untenable. At one minute past midnight on 12 July, a ceasefire came into effect. For all intents and purposes, this ended the campaign and an armistice was signed on 14 July at the "Sidney Smith Barracks" on the outskirts of the city of Acre.
The triumphant entry of the Australian 7th Division into Beirut successfully established the Allied occupation of Lebanon. Beirut later became an important Allied base for Mediterranean naval operations.
Battle of Keren[]
The Battle of Keren (Cheren) was fought as part of the East African Campaign during World War II. The Battle of Keren was fought from 5 February-1 April 1941 between the colonial Italian army defending Eritrea and the invading British and Commonwealth forces. In 1941, Kerenwas a town located in the Italian colony of Eritrea. Keren was of strategic importance to both the Italian and the British forces. The road and railway routes through Keren were the key to access the city of Asmara (colonial capital of Eritrea) and the Red Sea port of Massawa.
First battle: 5 February - 8 February[]
At 08:00 on 1 February 1941, Gazelle Force was held up in crossing the River Baraka some 40 mi (64 km) from

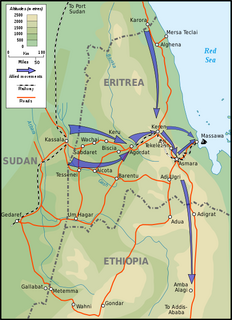
The advance of Platt's forces into Eritrea
Keren where the Ponte Mussolini had been blown and the approaches to the river heavily mined. By noon on 2 February, however, they were across the river and winding up the Ascidera Valley until brought to a halt at the Dongolaas Gorge, some 4 mi (6.4 km) from Keren, where the road had been blocked by the retreating Italians who had blown the overhanging crags to fill the gorge with boulders and rocks.
4th Indian Division's 11th Indian Infantry Brigade arrived on 3 February, and having made reconnaissance the next day, launched their offensive to the left of the gorge on 5 February. The 2nd Queen's Own Cameron Highlanders fought their way to the top of the ridge, feature 1616, in front of Sanchil and the next night, 6 February, the 3/14th Punjab Regiment passed through them and advanced onto Brig's Peak but were counter attacked by elements of the 65 Infantry Division "Savoia Grenadiers" (Granatieri di Savoia) who forced them from their newly taken positions back toward Cameron Ridge which was being reinforced by 1 (Wellesley's)/6th Rajputana Rifles. The ridge became a focus of fighting for the next ten days. The ridge was overlooked in front by Sanchil, to the left by Mount Sammana and even from behind by other mountains along the Ascidera Valley. The Cameron Highlanders and Rajputana Rifles narrowly hung on to their positions despite being under near constant attack and having to carry all food, water and ammunition up 1,500 ft (460 m) across the exposed terrain.
By 6 February, 4th Indian Division's 5th Indian Infantry Brigade had arrived. On 7 February, they attacked the Dologorodoc feature east of the gorge, looping right through the Scescilembi Valley (sarcastically renamed the Happy Valley by the attacking troops) and then thrusting from the south east towrd the ridge joining Mount Zelele and Mount Falestoh, known as Acqua Col. On the night of 7 February, a company of the 4(Outram's)/ 6th Rajputana Rifles—led by Subadar Richhpal Ram (who had assumed command when the company commander had been wounded)—took the col and held it until 04:30 when they ran out of ammunition and were driven back to the rest of the battalion on a lower feature. In turn, later on 8 February and having spent most of the day under heavy artillery and mortar fire, they were obliged to withdraw back to their starting positions.
Second battle: 10 - 13 February[]
On the afternoon of 10 February, 3/1st Punjab Regiment attacked Brig's Peak and by the morning of 11 February were on top of Sanchil. However, the requirement for men to handle and carry supplies, ammunition and wounded meant there were only two platoons to hold the feature. Having endured heavy shelling and mortar fire throughout the day, they were forced off Sanchil and Brig's Peak with heavy casualties by a determined counter attack from the Savoia Grenadiers. Once again the attackers were thrown onto desperate defence on Cameron Ridge.
Despite the failure by the Punjabis to hold the important observation posts on Sanchil, the renewed attack on Acqua Col—planned for 12 February—went ahead. 5th Indian Infantry Division's 29th Indian Infantry Brigade was brought up from Barentu and put under command of 4th Division's Major-General Beresford-Peirse and held in readiness to exploit the hoped-for break-through. At 05:30, supported by an intensive artillery barrage, 4/6th Rajputana Rifles once again led the way. This time, Richhpal Ram was less fortunate and having gained the crest, had a foot blown off and shortly thereafter was mortally wounded. He was awarded a posthumous Victoria Cross for his exploits on the Col. Meanwhile, the 4/11th Sikh Regimentwere pushing up around the side of Acqua Col but the overall attack could not be carried through, lacking the extra impact that might have come from the 2/5th Mahratta Light Infantry which had been diverted to reinforce the hard-pressed defences on Cameron Ridge.
Third battle: 15 - 27 March[]
Platt decided to pause, regroup and train before making a further attempt at Keren. In order to free up road transport to bring forward the necessary stockpiles for a new attack, 5th Indian Division returned to Kessala where it could be maintained by the railhead for a period of intensive training until such time as preparations were complete and the division could be brought forward again for the offensive. Skinners Horse and most of the Motor Machine Gun companies assembled in front of Arressa and Adi Ugri to pose a threat to the Italian line of reinforcement to Keren. From the north,Briggs Force—consisting of two battalions from 4th Indian Division's 7th Indian Infantry Brigade and two Free French battalions—had arrived under Brigadier Briggs, the 7th Indian Brigade commander. After crossing the border into Eritrea on the Red Sea coast, Briggsforce had captured Karora and then moved south to take Kubkub. On 1 March, the force had broken through the Mescelit pass some 15 mi (24 km) northeast of Keren. Briggsforce provided not only a third potential direction of attack to occupy the Keren defenders but also created a threat to Massawa on the coast and pinning valuable reserves there.
Plan of Attack[]
The scene was set for a set-piece battle with Major-General Noel Beresford-Peirse's 4th Indian Infantry Division concentrated on the Sanchil side of the gorge and Lewis Heath's 5th Indian Infantry Division, brought forward from Kessala once again, on the Happy Valley side. The Keren defences had been reinforced with the arrival of 6th Colonial Brigade from Metemma and also the 11th Blackshirt Battalion of the Savoia Grenadiers. The defenders now totaled 25,000 strong facing an attacking force which had grown to more than 13,000. Beresford-Pierce would launch 11th Brigade, expanded to five battalions under command, against the peaks of the Sanchil mass and 5th Brigade against Mount Sammana on the left of his front.
On the 5th Division front, the Italian reinforcements on Dologorodoc meant Happy Valley was dominated by the defenders and the attackers' artillery had had to be withdrawn from their forward positions in the valley to safer locations. Without the artillery, it was no longer considered practical to continue the flanking attack through Acqua Col to threaten the Dologorodoc lines of supply. Instead, Major-General Lewis Heath determined that Fort Dologorodoc would be the key objective for his Indian 5th Infantry Division. Gaining the fort would not only give the attacking forces the artillery observation post to direct fire on both sides of the gorge but would expose the reverse slopes of the Dologorodoc mass (which had been immune to his artillery fire and so a haven to the defenders for supplies and reserves) to direct fire from the fort.
The two offensives were planned to take place one after the other on 15 March so that the full force's artillery could be employed for the preliminary bombardment of them both. At the final meeting on 14 March with his commanders Platt said:
Do not let anybody think this is going to be a walkover. It is not. It is going to be a bloody battle: a bloody battle against both enemy and ground. It will be won by the side which lasts longest. I know you will last longer than they do. And I promise you I will last longer than my opposite number.
Platt Attack[]
At 07:00 on 15 March, the British and Commonwealth troops of 4th Indian Infantry Division attacked from Cameron Ridge making for Sanchil, Brig's Peak, Hog's Back and the three peaks of Mount Sammana. That night, the battle ebbed and flowed with attack and counter-attack inflicting very heavy casualties on both sides.
Meanwhile, on the right, 5TH Indian Infantry Division launched its attack on the Dologorodoc feature at 10:30 on 15 March. 2nd Highland Light Infantry led the attack on the lower features ("Pimple" and "Pinnacle") but made no progress in the daylight because of fire from the overlooking Sanchil peak where the Italian defenders had resolutely beaten off the 11th Brigade assault. They were pinned down, taking casualties and without supply until darkness provided the opportunity to withdraw.


Sketchmap of the Keren battlefield (not to scale)
By moonlight that evening, the attack on Dologorodoc was taken up by 9th Brigade, now commanded by the recently promoted Brigadier Messervy. Heath and Messervy planned a near two battalion attack on Pimple and Pinnacle with a third battalion ready to pass through and strike for the fort.
The capture of Pinnacle that night by the 3/5th Mahratta Light Infantry led by Lieutenant-Colonel Denys Reid (with 3/12th Frontier Force Regiment less two companies under command to take Pimple) is described by Compton Mackenzie in Eastern Epic, his official history of the British Indian Army during the war, as
one of the outstanding small actions of World War II, decisive in its results and formidable in its achievement... Next morning Messervy scrambled up Pinnacle to congratulate Reid and his Mahrattas and wondered how they had been able to scramble up with their equipment against fierce opposition, when he was finding it a pretty tough job without [either]... At the top, when he saw the victors, he was overcome by the splendor of their feat and his combative amber eyes filled with tears.
In the early hours of 16 February, the defenders of Fort Dologorodoc made a fierce counterattack on Pinnacle and Pimple which went on for several hours. Crucially, this left the defences at the fort weakened and whilst the counter attack was taking place, the 2nd West Yorkshire Regiment had made their way over a seemingly impossible knife-edge to surprise the fort's defenders and after a savage fight the fort was captured by 06:30 with 400 prisoners taken. Finally, Platt had the artillery observation point so greatly needed.
Through 16 March, the Italians repeatedly counterattacked whilst 29 Brigade made an unsuccessful attack in the evening to Falestoh and Zeban which was abandoned after dark on 17 March after a day exposed to blistering heat, fierce fighting and no supply. For the next 10 days, the 5th Indian Division position at Fort Dologorodoc—exposed to the enemy on three sides—was subject to intense fighting as the Italians threw in more new units in ultimately unsuccessful attempts to regain this key position.
Meanwhile on the Sanchil feature 4th Division, having been given 10th Indian Infantry Brigade under command, continued to batter away to no avail. On the night of 17 March, having sustained heavy losses, they withdrew from the slopes of Sanchil and Brig's Peak and the damaged 10th Brigade returned to 5th Division to reform. 4th Indian Division continued to hold Hog's Back and Flat Top. Over the next three days, the Italian forces continued to make fierce counter-attacks on both sides of the gorge involving desperate, often hand to hand, fighting.
Final Assault[]
Platt and his commanders decided that the supreme attack should be made through the Dongolaas Gorge. Heath felt that because of its physical defensive advantages, the Italians may have neglected their defenses. On the nights of 16/17 and 17/18 March, escorted engineers reconnoitered the road block and attempted to make a start to clear it. This failed because of interfering fire from the Italian lines. However, the information gathered made clear to Heath that the key to the gorge was not Sanchil but two smaller features (informally named the Railway Bumps) which overlooked the roadblock and could be approached with much less opposition along the railway line from the tunnel below Cameron Ridge.
An attack on the defenders at the head of the gorge was planned to give the sappers and miners the 48 hours they needed free of interference from mortar and machine gun fire required to clear the road. For this Heath would need his full division and had to wait until 10th Brigade had refitted after its mauling on the Sanchil feature. The plan was for 10th Brigade to advance into the gorge whilst 9th Brigade (which was holding the Fort Dologorodoc positions) would move down to take three smaller hills overlooking the far end of the gorge and 29th Brigade would then attack to take Mount Zeban and beyond it to the east Mount Canabai, which looked down on Keren and guarded the road to Asmara. Command of 10th Brigade was taken over by one of Heath's divisional staff officers, Thomas "Pete" Rees while his predecessor, Lieutenant-Colonel Bernard Fletcher was released to form Fletcher Force, a mobile force comprising Central India Horse and 12 Matilda II tanks, which would be used to exploit the planned break-through in the gorge and move rapidly into the defenders' rear position and attack their reserves.
On 24 March, diversionary attacks were made on Sanchil while just before midnight the West Yorkshires and the 3/5th Mahrattas in Fort Dologorodoc moved down to take the lower hills overlooking the gorge. The West Yorkshires were able to take their hill unopposed but the Mahrattas met heavy opposition which was well dug-in. However, by 07:30 all three hills were taken and the gorge's defenses on its south eastern side silenced.
At 03:00 on 25 March, the 2nd Highland Light Infantry and the 4/10th Baluch Regiment on their right advanced from the shelter of the railway tunnel, previously cleared by the sappers and miners, up the gorge. A 100-gun artillery bombardment was raining down on the ridge on Sanchil above (to suppress any defensive fire from this dominating height) and the attack in the gorge achieved complete surprise, with the defenders' attention focused on Sanchil. The 3/2nd Punjab Regiment then advanced between the Baluchis and the West Yorkshire's to clear the gorge. By 05:30, the railway bumps and most of the objectives were captured and the defenders no longer held positions from which to direct fire into the gorge below.
The sappers and miners laboured on the road while the battles on the Sanchil and Dologorodoc features continued. By midday on 26 March, they had completed remaking the road through the gorge.
In the early hours of 27 March, the British artillery turned onto Zeban and Falstoh. 29th Brigade passed through 9th Brigade's positions to launch their attack at 04:30, but when they made their assault they found the defenders had withdrawn and were able to occupy Falestoh Ridge and the two Zeban summits unopposed.
The Italian position was now untenable and by first light the Royal Air Force was reporting their withdrawal along the road from Keren to Asmara. The defenders on the Sanchil ridge were less fortunate and now effectively cut off the Savoia Grenadiers and Bersaglieri were left with no option but surrender. Fletcher Force was in Keren by 10:30 and was then sent in pursuit along the Asmara road.
Battle of Cape Matapan
The Battle of Cape Matapan (Greek: Ναυμαχία του Ταίναρου) was a Second World War naval battle fought from 27–29 March 1941. Thecape is on the southwest coast of Greece's Peloponnesian peninsula. A force of British Royal Navy ships accompanied by several Royal Australian Navy ships, under command of British Admiral Andrew Cunningham, intercepted and sank or severely damaged the ships of the Italian Regia Marina under Admiral Angelo Iachino. The opening actions of the battle are also known in Italy as the Battle of Gaudo.
Prelude[]
The Allied force was the British Mediterranean fleet, consisting of the aircraft carrier HMS Formidable, the modernised World War I battleshipsHMS Barham, Valiant and Warspite (as flagship). The main fleet was accompanied by two flotillas of destroyers:
- 10th Flotilla: HMS Greyhound, Griffin and HMAS Stuart commanded by Commander Hec. Waller, RAN
- 14th Flotilla: HMS Jervis, Janus, Mohawk and Nubian commanded by Philip Mack
Also present were HMS Hotspur and Havock.
A second force, under Admiral Sir Henry Pridham-Wippell, consisted of the British light cruisers HMS Ajax, Gloucester and Orion, the Australian light cruiser HMAS Perth and the British destroyers HMS Hasty, Hereward and Ilex. The Australian HMAS Vendetta had returned toAlexandria.
In addition, Allied warships attached to convoys were available: HMS Defender, Jaguar and Juno waited in the Kithira Channel and Decoy,Carlisle, Calcutta, Bonaventure and HMAS Vampire were nearby.
The Italian fleet was led by Iachino's vessel, the modern battleship Vittorio Veneto. It also included almost the entire Italian heavy cruiser force:Zara (under Vice-Admiral Carlo Cattaneo), Fiume and Pola; four destroyers of the 9th Flotilla (Alfredo Oriani, Giosué Carducci, Vincenzo Gioberti and Vittorio Alfieri). The heavy cruisers Trieste (carrying Vice-Admiral Luigi Sansonetti), Trento and Bolzano were accompanied by three destroyers of the 12th Flotilla (Ascari, Corazziere and Carabiniere), plus the light cruisers Duca degli Abruzzi (Vice-Admiral A. Legnano) and Giuseppe Garibaldi (7th cruiser division) and two destroyers of the 16th Flotilla (namely Emanuele Pessagno and Nicoloso de Recco) fromBrindisi.[2] None of the Italian ships had radar, although several Allied ships did.
The 13th Flotilla of Italian destroyers, Alpino, Bersagliere, Fuciliere, Granatierewas also involved screening the flagship.
Battle[]
On 27 March, Vice-Admiral Pridham-Wippell—with the cruisers Ajax, Gloucester, Orion and Perth and a number of destroyers—sailed from Greek waters for a position south of Crete. Admiral Cunningham with Formidable, Warspite, Barham and Valiant left Alexandria on the same day to meet the cruisers.
The Italian Fleet was spotted by a Short Sunderland flying boat at noon, thus Iachino lost the advantage of surprise. The Italian Admiral also learned that Formidable was at sea thanks to the decryption team aboard Vittorio Veneto. Nevertheless, after some discussion, the Italian headquarters decided to go ahead with the operation, in order to show the Germans their will to fight and confidence in the higher speed of their warships.
Action off Gavdos[]
On 28 March, an IMAM Ro.43 floatplane launched by Vittorio Veneto spotted the British cruiser squadron at 06:35. At 07:55, the Trento group encountered Admiral Pridham-Wippell's cruiser group south of the Greek island of Gavdos. The British squadron was heading to the southeast. Thinking they were attempting to run from their larger ships, the Italians gave chase, opening fire at 08:12 from 24,059 yd (22,000 m). The Italian guns had trouble grouping their rounds, which had little effect. The rangefinders also performed poorly, with the exception of those of Bolzano. After an hour of pursuit, the Italian cruisers broke off the chase and turned northwest, under orders to rejoin Vittorio Veneto. The Allied ships also reversed course, and followed the Italians at extreme range. Iachino's plan was to lure the British cruisers into the range of Vittorio Veneto's guns.


The battleship Vittorio Veneto firing upon the Allied cruisers during the battle
At 10:55, Vittorio Veneto met the Italian cruisers, and immediately opened fire on the shadowing Allied cruisers. She fired 94 rounds from a distance of 25,153 yd (23,000 m), all well aimed, but again with the excessive spreading of her individual salvoes. The Allied cruisers, until then unaware of the presence of a battleship, withdrew, suffering slight damage from 15 in (380 mm) shell splinters. A series of photographs showing the Italian salvoes falling around the Allied warships and taken from HMS Gloucester was published by Life magazine on 16 June 1941.
Air-Attacks[]
By this point, Cunningham's forces, which had been attempting to join up with Pridham-Wippell's, had launched a sortie of Fairey Albacore torpedo bombers from HMS Formidable at 09:38. They attacked Vittorio Veneto without direct effect, but the required manoeuvring made it difficult for the Italian ships to maintain their pursuit. Realising that they might not be so lucky next time, Iachino broke off the pursuit at 12:20, retiring towards his own air cover at Taranto.
A second sortie surprised the Italians at 15:09. Lieutenant-Commander Dalyell-Stead flew his Albacore to 1,094 yd (1,000 m) from Vittorio Veneto, hitting her outer port propeller and causing 4,000 long tons (4,100 t) of water


Vittorio Veneto withdraws from the battle area after being torpedoed by RN aircraft.
to be taken on. The ship stopped while damage was repaired, but was able to get underway again at 16:42, making 19 kn (22 mph; 35 km/h). Cunningham heard of the damage to Vittorio Veneto, and started to pursue her. Dalyell-Stead and his crew were killed when their aircraft was shot down.
A third strike by six Albacores and two Swordfish from 826 and 828 Squadrons on Formidable—as well as two Swordfish from 815 Squadron on Crete—was made between 19:36 and 19:50. A torpedo, apparently dropped by Lieutenant F.M.A. Torrens-Spence, crippled the cruiser Pola, forcing her to stop. Unaware of Cunningham's pursuit, a squadron of cruisers and destroyers were ordered to return and help Pola, formed on Pola's sister ships, Zara and Fiume. The squadron did not start to return towards Pola until about an hour after the order had been given by Iachino, officially due to communication problems, while Vittorio Veneto and the other ships continued to Taranto.
Night Action[]
At 20:15, HMS Ajax´s radar picked up a ship six miles to port, apparently dead in the water; she was the crippled Pola. The bulk of the Allied forces detected the Italian squadron on radar shortly after 22:00, and were able to close without being uncovered. Italian ships were not supposed to meet enemy ships by night and had their main gun batteries disarmed; they also had no radar and could not detect British ships by means other than direct sight. They managed to spot the Allied squadron at 22:20, which they thought to be Italian ships. Therefore the British battleships Barham, Valiant andWarspite were able to close to 3,828 yd (3,500 m) unnoticed by the Italian ships – extremely close range for battleship guns – from where they opened fire. The Allied searchlights illuminated their enemy. Some British gunners witnessed the cruiser's main turrets popping up dozens of metres into the air. After just three minutes, two Italian heavy cruisers—Fiume and Zara—had been destroyed.Fiume sank at 23:30, while Zara was finished off by a torpedo from the destroyer HMS Jervis at 02:40 of 29 March.
Two Italian destroyers, Vittorio Alfieri and Giosué Carducci, were sunk in the first five minutes. The other two destroyers, Gioberti and Oriani, managed to escape, the former with heavy damage. TowingPola to Alexandria as a prize was considered, but daylight was approaching and it was thought that the danger of enemy air attack was too high. The British boarding parties seized a number of the much needed Breda anti-aircraft machine guns.
Pola was eventually sunk with torpedoes by the destroyers Jervis and Nubian after her crew was taken off, shortly after 04:00. The only known Italian reaction after the shocking surprise was a fruitless torpedo charge by some destroyers and the aimless fire of one of Zara's 40 mm guns in the direction of the British warships.
The Allied ships took on survivors, but left the scene in the morning, fearing Axis air strikes. Admiral Cunningham ordered a signal to be made on the Merchant Marine emergency band. This signal was received by the Italian High Command. It informed them that due to air strikes the Allied ships had ceased their rescue operations, and it granted safe passage to a hospital ship for rescue purposes. The location of remaining survivors was broadcast and the Italian hospital ship Gradisca came to recover them.
Allied casualties during the battle were a single torpedo bomber shot down by Vittorio Veneto's 3.5 in (89 mm) anti-aircraft batteries, with the loss of the three-man crew. Italian losses were up to 2,303 sailors, most of them from Zara and Fiume. The Allies rescued 1,015 survivors, while the Italians saved another 160.
Battle of Denmark Strait
The Battle of the Denmark Strait was a Second World War naval battle between ships of the Royal Navy and the German Kriegsmarine, fought on 24 May 1941. The British battleship HMS Prince of Wales and the battlecruiser HMS Hood fought the German battleship Bismarckand the heavy cruiser Prinz Eugen, both of which were attempting to break out into the North Atlantic to destroy Allied merchant shipping.
Less than 10 minutes after the British opened fire, a shell from Bismarck struck Hood near her aft ammunition magazines. Soon afterwardsHood exploded, and sank within three minutes with the loss of all but three of her crew. Prince of Wales continued to exchange fire withBismarck but suffered serious malfunctions in her main armament as the battleship had not fully worked up after being completed in late March 1941. This, combined with the effects of the battle, caused her to break off the engagement. Bismarck, damaged but still very much operational, declined to chase Prince of Wales and instead headed for the Atlantic along with Prinz Eugen.
Plan gone Awry[]
Holland's battle plan was to have Hood and Prince of Wales engage Bismarck while Suffolk and Norfolk engaged Prinz Eugen (which, Holland assumed, still steamed behind Bismarck and not ahead of her). He signalled this to Captain John C. Leach of Prince of Wales but did not radio Rear Admiral Frederic Wake-Walker, who as Commander of the 1st Cruiser Squadron directed Suffolk and Norfolk for fear of disclosing his location. Instead, he observed radio silence. Holland hoped to meet the enemy at approximately 02:00. Sunset in this latitude was at 01:51. Bismarck and Prinz Eugen would be silhouetted against the sun's afterglow while Hood and Prince of Wales could approach rapidly, unseen in darkness, to a range close enough not to endanger Hood with plunging fire from Bismarck. The Germans would not expect an attack from this quarter, giving the British the advantage of surprise.
This plan's success depended on Suffolk's continually unbroken contact with the German ships. Suffolk lost


Last picture of Hood as a fighting unit, sailing toward her rendezvous with the Bismarck. In the foreground Prince of Wales 'X' turret can be seen. The guns in the photo appear to be from a triple turret, but untrimmed versions of this photo reveal that it is a quad, with one gun independently elevated to a position out of view.
contact, however, beginning at 00:28. For 90 minutes, Holland neither sighted the enemy nor received any further news from Norfolk or Suffolk. Reluctantly, he ordered Hood and Prince of Wales to turn south-south-west while the destroyers would continue searching to the north.
Before contact was re-established, the two squadrons missed each other by a hairsbreadth. Had the German ships not altered course to the west at 01:41 to follow the line of the Greenland icepack, the British would have intercepted them much earlier than they did. The British destroyers were just 10 mi (8.7 nmi; 16 km) to the southeast when the Germans made this course change. Had visibility not been reduced to 3–5 mi (2.6–4.3 nmi; 4.8–8.0 km), the German ships would likely have been spotted.
Just before 03:00, Suffolk regained contact with Bismarck. Hood and Prince of Wales were 35 mi (30 nmi; 56 km) away, slightly ahead of the Germans. Holland signalled to steer toward the Germans and increased speed to 28 kn (32 mph; 52 km/h). Suffolk's loss of contact had placed the British at a disadvantage. Instead of the swiftly closing head-on approach Holland had envisioned, he would have to converge at a wider angle, much more slowly. This would leave Hood vulnerable to Bismarck's plunging shells for a much longer period. The situation worsened further when, at 03:20, Suffolk reported that the Germans had made a further course alteration to the west, placing the German and British squadrons almost abeam of each other.
At 05:35, lookouts on Prince of Wales spotted the German ships 17 mi (15 nmi; 27 km) away. The Germans, already alerted to the British presence through their hydrophonic equipment, picked up the smoke and masts of the British ships 10 minutes later. Holland at this point had the option of joining Suffolk in shadowing Bismarck and waiting for Tovey to arrive with King George V and other ships to attack or to order his squadron into action, which he did at 05:37. The rough seas in the Strait kept the destroyers' role to a minimum. The cruisersNorfolk and Suffolk would be too far behind the German force to reach the battle.
The Battle Begins[]
Hood opened fire at 05:52 at a distance of approximately 26,500 yd (24,200 m). Holland had ordered firing on the leading ship, Prinz Eugen, believing from her position that she was Bismarck. Holland soon amended his order and directed both ships to engage the rear ship, Bismarck. Prince of Wales had already correctly identified and targeted Bismarck, whereas Hood is believed to have continued to fire at Prinz Eugen for some time.


The original track chart of HMS Prince of Wales for the battle of the Denmark Strait (click to enlarge). Note the manuscript additions
Holland, himself a gunnery expert, was well aware of the danger posed by Hood's weak horizontal protection. Therefore, he wanted to reduce the range as quickly as possible. At a shorter range, the trajectory of Bismarck's shells would be flatter and they would be more likely to hit the sides of the ship rather than the decking, or to glance off the top deck. However, he closed the range at an angle that placed the German ships too far forward of the beam. This meant he could use only 10 of his capital ships' 18 heavy guns while presenting the Germans more at which to aim than necessary. Those 10 guns became nine when a defect in one of Prince of Wales' forward guns rendered it inoperative after the first salvo. Both Suffolk and Norfolk attempted to engageBismarck during the action, but both were out of range and neither cruiser had a sufficient speed advantage over Bismarck to rapidly close the range during the brief engagement.
The Germans also had the weather gauge, meaning the British ships were steaming into the wind, spray drenching the lenses of Prince of Wales "A" turret' 42 ft (13 m) Barr and Stroud coincidence rangefinder and both British ships' "B" turret 30 ft (9.1 m) rangefinders. This necessitated using smaller 15 ft (4.6 m) rangefinders in the director towers instead. In addition, Admiral Holland had Prince of Wales stay close to Hood, conforming to Hood's movements instead of varying course and speed. This made it easier for the Germans to find the range to both British ships, although it would have aided Holland's gunners if they had both fired upon Bismarck as originally planned, since they could then precisely time each other's salvos to avoid mistaking one ship's fire for the other. They could also use Concentration Fire, where both ships' main armament salvos would be controlled by one ship's fire control computer, probably Prince of Wales' modern Admiralty Fire Control Table.
Prince of Wales struck her target first. She would ultimately hit Bismarck three times. One shot struck the commander's boat and put the seaplane catapult amidships out of action (the latter damage not being discovered until much later, during an attempt to fly off the ship's War Diary on the eve of her final battle). The second shell passed through the bow from one side to the other without exploding. The third struck the hull underwater and burst inside the ship, flooding a generator room and damaging the bulkhead to an adjoining boiler room, partially flooding it. These last hits two caused damage to Bismarck's machinery and medium flooding. More importantly, the damage to the bow cut access to the forward fuel tanks' 1,000 long tons (1,000 t) of fuel oil. It also causedBismarck to trail a visible oil slick and reduced her speed by 2 kn (2.3 mph; 3.7 km/h). Bismarck was soon listing 9° to port and her bow lost 2 m (6.6 ft) of freeboard.
The Germans held fire until 05:55, when both German ships targeted Hood. Admiral Lütjens did not immediately give the order to commence firing. After multiple inquiries by Bismarck's first gunnery officer Korvettenkapitän Adalbert Schneider, "Frage Feuererlaubnis"? (Permission to open fire?) did the commander of Bismarck Kapitän zur See Ernst Lindemann impatiently respond: "Ich lasse mir doch nicht mein Schiff unter dem Arsch wegschießen. Feuererlaubnis!" (I'm not letting my ship get shot out from under my arse. Open fire!) A shell hit Hood's boat deck, starting a sizable fire in the ready-use 4 in (100 mm) ammunition stored there, but this fire did not spread to other areas of the ship or cause the later explosion. Although unconfirmed, it is possible that Hood was struck again at the base of her bridge and in her foretop radar director.
There has been some contention over which German vessel struck Hood at this time. Prinz Eugen, under the command of Kapitän zur See Helmuth Brinkmann, was targeting Prince of Wales by this stage, following an order from the fleet commander. However, Prinz Eugen's Gunnery Officer, Paul Schmalenbach is quoted as confirming that Prinz Eugen's target was Hood.
Sinking of Hood[]
At 06:00, Holland ordered his force to turn once again to port to ensure that the aft main guns on both Hood and Prince of Wales could bear on the enemy. During the execution of that turn, a salvo from Bismarck, fired at a range of about 9 mi (7.8 nmi; 14 km), was seen by men aboard Prince of Wales to straddleHood abreast her mainmast. It is likely that one 15 in (380 mm) shell struck somewhere between Hood's mainmast and "X" turret aft of the mast.
This was immediately followed by a huge pillar of flame that shot upward like a giant blowtorch, in the vicinity of the mainmast. This was followed by an explosion that destroyed a large portion of the ship from amidships clear to the rear of "Y" turret. The ship broke into two. The stern broke away and sank. The bow, pointed upward and pivoting about, followed shortly thereafter. The forward turret did manage to fire one last salvo while upwards, possibly from the doomed gun crew, just before the bow section sank.
Splinters rained down on Prince of Wales .5 mi (0.43 nmi; 0.80 km) away. Hood sank in about three minutes, taking 1,415 men, including Vice-Admiral Holland, with her. Only three of her crew (Ted Briggs, Bob Tilburn and Bill Dundas) survived to be rescued two hours later by the destroyer HMS Electra.
The British Admiralty later concluded that the most likely explanation for the loss of Hood was a penetration of her magazines by a single 15 in (380 mm) shell from Bismarck, causing the subsequent catastrophic explosion. Recent research by submersible craft suggests that the initial explosion was in the after 4 in (100 mm) magazine and that it spread to the 15 in (380 mm) magazines via the ammunition trunks.
It has been suggested from examination of the wreckage, found in 2001, that the magazine explosion in the 4 in (100 mm) armament near the mainmast caused the vertical blast of flame seen there, and this in turn ignited the magazines of the aft 15 in (380 mm) guns that caused the explosion that wrecked the stern. This explosion might have travelled through the starboard fuel tanks, igniting the fuel oil there, setting off the forward magazines and completing the destruction of the ship. The wreck of Hood revealed the bow section bereft of any structure and a huge section of its side is missing, from the 'A' barbette to the foredeck. The midship section had its plates curled outward. Moreover, the main parts of the forward structure including the 600 long tons (610 t) conning tower were found about 1.1 km (0.59 nmi; 0.68 mi) away from the main wreckage. This has sparked theories that the 15 in (380 mm) forward magazines exploded as a result of the force, flames and pressure, caused by the detonation of the aft magazines. A team of marine forensic scientists has found that implosion damage to the forward hull due to the rapid sinking of the Hood, is the most likely cause of the state of the forward hull, and they do not support any theory that the forward magazines exploded.
Prince of Wales Alone[]
Prince of Wales found herself steering towards the sinking Hood. Her commanding officer, Captain Leach, ordered an emergency avoidance turn away fromHood's wreckage. This violent change of course disrupted her aim and put her in a position that made it easier for the Germans to target her. She resumed her previous course, but was now under the concentrated fire of both German ships.
Prince of Wales was struck four times by Bismarck and three times by Prinz Eugen. One shell passed through her upper superstructure, killing or wounding several crewmen in the Compass Platform and Air Defence Platform. Pieces of another shell struck her radar office aft, killing crewmen within. An 8 in (200 mm) shell from Prinz Eugen found its way to the propelling charge/round manipulation chamber below the aft 5.25 in (133 mm) gun turrets, and a 15 in (380 mm) shell from Bismarck hit underwater below the armour belt, and penetrated about 13 ft (4.0 m) into the ship's hull, about 25 ft (7.6 m) below the waterline, but was stopped by the anti-torpedo bulkhead. Fortunately for Prince of Wales, neither shell exploded, but she still suffered minor flooding and the loss of some fuel oil. Contrary to some mistaken opinion, the 15 in (380 mm) shell that struck Prince of Wales below the waterline did not endanger her magazines, as it came to rest abreast an auxiliary machinery room.
By this time, serious gunnery malfunctions had caused intermittent problems with the main armament, leading to a 26% reduction in output. Captain Leach realised that continuing the action would risk losing Prince of Wales without inflicting further damage on the enemy. He therefore ordered the ship to make smoke and withdraw, 'pending a more favourable opportunity'. Prince of Wales turned away just after 06:04, firing from her rear turret under local control until the turret suffered a jammed shell ring, cutting off the ammunition supply and making the guns inoperable. Despite efforts by crew members and civilian technicians to repair the shell ring, all four guns were not back in service until 08:25, although two of the four guns were serviceable by 07:20.This temporarily left only five 14 in (360 mm) guns operational, but nine of the ten were operational in five hours. The final salvos fired were ragged and are believed to have fallen short. She retired from the battle around 06:10. Thirteen of her crew were killed, nine wounded. The timing ofPrince of Wales' withdrawal was fortunate for her, as she had come into torpedo range of Prinz Eugen and turned away as the German cruiser was about to fire.
Breaking of Action[]
On Bismarck, there was tremendous elation at the sinking of Hood. There was also a keen expectation that they would close on Prince of Wales and possibly finish her off. Bismarck's captain —Kapitän zur See Ernst Lindemann — requested that Großadmiral Lütjens allow Bismarck to do just that. Kaptitän Lindemann was a master naval gunner and knew he had Prince of Wales within reach. Even if British Admiral John Tovey's squadron had left Scapa Flow the previous day, he would still be more than 300 nmi (350 mi; 560 km) away from Bismarck even after diverting to sink Prince of Wales — a chase Lindemann figured would take only two or three hours. Lütjens refused to allow Lindemann to give chase, giving no explanation. Lindemann repeated his request, this time more assertively. Lütjens held firm to orders from the German Naval Commander —Großadmiral Erich Raeder — to avoid unnecessary combat with the Royal Navy, especially when it could lead to further damage that could hasten delivering Bismarck toward the waiting hands of the enemy. He broke off combat instead of pursuing Prince of Wales and ordered a course of 270°, due west. Bismarckhad fired 93 of her 353 base-fused Armour Piercing (AP) shells during the engagement.
This clash between the two senior German officers reflected their disparate and distinct command functions. As commander of Bismarck, Lindemann operated first and foremost as a tactician. As such, he had no question about his ship's immediate objective to destroy Prince of Wales, and he had pressed his case as far and hard as he should. Lütjens, as fleet chief and task force commander, operated at the strategic and operational levels. To some degree, his orders were clear — attacking convoys was his priority, not risking "a major engagement for limited, and perhaps uncertain, goals." Nevertheless, Raeder had also ordered Lütjens to be bold and imaginative, to accept battle if unavoidable and conduct it vigorously to the finish.
The bottom line was that Lütjens' orders did not cover a spectacular success like the one just achieved. His priority therefore was to stick to his instructions, focus on sinking merchant shipping and avoid encounters with enemy warships whenever possible. Moreover, before leaving Germany, Lütjens had told Admirals Conrad Patzig and Wilhelm Marschall, that he would adhere to Raeder's directives. This meant he did not intend to become the third fleet chief to be relieved for contradicting Raeder's orders; Marschall, one of his two predecessors, had been relieved of command for not following his orders to the letter despite the fact that Marschall's analysis of the changes in the tactical situation since the orders were issued resulted in the sinking of the British aircraft carrierHMS Glorious and its two escorting destroyers. Nor was he predisposed to discuss his command decisions with a subordinate officer.
Even if he had known it was the untried Prince of Wales he was fighting and not King George V, Lütjens would probably have stuck to his decision. Following her would have meant exposing the squadron to further gunfire as well as to torpedo attacks from Norfolk and Suffolk. He would have risked his ships and crews on an expressly forbidden opportunity.
Between 06:19 and 06:25, Suffolk fired six salvoes in the direction of Bismarck, having mistaken Bismarck for a radar contact with an aircraft. Suffolk was actually out of gun range of both Bismarckand Prinz Eugen at the time.
Invasion of Yugoslavia
The Invasion of Yugoslavia (code-name Directive 25 or Operation 25), also known as the April War (Croatian: Travanjski rat,Serbian/Bosnian: Aprilski rat, Slovene: aprilska vojna), was the Axis Powers' attack on the Kingdom of Yugoslavia which began on 6 April 1941 during World War II. The invasion ended with the unconditional surrender of the Royal Yugoslav Army on 17 April 1941, annexation and occupation of the region by the Axis powers and the creation of the Independent State of Croatia (Nezavisna Država Hrvatska, or NDH).
Battle of Greece[]
The Battle of Greece (also known as Operation Marita, German: Unternehmen Marita)[11] is the common name for the invasion and conquest of Greece by Nazi Germany in April 1941. Greece was supported by British Commonwealth forces, while the Germans' Axis alliesItaly and Bulgaria played secondary roles. The Battle of Greece is usually distinguished from the Greco-Italian War fought in northwestern Greece and southern Albania from October 1940, as well as from the Battle of Crete fought in late May. These operations, along with theInvasion of Yugoslavia, comprise the Balkans Campaign of World War II.
The Balkans Campaign began with the Italian invasion of Greece on 28 October 1940. Within weeks, the Italians were driven out of Greece and Greek forces pushed on to occupy much of southern Albania. In March 1941, a major Italian counterattack failed, and Germany was forced to come to the aid of its ally. Operation Marita began on 6 April 1941, with German troops invading Greece through Bulgaria in an effort to secure its southern flank. The combined Greek and British Commonwealth forces fought back with great tenacity, but were vastly outnumbered and out-gunned, and finally collapsed. Athens fell on 27 April, however the British managed to evacuate about 50,000 troops. The Greek campaign ended in a quick and complete German victory with the fall of Kalamata in the Peloponnese; it was over within 24 days. The conquest of Greece was completed through the capture of Crete a month later. Greece remained under occupation by the Axis powers until October 1944.
Some historians regard the German campaign in Greece as decisive in determining the course of World War II, maintaining that it fatally delayed the Axis invasion of the Soviet Union. Others hold that the campaign had no influence on the launching of Operation Barbarossa as monsoon conditions in the Ukraine would have postponed Axis operations regardless. Others believed British intervention in Greece as a hopeless undertaking, a "political and sentimental decision" or even a "definite strategic blunder." It has also been suggested the British strategy was to create a barrier in Greece, to protect Turkey, the only (neutral) country standing between an Axis block in the Balkans and the oil-rich Middle East.
Battle of Crete[]
The Battle of Crete (German: Luftlandeschlacht um Kreta; Greek: Μάχη της Κρήτης) was a battle during World War II on the Greek island ofCrete. It began on the morning of 20 May 1941, when Nazi Germany launched an airborne invasion of Crete under the code-name Unternehmen Merkur ("Operation Mercury"). Greek and Allied forces, along with Cretan civilians, defended the island.
After one day of fighting, the Germans had suffered very heavy casualties and none of their objectives had been achieved. The next day, through miscommunication and the failure of Allied commanders to grasp the situation, Maleme airfield in western Crete fell to the Germans, enabling them to fly in reinforcements and overwhelm the defenders. The battle lasted about 10 days.
The Battle of Crete was unprecedented in three respects: it was not only the first battle where the Fallschirmjäger ("parachute rangers") were used on a massive scale, but also the first mainly airborne invasion in military history; the first time the Allies made significant use of intelligence from the deciphered German Enigma code; and the first time invading German troops encountered mass resistance from a civilian population. Because of the heavy casualties suffered by the paratroopers, Adolf Hitler forbade further large scale airborne operations. However, the Allies were impressed by the potential of paratroopers and started to build their own airborne divisions.
Operation Barbossa[]
Operation Barbarossa (named for Frederick Barbarossa, the medieval German ruler) was the code name for Germany's invasion of the Soviet Union during World War II that began on 22 June 1941. Over 4.5 million troops of the Axis powers invaded the USSR along a 2,900 km (1,800 mi) front. In addition to the large number of troops, it also involved 600,000 motor vehicles and 750,000 horses. Planning for Operation Barbarossa started on 18 December 1940; the secret preparations and the military operation itself lasted almost a year, from spring to winter 1941. The Red Army repelled the Wehrmacht's strongest blow, and Adolf Hitler did not achieve the expected victory, but the Soviet Union's situation remained dire. Tactically, the Germans had won some resounding victories and occupied some of the most important economic areas of the country, mainly in Ukraine. Despite these successes, the Germans were pushed back from Moscow and could never mount an offensive simultaneously along the entire strategic Soviet-German front again.
Operation Barbarossa's failure led to Hitler's demands for further operations inside the USSR, all of which eventually failed, such as continuing the Siege of Leningrad, Operation Nordlicht, and Battle of Stalingrad, among other battles on the occupied Soviet territory.
Operation Barbarossa was the largest military operation in human history in both manpower and casualties. Its failure was a turning point in the Third Reich's fortunes. Most important, Operation Barbarossa opened up the Eastern Front, to which more forces were committed than in any other theatre of war in world history. Operation Barbarossa and the areas that fell under it became the site of some of the largest battles, deadliest atrocities, highest casualties, and most horrific conditions for Soviets and Germans alike — all of which influenced the course of both World War II and 20th century history. The German forces captured 3 million Russian POWs, who did not enjoy the protection stipulated in theGeneva Conventions. Some 2/3 of them never returned alive
Phase 1: The Frontier Battles (22 June 1941–3 July 1941)[]
At 03:15 on Sunday, 22 June 1941, the Axis bombed major cities in Soviet-occupied Poland. It is hard to pinpoint the opposing sides' strength in this initial phase, as most German figures include reserves allocated to the East but not yet committed, as well as several other comparability issues between the German and USSR's


German advances during the opening phases of Operation Barbarossa
figures. Roughly three million Wehrmacht troops went into action on 22 June, and they faced slightly fewer Soviet troops in the border Military Districts. The contribution of the German allies would generally not make itself felt until later. The surprise was complete: though the Stavka, alarmed by reports that Wehrmacht units were approaching the border, had at 00:30 ordered that the border troops be warned that war was imminent, only a small number of units were alerted in time.
Aside from the roughly 3.2 million German ground troops engaged in, or earmarked for the Eastern Campaign, about 500,000 Romanian, Hungarian, Slovakian, Croatian, and Italian troops accompanied the German forces, while the Army of Finland made a major contribution in the north. The 250th Spanish "Blue" Infantry Division was a formation of volunteered Spanish Falangists and Nazi sympathisers.
Luftwaffe reconnaissance units worked frantically to plot troop concentration, supply dumps, and airfields, and mark them for destruction. The Luftwaffe's task was to neutralize the Soviet Air Force. This was not achieved in the first days of operations, despite the Soviets having concentrated aircraft in huge groups on the permanent airfields rather than dispersing them on field landing strips, making them ideal targets. The Luftwaffe claimed to have destroyed 1,489 aircraft on the first day of operations. Hermann Göring — Chief of the Luftwaffe — distrusted the reports and ordered the figure checked. Picking through the wreckages of Soviet airfields, theLuftwaffe's figures proved conservative, as over 2,000 destroyed Soviet aircraft were found. The Luftwaffe lost 35 aircraft on the first day of combat. The Germans claimed to have destroyed only 3,100 Soviet aircraft in the first three days. In fact Soviet losses were far higher: some 3,922 Soviet machines had been lost (according to Russian Historian Viktor Kulikov). The Luftwaffe had achieved air superiority over all three sectors of the front, and would maintain it until the close of the year. The Luftwaffe could now devote large numbers of its Geschwader (see Luftwaffe Organization) to support the ground forces.
Army Group North
Opposite Army Group North were two Soviet armies. The Wehrmacht OKH thrust the 4th Panzer Group, with a strength of 600 tanks, at the junction of the two Soviet armies in that sector. The 4th Panzer Group's objective was to cross the Neman and Daugava Rivers which were the two largest obstacles in the advance toLeningrad. On the first day, the tanks crossed the River Neman and penetrated 50 mi (80 km). Near Raseiniai, the armoured


Crossing of the Daugava (Dvina) river by the 20th Panzer Division
units were counter attacked by 300 tanks of the 3rd and 12th Soviet Mechanized Corps. It took four days for the Germans to encircle and destroy the Soviet armour who lacked fuel, ammunition and coordination. By the end of the first week the Soviet Mechanized Corps had lost 90% of its strength. The Panzer Groups then crossed the Daugava nearDaugavpils. The Germans were now within striking distance of Leningrad. However, due to their deteriorated supply situation, Hitler ordered the Panzer Groups to hold their position while the infantry formations caught up. The orders to hold would last over a week, giving time for the Soviets to build up a defence around Leningrad and along the bank of the Luga River. Further complicating the Soviet position, on 22 June the anti-Soviet June Uprising in Lithuania began, and on the next day an independent Lithuania was proclaimed. An estimated 30,000 Lithuanian rebels engaged Soviet forces, joined by ethnic Lithuanians from the Red Army. As the Germans reached further north, armed resistance against the Soviets broke out in Estonia as well. The "Battle of Estonia" ended on 7 August, when the 18th Army reached the Gulf of Finland coast.
Army Group Centre[]
Opposite Army Group Centre were four Soviet armies: the 3rd, 4th, 10th and 11th Armies. The Soviet Armies occupied a salient that jutted into German occupied Polish territory with the Soviet salient's center at Białystok. Beyond Białystok was Minsk, both the capital of Byelorussian Soviet Socialist Republicand a key railway junction. AG Centre's two Panzer Groups' goal was to meet at Minsk, denying the Red Army an escape route from the salient. The 3rd Panzer Group broke through the junction of two Soviet Fronts in the north of the salient, and crossed the River Neman while the 2nd Panzer Group crossed the Bug River river in the South. While the Panzer Groups attacked, the Wehrmacht Army Group Centre infantry Armies struck at the salient, eventually


Captured Soviet equipment.
encircling Soviet troops at Białystok.
Moscow at first failed to grasp the dimensions of the catastrophe that had befallen the USSR. Marshall Timoshenko ordered all Soviet forces to launch a general counter-offensive, but with supply and ammunition dumps destroyed, and a complete collapse of communication, the uncoordinated attacks failed. Zhukov signed the infamous Directive of People's Commissariat of Defence No. 3 (he later claimed under pressure from Stalin), which ordered the Red Armyto start an offensive. He commanded the troops “to encircle and destroy the enemy grouping near Suwałki and to seize the Suwałki region by the evening of 26 June" and “to encircle and destroy the enemy grouping invading in Vladimir-Volynia and Brody direction” and even “to seize the Lublin region by the evening of 24.6”This maneuver failed and disorganized Red Army units were soon destroyed by the Wehrmacht forces.
On 27 June, 2 and 3 Panzer Groups met up at Minsk, advancing 200 mi (320 km) into Soviet territory and a third of the way to Moscow. In the vast pocket between Minsk and the Polish border, the remnants of 32 Soviet Rifle, eight tank, and motorized, cavalry and artillery divisions were encircled.
Army Group South[]
In the south, opposite Army Group South were three Soviet armies, the 5th, 6th and 26th. Soviet commanders reacted quicker and Germans faced determined resistance from the start. The German infantry Armies struck at


Ukraine, early days of Barbarossa
the junctions of these armies while the 1st Panzer Group drove its armored spearhead of 600 tanks right through the Soviet 6th Army, aiming to take Brody. On 26 June, five Soviet mechanized corpswith over 1,000 tanks mounted a massive counter-attack on the 1st Panzer Group. The battle was among the fiercest of the invasion, lasting over four days; in the end the Germans prevailed, though the Soviets inflicted heavy losses on the 1st Panzer Group.
With the Soviet counter-offensives' failure, the last substantial Soviet tank forces in Western Ukraine had been committed, and the Red Army assumed a defensive posture, focusing on a strategic withdrawal under severe pressure. The Soviet air arm, the VVS, lost 1,561 aircraft over Kiev. The battle was a huge tactical (Hitler thought strategic) victory, but it had drawn the German forces away from an early offensive against Moscow, and had delayed further German progress by 11 weeks. General Kurt Von Tippleskirch noted, "The Russians had indeed lost a battle, but they won the campaign".
Summary of the First Phase[]
By the end of the first week, all three German Army Groups had achieved major campaign objectives. However, in the vast pocket around Minsk and Białystok, the Soviets were still fighting; reducing the pocket was causing high German casualties and many Red Army troops were escaping. The usual estimated casualties of the Red Army amount to 600,000 killed, missing, captured or wounded.
Phase 2: Battle for Smolensk (3 July 1941–5 August 1941)[]
On 3 July, Hitler finally gave the go-ahead for the Panzers to resume their drive east after the infantry divisions had caught up. However, a rainstorm typical of Russian summers slowed their progress and Russian defenses stiffened. The delays gave the Soviets time to organize a massive counterattack against Army Group Center. Army Group Center's ultimate objective was Smolensk, which commanded the road to Moscow. Facing the Germans was an old Soviet defensive line held by six armies. On 6 July, the Soviets attacked the 3rd Panzer Army with 700 tanks. The Germans defeated this counterattack with overwhelming air superiority. The 2nd Panzer Army crossed the River Dnieper and closed on Smolensk from the south while the 3rd Panzer Army, after defeating the Soviet counter attack, closed on Smolensk from the north. Trapped between their pincers were


German advances during Operation Barbarossa, 22 June 1941 to 9 September 1941.
three Soviet armies. On 18 July, the Panzer Groups came to within 10 miles of closing the gap but the trap would not snap shut until 26 July. When the Panzer Groups finally closed the gap, 180,000 Red Army troops were captured but liquidating the pocket took another 10 days in which time 100,000 Soviet troops escaped to stand between the Germans and Moscow.
Four weeks into the campaign, the Germans realized they had grossly underestimated Soviet strength. The German troops had used their initial supplies without attaining the expected strategic freedom of movement. Operations were now slowed down to allow for resupply; the delay was to be used to adapt strategy to the new situation. Hitler had lost faith in encirclement as large numbers of Soviet soldiers had escaped the pincers. Hitler now believed he could defeat the Soviets by economic damage, depriving them of the industrial capacity to continue the war. That meant seizing the industrial center of Kharkov, the Donets Basin and the oil fields of theCaucasus in the south and a speedy capture of Leningrad, a major center of military production, in the north. He also wanted to link up with the Finns to the north.
Fedor von Bock and almost all the German generals involved in Operation Barbarossa, vehemently argued in favor of continuing the all-out drive toward Moscow. Besides the psychological importance of capturing the enemy's capital, the generals pointed out that Moscow was a major center of arms production and the center of the Soviet communications and transportation system. More importantly, intelligence reports indicated that the bulk of the Red Army was deployed near Moscow under Semyon Timoshenko for an all-out defense of the capital. But Hitler was adamant, and issued a direct order to Guderian, bypassing his commanding officerBock, to send Army Group Centre's tanks to the north and south, temporarily halting the drive to Moscow.
Phase 3: Kiev and Leningrad (5 August 1941–2 October 1941)[]
By mid-July below the Pinsk Marshes, the Germans had come within a few kilometers of Kiev. The 1st Panzer Army then went south while the German 17th Army struck east and in between the Germans trapped three Soviet armies near Uman. As the Germans eliminated the pocket, the tanks turned north and crossed the Dnieper. Meanwhile, the 2nd Panzer Army, diverted from Army Group Centre, had crossed the River Desna with 2nd Army on its right flank. The two Panzer armies now trapped four Soviet armies and parts of two others.
For its final attack on Leningrad, the 4th Panzer Army was reinforced by tanks from Army Group Centre. On 8 August, the Panzers broke through the Soviet defenses; the German 16th Army attacked to the northeast, the 18th Army and the Estonian guerilla Forest Brothers cleared the country and advanced toLake Peipus. By the


.jpg)
Killing of Jews at Ivangorod, Ukraine, 1942
end of August, 4th Panzer Army had penetrated to within 30 mi (48 km) of Leningrad. The Finns had pushed southeast on both sides of Lake Ladoga, reaching the old Finnish-Soviet frontier.
At this stage, Hitler ordered the final destruction of Leningrad with no prisoners taken, and on 9 September, Army Group North began the final push which within ten days brought it within 7 mi (11 km) of the city. However, the advance over the last 10 km (6.2 mi) proved very slow and casualties mounted. At this stage, Hitler lost patience and ordered that Leningrad should not be stormed but starved into submission. Deprived of its Panzer forces, Army Group Center had remained static and was subjected to numerous Soviet counter-attacks in particular the Yelnya Offensive in which the Germans suffered their first major tactical defeat since their invasion began. These attacks drew Hitler's attention back to Army Group Center and its drive on Moscow. The Germans ordered the 3rd and 4th Panzer Armies to break off their siege of Leningrad and support Army Group Center on its attack on Moscow.
Before the attack on Moscow could begin, operations in Kiev needed to be finished. Half of Army Group Centre had swung to the south in the back of the Kiev position, while Army Group South moved to the north from its Dniepr bridgehead. The encirclement of Soviet Forces in Kiev was achieved on 16 September. A savage battle ensued in which the Soviets were hammered with tanks, artillery, and aerial bombardment. In the end, after ten days of vicious fighting, the Germans claimed over 600,000 Soviet soldiers captured. Actual losses were 452,720 men, 3,867 artillery guns and mortars from 43 Divisions of the 5th, 37th, 26th and 21st Soviet Armies.
Phase 4: Operation Typhoon (2 October 1941–5 December 1941)[]
After Kiev, the Red Army no longer outnumbered the Germans and there were no more directly available trained reserves. To defend Moscow, Stalin could field 800,000 men in 83 divisions, but no more than 25 divisions were fully effective. Operation Typhoon, the drive to Moscow, began on 2 October. In front of Army Group Centre was a series of elaborate defense lines, the first centered on Vyazma and the second on Mozhaysk.
The first blow took the Soviets completely by surprise as 2nd Panzer Army returning from the south took Oryolwhich was 75 mi (121 km) south of the Soviet first main defense line. Three days later the Panzers pushed onBryansk while 2nd Army attacked from the west. The Soviet 3rd and 13th armies were now encircled. To the north, the 3rd and 4th Panzer Armies attacked Vyazma, trapping the 19th, 20th, 24th and 32nd Soviet Armies.

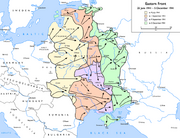
The eastern front at the time of the Battle of Moscow: Initial Wehrmacht advance - to 9 July 1941 Subsequent advances - to 1 September 1941 Encirclement and battle of Kiev - to 9 September 1941 Final Wehrmacht advance - to 5 December 1941
Moscow's first line of defence had been shattered. The pocket yielded 673,000 Soviet prisoners, bringing the tally since the start of the invasion to three million Soviet soldiers captured. The Soviets had only 90,000 men and 150 tanks left for the defense of Moscow.
On 13 October, 3rd Panzer Army penetrated to within 90 mi (140 km) of the capital. Martial law was declared in Moscow. Almost from the beginning of Operation Typhoon the weather had deteriorated. Temperatures fell while there was a continued rainfall, turning the unpaved road network into mud and steadily slowing the German advance on Moscow to as little as 2 mi (3.2 km) a day. The supply situation rapidly deteriorated. On 31 October, the German Army High Command ordered a halt to Operation Typhoon while the armies were re-organized. The pause gave the Soviets, who were in a far better supply situation, time to consolidate their positions and organize formations of newly activated reservists. In little over a month the Soviets organized eleven new armies which included 30 divisions of Siberian troops. These had been freed from the Soviet far east as Soviet intelligence had assured Stalin there was no longer a threat from the Japanese. With the Siberian forces came over 1,000 tanks and 1,000 aircraft.
The Germans were nearing exhaustion, they also began to recall Napoleon's invasion of Russia. General Günther Blumentritt noted in his diary:
They remembered what happened to Napoleon's Army. Most of them began to re-read Caulaincourt's grim account of 1812. That had a weighty influence at this critical time in 1941. I can still see Von Kluge trudging through the mud from his sleeping quarters to his office and standing before the map with Caulaincourt's book in his hand.
On 15 November, with the ground hardening due to the cold weather, the Germans once again began the attack on Moscow. Although the troops themselves were now able to advance again, there had been no delay allowed to improve the supply situation. Facing the Germans were the 5th, 16th, 30th, 43rd, 49th, and 50th Soviet armies. The Germans intended to let 3rd and 4th Panzer Armies cross the Moscow Canal and envelop Moscow from the northeast. 2nd Panzer Army would attack Tula and then close in on Moscow from the south. As the Soviets reacted to the flanks, 4th Army would attack the center. In two weeks of desperate fighting, lacking sufficient fuel and ammunition, the Germans slowly crept towards Moscow. However, in the south, 2nd Panzer Army was being blocked. On 22 November, Soviet Siberian units augmented with the 49th and 50th Soviet Armies attacked the 2nd Panzer Army and inflicted a shocking defeat on the Germans. However, 4th Panzer Army pushed the Soviet 16th Army back and succeeded in crossing the Moscow canal and began the encirclement.
On 2 December, part of the 258th Infantry Division advanced to within 15 mi (24 km) of Moscow, and could see the spires of the Kremlin, but by then the first blizzards of the winter began. A Reconnaissance-Battalion also managed to reach the town of Khimki—some 8 km (5.0 mi) away from Moscow—and captured its bridge over the Moscow-Volga Canal as well as its railway station, which marked the farthest advance of German forces on Moscow.[93][94] The Wehrmacht was not equipped for winter warfare. Frostbite and disease caused more casualties than combat, and dead and wounded had already reached 155,000 in three weeks. Some divisions were now at 50% strength. The bitter cold also caused severe problems for their guns and equipment, and weather conditions grounded the Luftwaffe. Newly built-up Soviet units near Moscow now numbered over 500,000 men, and on 5 December, they launched a massive counterattack which pushed the Germans back over 200 mi (320 km). The invasion of the USSR eventually cost the German Army over 250,000 dead and 500,000 wounded, the majority of whom became casualties after 1 October and an unknown number of Axis casualties such as Hungarians, Romanians and Waffen SS troops as well as co-belligerent Finns.
Battle of Moscow[]
The Battle of Moscow (Russian: Битва под Москвой, Romanized: Bitva pod Moskvoy, German: Schlacht um Moskau) is the name given by Soviet historians to two periods of strategically significant fighting on a 600 km (370 mi) sector of the Eastern Front during World War II. It took place between October 1941 and January 1942. The Soviet defensive effort frustrated Hitler's attack on Moscow, capital of the Union of Soviet Socialist Republics (USSR) and the largest Soviet city. Moscow was one of the primary military and political objectives for Axis forces in theirinvasion of the Soviet Union.
The German strategic offensive named Operation Typhoon was planned to conduct two pincer offensives, one to the north of Moscow against the Kalinin Front by the 3rd and 4th Panzer Groups, simultaneously severing the Moscow-Leningrad railway, and another to the south ofMoscow Oblast against the Western Front, south of Tula by the 2nd Panzer Army, while the 4th Army advanced directly towards Moscow from the west. A separate operational German plan, codenamed Operation Wotan, was included in the final phase of the German offensive.
Initially, the Soviet forces conducted a strategic defence of the Moscow Oblast by constructing three defensive belts, and deploying newly raised reserve armies as well as bringing troops from the Siberian and Far Eastern Military Districts. Subsequently, as the German offensives were halted, a Soviet strategic counter-offensive and smaller-scale offensive operations were executed to force German armies back to the positions around the cities of Oryol, Vyazma and Vitebsk, nearly surrounding three German armies in the process.
Battle of Gondar
The Battle of Gondar was the last stand of the Italian forces in Italian East Africa during the Second World War. The battle took place in November 1941, during the East African Campaign. The Italian garrison of 40,000 was commanded by Generale Guglielmo Nasi.
Kulkaber[]
On 13 November, a mixed force from the British 12th (African) Division under Major-General Charles Fowkes—supported by Ethiopian patriots—attacked the key defensive position of Kulkaber and were repelled. However, a renewed attack a week later on Kulkaber was successful.
Mountain passes captured
There were two mountain passes that overlooked the town which were controlled by the Italian troops. They were invested by the two brigadesof the British 12th (African) Division and the two Italian groups in the passes were cut off and were forced to surrender when their supplies ran out.
Gondar town surrenders
Once the Allied troops had taken the passes, they gained control of the heights overlooking the town, and the Italian garrison under GeneraleNasi in the town itself was attacked on 27 November and surrendered after the Kenya Armoured Car Regiment had penetrated the outerskirts of the town.
Attack on Pearl Harbor[]
The attack on Pearl Harbor (called Hawaii Operation or Operation AI by the Japanese Imperial General Headquarters (Operation Z in planning) and the Battle of Pearl Harbor) was a surprise military strike conducted by the Imperial Japanese Navy against the United States naval base at Pearl Harbor, Hawaii, on the morning of December 7, 1941 (December 8 in Japan). The attack was intended as a preventiveaction in order to keep the U.S. Pacific Fleet from interfering with military actions the Empire of Japan was planning in Southeast Asia against overseas territories of the United Kingdom, the Netherlands, and the United States.


Pearl Harbor.
The base was attacked by 353 Japanese fighters, bombers and torpedo planes in two waves, launched from six aircraft carriers. Four U.S. Navy battleships were sunk (two of which were raised and returned to service later in the war) and the four others present were damaged. The Japanese also sank or damaged three cruisers, three destroyers, an anti-aircraft training ship, and one minelayer. 188 U.S. aircraft were destroyed; 2,402 men were killed and 1,282 wounded. The power station, shipyard, maintenance, and fuel and torpedo storage facilities, as well as the submarine piers and headquarters building (also home of the intelligence section) were not attacked. Japanese losses were light: 29 aircraft and five midget submarines lost, and 65 servicemen killed or wounded. One Japanese sailor was captured.
The attack came as a profound shock to the American people and led directly to the American entry into World War II in both the Pacific andEuropean theaters. The following day (December 8) the United States declared war on Japan. Domestic support for isolationism, which had been strong, disappeared. Clandestine support of Britain (for example the Neutrality Patrol) was replaced by active alliance. Subsequent operations by the U.S. prompted Germany and Italy to declare war on the U.S. on December 11, which was reciprocated by the U.S. the same day.
Despite numerous historical precedents for unannounced military action by Japan, the lack of any formal warning, particularly while negotiations were still apparently ongoing, led President Franklin D. Roosevelt to proclaim December 7, 1941, "a date which will live in infamy".
Second Battle of Changsha
The battle started when a small Chinese guerrilla force clashed with the Japanese 6th Division in the mountains southeast of Yueyang on 6 September. On the 17th, the Japanese crossed the Sinchiang River (新墙河) at four points and made rapid advances, crossing the Milo River on 19 September. The main Chinese force avoided confronting the enemy but marched in a parallel fashion, out-flanking the Japanese trail southward. The Japanese also attempted to out-flank and encircle the Chinese. This caused both the Chinese and the Japanese armies to reach the Laotao River (捞刀河) regions for an inevitable battle.
On 27 September, several hundred Japanese troops in plain clothes reached the north gate of Changsha but were unable to sabotage the city defenses, leading to heavy fighting on the 28th. Unable to overcome the defenders, the Japanese began a general retreat back to the Yueyang region on 30 September.
Japanese Invasion of Thailand[]
The Japanese invasion of Thailand occurred on December 8, 1941. It was fought between Thailand and the Empire of Japan. Despite fierce fighting in Southern Thailand, Thai resistance lasted only a few hours before ending in a ceasefire.
Battle of Hong Kong[]
The Battle of Hong Kong took place during the Pacific campaign of World War II. It began on 8 December 1941 and ended on 25 December 1941 with Hong Kong, then a Crown colony, surrendering to the Empire of Japan.
Battle[]
The Japanese attack began shortly after 08:00 on 8 December 1941 (Hong Kong local time), less than eight hours after the Attack on Pearl Harbor (because of the day shift that occurs on the international date line between Hawaii and Asia, the Pearl Harbor event is recorded to have occurred on 7 December). British,Canadian and Indian forces, commanded by Major-General Christopher Maltby supported by the Hong Kong Volunteer


Canadian infantrymen in Hong Kong
Defence Corps resisted the Japanese invasion by the Japanese 21st, 23rd and the 38th Regiment, commanded by Lieutenant General Takashi Sakai, but were outnumbered nearly four to one (Japanese, 52,000; Allied, 14,000) and lacked their opponents' recent combat experience.
The colony had no significant air defence. The RAF Station at Hong Kong's Kai Tak Airport had only five airplanes: two Supermarine Walrus amphibians and threeVickers Vildebeest torpedo-reconnaissance bombers, flown and serviced by seven officers and 108 airmen. An earlier request for a fighter squadron had been rejected, and the nearest fully operational RAF base was in Kota Bharu, Malaya, nearly 2,250 kilometres away.
Hong Kong also lacked adequate naval defence. Three destroyers were to withdraw to Singapore.
The Japanese bombed Kai Tak Airport on 8 December. Two of the three Vildebeest and the two Walrus were destroyed by 12 Japanese bombers. The attack also destroyed several civil aircraft including all but two of the aircraft used by the Air Unit of the Hong Kong Volunteer Defence Corp. The RAF and Air Unit personnel from then on fought as ground troops. Two of the Royal Navy's three remaining destroyers were ordered to leave Hong Kong for Singapore. Only one destroyer, HMS Thracian, several gunboats and a flotilla of motor torpedo boats remained.
The Commonwealth forces decided against holding the Sham Chun River and instead established three battalions in the Gin Drinkers' Line across the hills. The Japanese 38th Infantry under the command of Major General Takaishi Sakai quickly forded the Sham Chun River by using temporary bridges. Early on 10 December 1941 the 228th Infantry Regiment, commanded by Colonel Teihichi, of the 38th Division attacked the Commonwealth defences at the Shing Mun Redoubt defended by 2nd Battalion Royal Scots, commanded by Lieutenant Colonel S. White. The line is breached in five hours and later that day the Royal Scots also withdraw from Golden Hill. D company of the Royal Scots counter-attacks and captures Golden Hill. By 10:00am the hill is again taken by the Japanese. This makes the situation on the New Territories and Kowloon untenable and the evacuation from started on 11 December 1941 under aerial bombardment and artillery barrage. As much as


Map of the Japanese lines of attack
possible, military and harbour facilities were demolished before the withdrawal. By 13 December, the 5/7 Rajputs of the British Indian Army commanded by Lieutenant Colonel R. Cadosan-Rowlinson, the last Commonwealth troops on the mainland, had retreated to Hong Kong Island.
Maltby organised the defence of the island, splitting it between an East Brigade and a West Brigade. On 15 December, the Japanese began systematic bombardment of the island's North Shore. Two demands for surrender were made on 13 December and 17 December. When these were rejected, Japanese forces crossed the harbour on the evening of 18 December and landed on the island's North-East. They suffered only light casualties, although no effective command could be maintained until the dawn came. That night, approximately 20 gunners were massacred at the Sai Wan Battery after they had surrendered. There was a further massacre of prisoners, this time of medical staff, in the Salesian Mission on Chai Wan Road. In both cases, a few men survived to tell the story.
On the morning of 19 December, a Canadian Company Sergeant Major, John Robert Osborn of the Winnipeg Grenadiers, threw himself on top of a grenade, sacrificing himself to save the lives of the men around him; he was later posthumously awarded the Victoria Cross. Fierce fighting continued on Hong Kong Island but the Japanese annihilated the headquarters of West Brigade, causing the death of Brigadier John K. Lawson, the commander of the West Brigade . A British counter-attack could not force them from the Wong Nai Chung Gap that secured the passage between downtown and the secluded southern parts of the island. From 20 December, the island became split in two with the British Commonwealth forces still holding out around the Stanley peninsula and in the West of the island. At the same time, water supplies started to run short as the Japanese captured the island's reservoirs.
On the morning of 25 December, Japanese soldiers entered the British field hospital at St. Stephen's College, and tortured and killed a large number of injured soldiers, along with the medical staff.
By the afternoon of 25 December 1941, it was clear that further resistance would be futile and British colonial officials headed by the Governor of Hong Kong, Sir Mark Aitchison Young, surrendered in person at the Japanese headquarters on the third floor of the Peninsula Hong Kong hotel. This was the first occasion on which a British Crown Colony has surrendered to an invading force.[citation needed] The garrison had held out for 17 days. This day is known in Hong Kong as "Black Christmas".
Battle of Guam[]
The First Battle of Guam, was an engagement during the Pacific War in World War II, and took place on 8 December 1941 on Guam in theMariana Islands between the Empire of Japan and the United States. The American garrison was defeated by Japanese forces which resulted in an occupation until the Second Battle of Guam in 1944.
Prelude[]
Japanese plans for the Pacific War included capturing Guam within the war's first days. From March 1941 Japanese aircraft flew photo reconnaissance sorties over the island. Plans for the invasion of the island were completed in September that year, and the South Seas Detachment was selected as the main unit responsible for this. The South Seas Detachment comprised the 144th Infantry Regiment and other units detached from the 55th Division and had a strength of 4,886 men. The South Seas Detachment was concentrated in Korea during November 1941 and, following a brief stay in Japan, sailed for Chichi-jima in the Bonin Islands late that month. The 370-man strong 5th Company of the 2nd Maizuru Special Naval Landing Force, which was based at Saipan


Japanese landings on Guam.
in the Marianas, was also assigned to join the assault on Guam. These units would be transported to Guam by nine transports escorted by the minelayer Tsugaru and four destroyers. The 6th Cruiser Division, which comprised four heavy cruisers, was also available to provide support if needed. The landing force and naval units were supported by the 18th Naval Air Corps, which was based at Saipan and equipped with obsolete floatplanes.
The United States Government did not believe that it would be possible or practical to defend Guam if it was attacked. The island was not seen as being useful in efforts to reinforce the Philippines, though it served as a refueling point for Pan Am flying boats and was one of the relay points for the Pacific Cable Company's telegraph cable which linked the Philippines to the US west coast. In 1941 the island was given a "Category F" defense rating; this ruled out the construction of new defenses and meant that when war broke out Guam's defenders would destroy all facilities of military value and withdraw.
Despite the low priority accorded to Guam, some minor steps were taken to improve its defenses before war broke out. A contract for minor improvements to the military facilities on Guam was issued in April 1941, and work began the next month. The Guam Insular Force Guard, which was a locally-manned milita force responsible for protecting the naval base, was also slightly expanded in May. On 17 October the dependents of the American military personnel on the island were evacuated to the United States by the transport USS Henderson, followed by more than 1000 construction workers. On 23 October 1941 the US Navy's General Board provided Secretary of the Navy Frank Knox with a report on Guam's defenses which recommended against reinforcing the island due to the difficulties of defending it and the need to allocate resources to other priorities. The report argued in favor of continuing to improve Guam's harbour and seaplane facilities, however.
At the outbreak of war on 8 December 1941 (local time), Guam was defended by small US Navy and USMC units as well as the Insular Force Guard. Captain George McMillin, who was also the island's governor and the overall commander of the garrison, was in charge of Naval Forces, Guam which comprised 271 personnel and four nurses. This force was a subordinate unit of the Asiatic Fleet and most of its personnel were unarmed. Guam's guard ship, the USS Gold Star had sailed to the Philippines to pick up supplies and enable the crew to buy Christmas presents and was directed to remain there. The minesweeper USS Penguin was present at the island, however, along with the immobile oil depot ship Robert L. Barnes. Marine Barracks, Sumay had a strength of 145 men who were organised into a company armed with rifles and a small number of machine guns. The Insular Force Guard comprised 246 men, most of whom had received little training. The marines and Insular Force Guard were equipped with 170 M1903 Springfield rifles, 13 Lewis Guns and 15 Browning Automatic Rifles. The defenders did not have any mortars or artillery other than the guns on board Penguin. In addition to these military units, Guam's police force (the Guam Insular Patrol) had a strength of 80 men who were armed only with pistols.
Battle[]
At 04:45 on 8 December, the Governor of the island, George McMillin was informed about the attack on Pearl Harbor. At 08:27, Japanese aircraft from Saipan attacked the Marine Barracks, the Piti Navy Yard, Libugon radio station, Standard Oil Company, and the Pan American Hotel. During the air attack, the minesweeper USS Penguin, the largest navy vessel at the island, was sunk. One officer was killed and several men wounded. The air raids all over Guam continued into the morning and afternoon before subsiding at 17:00.
The next day at 08:30, Japanese air attacks resumed, with no more than nine aircraft attacking at a time. The same targets as the previous day were attacked, and also the Government House in Agana and several villages. That evening, a Japanese invasion fleet of four heavy cruisers, four destroyers, two gunboats, and six submarine chasers, two minesweepers, and two tenders left Saipan for Guam.


Another illustration of the route Japanese forces following during the invasion.
The Japanese landed about 400 troops of the 5th Defence Force from Saipan on Guam on 10 December 1941 at Dungcas Beach, north of Agana. They attacked and quickly defeated the Insular Force Guard in Agana. They then advanced on Piti, moving toward Sumay and the Marine Barracks. The principal engagement took place on Agana's Plaza de Espana at 04:45 when a few Marines and Insular Force Guardsmen fought with the Japanese naval soldiers. After token resistance, the Marines surrendered at 05:45. Governor McMillin officially surrendered at 06:00. A few skirmishes took place all over the island before news of the surrender spread and the rest of the island forces laid down their arms. The American patrol boat YP-16 was scuttled by means of fire during the event and YP-17 was captured by Japanese naval forces. An American freighter was damaged by the Japanese.
In the meantime the Japanese South Seas Detached Force (about 5,500 men) under the command of Major-General Tomitaro Horii made separate landings at Tumon Bay in the north, on the southwest coast near Merizo, and on the eastern shore of the island at Talafofo Bay.
U.S. Marine losses were 5 killed and 13 wounded. The U.S. Navy lost 8 killed, The Guam Insular Force Guards lost 4 killed and 22 wounded. One Japanese naval soldier was killed and 6 wounded.
Pfc Kauffman was killed by the Japanese after the surrender.
Battle of Wake Island[]
The Battle of Wake Island began simultaneously with the Attack on Pearl Harbor and ended on 23 December 1941, with the surrender of the American forces to the Empire of Japan. It was fought on and around the atoll formed by Wake Island and its islets of Peale and Wilkes Islands by the air, land and naval forces of the Empire of Japan against those of the U.S., with Marines playing a prominent role on both sides.
The island was held by the Japanese until September 4, 1945, when the remaining Japanese garrison surrendered to a detachment of United States Marines.
Prelude[]
The United States Navy constructed a military base on the atoll. On 19 August, the first permanent military garrison, understrength elements of the 1st Marine Defense Battalion, totaling 450 officers and men, were

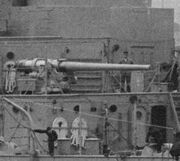
5"/51 caliber gun on Texas 1914.
stationed on the island, under Major James P.S. Devereux. Also present on the island were 68 U.S. Navy personnel and about 1,221 civilian workers for the Morrison-Knudsen Company.
The Marines were armed with six 5 in (130 mm)/51 cal shore batteries, removed from a scrappedbattleship; twelve 3 in (76 mm)/50 cal anti-aircraft guns (with only a single working anti-aircraftdirector among them); eighteen .50 in (12.7 mm) Browning heavy machine guns; and thirty .30 in (7.62 mm) heavy, medium and light water- and air-cooled machine guns of various manufacture and operating condition.
On 28 November, U.S. Navy Commander Winfield S. Cunningham reported to Wake to assume overall command of U.S. forces on the island. He had only 10 days to examine defenses and


3"/50 caliber gun aboard Slater
assess his men before war began.
On 8 December, just hours after the attack on Pearl Harbor (Wake being on the opposite side of theInternational Date Line), 36 Japanese Mitsubishi G3M3 bombers flown from bases on the Marshall Islands attacked Wake Island, destroying 8 of the 12 F4F-3 Wildcat fighter aircraft belonging to Marine Corps fighter squadron VMF-211 on the ground. The remaining four wildcats were in the air patrolling, but because of poor visibility failed to see the attacking Japanese bombers. These Wildcats did down two bombers on the following day, however. All of the Marine garrison’s defensive emplacements were left intact by the raid, which primarily targeted the naval aircraft. Of 55 Marine aviation personnel, 23 were killed and 11 were wounded. Ten Chamorro civilian employees of Pan American Airways were also killed.
First Landing Attempt[]
Early on the morning of 11 December, the garrison, with the support of the four remaining Wildcats, repelled the first Japanese landing attempt by the South Seas Force, which included the light cruisers Yubari, Tenryū, and Tatsuta; the destroyers Yayoi, Mutsuki, Kisaragi, Hayate, Oite, andAsanagi; two Momi-class destroyers converted to patrol boats (Patrol Boat No. 32 and Patrol Boat No. 33), and two troop transport ships containing 450 Special Naval Landing Force troops.
The U.S. Marines fired at the invasion fleet with their six 5 in (130 mm) coastal artillery guns. Major Devereux, the Marine commander under Cunningham, ordered the gunners to hold their fire until the enemy moved within range of the coastal defenses. "Battery L", on Peale islet, succeeded in sinking Hayate at a distance of 4,000 yd (3,700 m) with at least two direct hits to her magazines, causing her to explode and sink within two minutes, in full view of the defenders on shore. Yubari's superstructure was hit 11 times. The four Wildcats also succeeded in sinking another destroyer, Kisaragi, by dropping a bomb on her stern where the depth charges were stored. Both Japanese destroyers were lost with all hands, with Hayate becoming the first Japanese surface warship to be sunk during World War II. The Japanese force withdrew before landing. This was the first Japanese defeat of the war.
After the initial raid was fought off, American news media reported that, when queried about reinforcement and resupply, Cunningham was reported to have quipped “Send us more Japs!” In fact, Commander Cunningham sent a long list of critical equipment—including gunsights, spare parts, and fire-control radar—to his immediate superior: Commandant, 14th Naval District. It is believed that the quip was actually padding (a technique of adding nonsense text to a message to make cryptanalysis more difficult).
But the continuing siege and frequent Japanese air attacks on the Wake garrison continued, without resupply for the Americans. The initial resistance offered by the garrison prompted the Japanese Navy to detach two aircraft carriers (Sōryū and Hiryū) from the force that attacked Pearl Harbor to support the second landing attempt.
USN Relief Attempt[]
The projected U.S. relief attempt by Admiral Frank Fletcher's Task Force 11 (TF 11) and supported Admiral Wilson Brown’s TF 14 consisted of the fleet carrier Saratoga, the fleet oiler Neches, the seaplane tender Tangier, the heavy cruisers Astoria, Minneapolis, and San Francisco, and 10 destroyers. The convoy carried the 4th Marine Defense Battalion, the VMF-221 fighter squadron equipped with Brewster F2A-3 Buffalo fighters, along with 9,000 5 in (130 mm) rounds, 12,000 3 in (76 mm) rounds, and 3,000,000 .50 in (12.7 mm) rounds, as well as a large amount of ammunition for mortars and other battalion small arms. TF 14—with the fleet carrier Lexington, three heavy cruisers, eight destroyers, and an oiler—was to undertake a raid on the Marshall Islands to divert Japanese attention.
At 21:00 on 22 December, after receiving information indicating the presence of two IJN carriers and two fast battleships near Wake Island Vice Admiral William S. Pye—the Acting Commander in Chief of the U.S. Pacific Fleet—ordered TF 14 to return to Pearl Harbor for fear of losses.
Second Assault[]
The second Japanese invasion force came on 23 December, composed mostly of the same ships from the first attempt with some new additions, plus 1,500 Japanese marines. The landings began at 02:35 where, after a preliminary bombardment, the ex-destroyers Patrol Boat No. 32 and Patrol Boat No. 33 were beached and burned in their attempts to land the invasion force. After a full night and morning of fighting, the Wake garrison surrendered to the Japanese by mid-afternoon.
The U.S. Marines lost 47 killed and 2 MIA during the entire 15-day siege, while three U.S. Navy personnel and at least 10 U.S. civilians were killed, 10 Chamorros civilians killed, and 12 civilians wounded. Japanese losses were recorded at between 700 to 900 killed, with at least 300 more wounded, in addition to the two destroyers lost in the first invasion attempt and at least 28 land-based and carrier aircraft either shot down or damaged. The Japanese captured all men remaining on the island, the majority of whom were civilian contractors employed withMorrison-Knudsen Company.
Captain Henry T. Elrod, one of the pilots from VMF-211, was awarded the Medal of Honor posthumously for his action on the island during the second landing attempt, having shot down two Japanese A6M2 Zeros, and sunk the Japanese destroyer Kisaragi. A special military decoration, the Wake Island Device, was created to honor those who had fought in the defense of the island.
Malayan Campaign[]
The Malayan Campaign was a campaign fought by Allied and Japanese forces in Malaya, from 8 December 1941 – 31 January 1942 during the Second World War. The campaign was dominated by land battles between British Commonwealth army units, and the Imperial Japanese Army. For the British, Indian, Australian and Malayan forces defending the colony, the campaign was a total disaster.
The battle is notable for the Japanese use of bicycle infantry, which allowed troops to carry more equipment and swiftly move through thick jungle terrain. Royal Engineers, equipped with demolition charges, destroyed over a hundred bridges during the retreat, which did little to delay the Japanese. By the time the Japanese had captured Singapore, they had suffered 9,600 casualties.
Battle of Singapore[]
The Battle of Singapore was fought in the South-East Asian theatre of the Second World War when the Empire of Japan invaded the Alliedstronghold of Singapore. Singapore was the major British military base in Southeast Asia and nicknamed the "Gibraltar of the East". The fighting in Singapore lasted from 8–15 February 1942.
It resulted in the fall of Singapore to the Japanese, and the largest surrender of British-led military personnel in history. About 80,000 British,Australian and Indian troops became prisoners of war, joining 50,000 taken by the Japanese in the Malayan Campaign. British Prime MinisterWinston Churchill called the ignominious fall of Singapore to the Japanese the "worst disaster" and "largest capitulation" in British history. In just seven days, Singapore, the "Impregnable Fortress", had fallen.